

I remember when Crumpled Dog starting getting involved with Umbraco that, at various events and meetups, one of the most valuable learnings for me was when somebody else demonstrated their project structure and starter kit. I would take away bits and pieces I saw and began creating the "Crumpled Dog Core" which is both an approach to project structure and a starter kit.
Looking back, I think I was so interested in what others were doing because I wasn't happy with how we were approaching project structure. Now our "Core" is in it's fifth generation and I'm happy I think it's time to pay it back.
For this article I'm going to focus on the project approach and structure aspect and how over the last 18 months we've integrated various NodeJs and Ruby tools with our Visual Studio solution. As with many things Umbraco there is no right or wrong way to structure Umbraco projects; I'm going to outline how we do it and what and why it works for us.
Our team, like many, have a variety of different skills and people are using a variety of different tools, so our project structure is primarily designed for developers using Visual Studio on Windows. However, to include the whole team it also supports Windows users with WebMatrix and supports usable HTML & SASS contribution from our UX designers who are using various authoring tools on OSX!
the Prerequisites
When a new team member joins us (or has to perform a computer reinstall) these are the frameworks/tools/runtimes etc… we need to install for our projects to build and run. I'm going to focus on installing these on a Windows machine.
I realised after talking to various developers at CodeGarden 2015 who had tried to use some of these tools that actually getting them installed and correctly configured can be the biggest hurdle. So for each of these installers below I'll add a version test you can execute to ensure they were correctly configured, if you don't see the expected result try to logout/login or restart your machine before beginning further troubleshooting.
Git
System Git is a requirement of Bower which we will install later on.
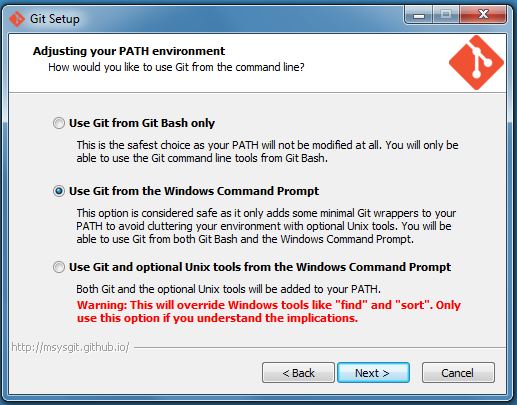
Download the installed and run, when presented with the "PATH" environment choose "Use Git from the Windows Command Prompt" unless you know what you are doing.
To test Git was installed and was configured properly, open command prompt and execute:
git --versionIf successful you should see:

NodeJS
We use quite a few NodeJs modules in our build process.
Grab the download and run the installer. Once it's completed check it worked using the command line:
node –vIf successful you should see:

NPM
NPM is installed along with NodeJS so generally you don’t need to do anything. However sometimes we need to update NPM to its latest version, so here’s how you can do that if you want to.
To check your version of NPM executed:
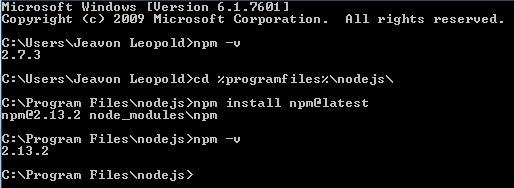
npm -vUsing command prompt (running as administrator) we need to first change to the folder where NodeJS keeps it’s core packages (assuming 64 bit installed).
cd %programfiles%\nodejs\Now with a little NPM inception it can update itself:
npm install npm@latestYou can see below the successful update from NPM v2.7.3 to v2.13.2
Grunt
We use Grunt as our task runner, you can of course use Gulp if you know how to. You need to install the Grunt CLI as a global (the hyphen “g”) NodeJs module using NPM in a command prompt:
npm install grunt-cli -g
If you want to check the version of Grunt CLI you have:
grunt --version
Bower
Bower is a package manager for front end frameworks such as ResponsiveBP or jQuery. It downloads and tracks releases for you, meaning you don’t need to commit these third party libraries to source control. If you are familiar with NuGet, think of Bower as NuGet for Css/Js stuff.
To install Bower we use NPM again to install as another global NodeJs module.
npm install bower -gTo check the version and to make sure it’s available from the command prompt:
bower -vRuby
http://rubyinstaller.org/downloads/
We need Ruby to compile SASS, there is a mountain of other amazing things you can use it for. To find other Gems explore https://rubygems.org/
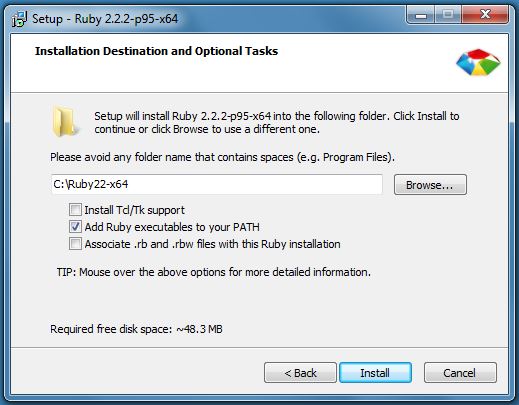
Download the x64 installer, when presented with the “Optional Tasks” be sure to check the “Add Ruby executables to your PATH”
To check if Ruby was successfully installed and configured (you will need to login/logout before this will work):
ruby -v
Sass
Our front end developers use Sass for CSS pre-compilation because it’s Sassy and they like it. Sass is Ruby Gem so it’s easy to install from the command prompt:
gem install sass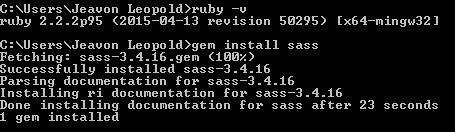
To check Sass is available, its version and the release’s funky code name:
sass -v
Visual Studio
https://www.visualstudio.com/en-us/products/visual-studio-community-vs.aspx
To get the most out of our project setup you will need Visual Studio, if you don’t have it already you can download the free & fully featured Community Edition.
The Solution Structure
The Solution Structure
In Visual Studio we start with two projects in our solution, a “.Site” project and a “.Logic” project. For more complex projects we may add further projects but this is our starting point. The “.Logic” project is a Class Library project and the “.Site” project is a Web Application.

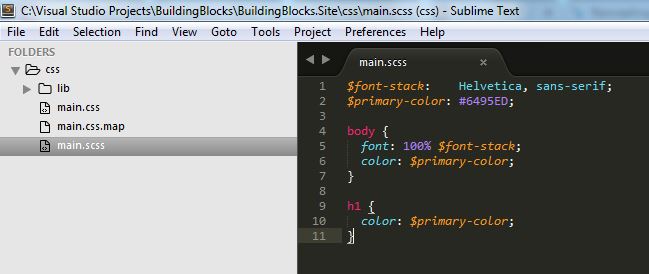
Sass Source Files
Generally front end developers are using Sublime Text for authoring Sass so we have a master Sass file called main.scss which will compile to main.css. There may be many further scss files but these will all be eventually included by main.scss.
main.scss should be located within the /css/ folder.
".Site" project
This project contains the deployable application and also Umbraco. We don’t ever add any C# code to this project, it should be limited to Umbraco itself and any packages that are needed.
We have a NuGet first policy, so Umbraco is installed via NuGet and for any packages that have a NuGet version we will use that. If a package doesn’t have a NuGet version we will use the Umbraco version, I will explain how to do that later. The advantage to using NuGet is two fold, firstly we don’t have to commit the dll’s of the package and secondly it makes it incredibly easy to upgrade both Umbraco and other packages.
Configuration files
There are three files in the root of this project that are used to configure our additional tools.
package.json
This file specifies the npm packages that are required, more info on package.json can be found on the following linkhttps://docs.npmjs.com/files/package.json
{
  "name": "BuildingBlocks",
  "version": "0.0.1",
  "devDependencies": {
    "grunt": "^0.4.5",
    "grunt-contrib-sass": "^0.9.2",
    "grunt-contrib-watch": "^0.6.1",
    "grunt-svgmin": "^1.0.0",
    "grunt-bower-task": "^0.4.0",
    "grunt-contrib-copy": "^0.7.0",
    "grunt-contrib-clean": "^0.6.0"
  }
}
As you can see all of these starter packages are grunt and additional grunt tasks
bower.js
This file specifies which Bower packages we require for our project.
{
  "name": "BuildingBlocks",
  "version": "0.0.0",
  "authors": [
    "Jeavon Leopold <jeavon@crumpled-dog.com>"
  ],
  "license": "MIT",
  "ignore": [
    "**/.*",
    "node_modules",
    "bower_components",
    "test",
    "tests"
  ],
  "dependencies": {
    "responsive": "~4.x"
  }
}
In our starter we have only Responsive specified. As Responsive has dependency on jQuery we know it will also be downloaded and can be used.
More info on bower.json can be found here http://bower.io/docs/creating-packages/
Gruntfile.js
Grunt does the majority of the “grunt work” and our default task will execute everything non Visual Studio. The basic tasks we have are:
-
sass - compiles our Sass from main.scss
-
watch - watches for any changes in scss files and compiles
-
svgmin - a very useful task to minify any SVG’s in the images folder
-
bower - execute Bower to get any packages you need
-
copy - used to copy Bower libs to the /css/lib/ and /scripts/lib/ folders so they can be easily viewed in Umbraco or combined and minified by the Optimus package https://our.umbraco.org/projects/developer-tools/optimus.
The fantastic thing about grunt is it can do pretty much anything if you find the right module.
module.exports = function(grunt) {
    grunt.initConfig({
        pkg: grunt.file.readJSON('package.json'),
        sass: {
            compile: {
                files: {
                    'css/main.css': 'css/main.scss'
                }
            }
        },
        watch: {
            css: {
                files: 'css/**/*.scss',
                tasks: ['sass']
            }
        },
        svgmin: {
            dist: {
                files: [{
                    expand: true,
                    cwd: 'images',
                    src: ['**/*.svg'],
                    dest: 'images'
                }]
            }
        },
        bower: {
            install: {
                production: true
            }
        },
        copy: {
            css: {
                expand: true,
                cwd: './lib/',
                src: '**/*.css',
                dest: './css/lib/'
            },
            js: {
                expand: true,
                cwd: './lib/',
                src: '**/*.js',
                dest: './scripts/lib/'
            }
        }
    });
    grunt.loadNpmTasks('grunt-bower-task');
    grunt.loadNpmTasks('grunt-contrib-sass');
    grunt.loadNpmTasks('grunt-contrib-watch');
    grunt.loadNpmTasks('grunt-contrib-clean');
    grunt.loadNpmTasks('grunt-contrib-copy');
    grunt.loadNpmTasks('grunt-svgmin');
    grunt.registerTask('default', ['bower:install', 'copy', 'sass']);
    grunt.registerTask('svgcompress', ['svgmin']);
}
".Logic" project
This project contains all of our custom C#, typically these are models and controllers but can be anything. The “.Site” project has a reference dependency on this project so its dll output will be automatically copied to the bin folder on build.
This project references the UmbracoCms.Core NuGet package.
Building and running the solution
1) We need to install the node modules specified in package.json. We need to do this only once or when a new module is added to package.json. To do this in command prompt we need to change to the “.Site” project and execute:
npm install
Once complete you will see a node_modules folder, this folder should be excluded from being committed to source control.
2) Run grunt, either from the command line or by using the excellent “Task Runner Explorer” extension for Visual Studio and double clicking the default task https://visualstudiogallery.msdn.microsoft.com/8e1b4368-4afb-467a-bc13-9650572db708
grunt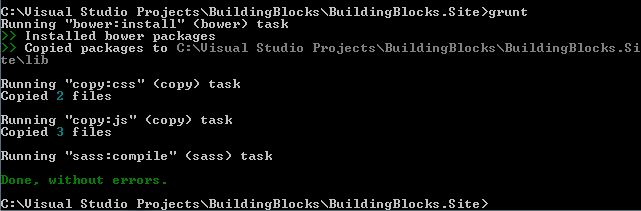
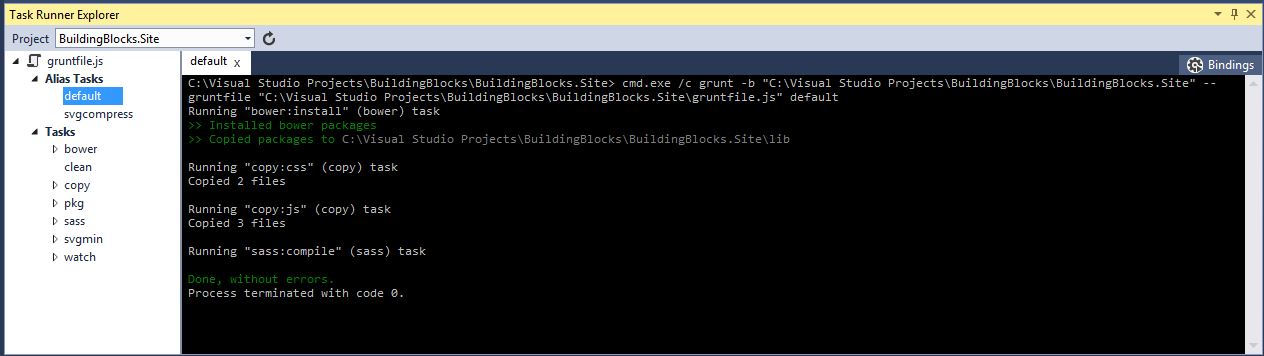
All the magic just happened in five characters in command prompt or a double click! Css/Js packages were downloaded by Bower and copied to where we want them and our Sass was compiled and created a main.css ready to use.
Now we need to add our assets to our normal Razor view and run our Visual Studio Umbraco project.
@inherits Umbraco.Web.Mvc.UmbracoTemplatePage
@{
   Layout = null;
}
<!doctype html>
<html>
<head>
   <meta charset="utf-8" />
   <meta http-equiv="X-UA-Compatible" content="IE=edge">
   <meta name="viewport" content="width=device-width, initial-scale=1" />
   <meta name="description" content="Your site description." />
   <title>Your page title</title>
   <link href="/css/lib/responsive/responsive.min.css" rel="stylesheet"/>
   <link href="/css/main.css" rel="stylesheet" />
</head>
<body>
   <div class="row">
       <div class="col-xxs-12">
           <h1>Building Blocks</h1>
       </div>
   </div>
   <script src="/scripts/lib/jquery/jquery.js"></script>
   <script src="/scripts/lib/responsive/responsive.min.js"></script>
</body>
</html>
What about those WebMatrix and OSX users?
We do have junior developers or other staff who might be using WebMatrix to make some simple changes to Razor files for example.
If these machines do not have Visual Studio installed we need to install the “Visual Studio 2013 Build Tools”https://www.microsoft.com/en-us/download/details.aspx?id=40760. Once installed we have to copy the build targets files, these are located within our project \BuildTools\MSBuild\v12.0\ the contents must be copied toC:\Program Files (x86)\MSBuild\Microsoft\VisualStudio\v12.0\
Now we have a magical build.bat located in \BuildTools\MSBuild\, simply run this and it will perform everything I have described and even build the Visual Studio solution, now the “.Site” folder can be opened with WebMatrix.
To keep our OSX using UX designers integrated into our workflow, they will also install all of the prerequisites and then can simply execute npm install and then grunt in the “.Site” folder. They will generally create a “HtmlTemplates” folder inside the “.Site” folder into which they can craft their html, but importantly the Bower packages and Sass is all the same files being used in the Razor Views.
AppVeyor CI
Included in the project is a appveyor.yml this contains all configuration required for AppVeyor to start building your project and ensuring you don’t have any broken builds.
Essentially AppVeyor will run the same build.bat described above.
More about appveyor.yml and AppVeyor can be found here http://www.appveyor.com/docs/appveyor-yml
Tips & tricks
Non NuGet (Umbraco) Packages
Sometimes we do want to use a package that doesn’t have NuGet version (although this is becoming rarer). As we don’t want to commit our bin folder into source control we will have to perform the following:
-
Install the Umbraco package in the backoffice
-
Copy all of the package’s dll files from the bin folder to a folder in the project root, we call this NonNugetAssemblies
-
Add references to all of the assemblies in the “.Site” project
-
Commit the NonNugetAssemblies to source control
This means that those assemblies will now be copied to the bin folder on every build
Help, I can’t delete node_modules
A common problem due the ridiculous length of some of the paths of NodeJs modules.
Fear not, in \BuildingBlocks\BuildTools\ you will find another magic file, DeleteNodeModules.cmd run this and the folder will be gone.
Watch Sass
In \BuildingBlocks\BuildTools\ you will find WatchSass.cmd, run this in the background and any saved changed .scss file in \css\ will trigger a Sass compile
NuGet.config
Often we like to use bleeding edge versions of packages from MyGet, to ensure that all developers (and AppVeyor) can easily restore packages from MyGet, create a NuGet.config file next to your .sln file with all of the package repositories specified.
<?xml version="1.0" encoding="utf-8"?>
<configuration>
 <packageSources>
   <add key="nuget.org" value="https://www.nuget.org/api/v2/" />
   <add key="MyGet.NestedContent" value="https://www.myget.org/gallery/umbraco-nested-content" />
   <add key="MyGet.YouTube" value="https://www.myget.org/F/youtube-umbraco/" />
   <add key="MyGet.Ditto" value="https://www.myget.org/F/umbraco-ditto/" />
   <add key="MyGet.nuPickers" value="https://www.myget.org/F/nupickers/" />
 </packageSources>
</configuration>
Thanks
I hope you’ve found this look into our project structure and the tools we use useful. It certainly has taken us a lot of experimentation to be able to utilise NodeJs and Ruby tools alongside and complementing a Visual Studio project.
Download
You can download this complete starter solution from https://github.com/CrumpledDog/SkriftBuildingBlocks
Umbraco username/password: admin/password