
Over the last couple of years Umbraco has been supporting Load-balancing better and better. But what about the Logging with Load-balancing?
So you have set up your fancy load-balanced applications and figured out all the necessary configurations. Umbraco recommends you don't scale the backoffice instance of your website, so most of the people reading this will have at least two separate apps running: a backoffice and a front-end/API (that can be scaled). But would it not be convenient to be able to view all logs of all instances in one single place? In this article we will go into how to solve this problem using a shared mounted Azure File share on your Web App.
Since editors, administrators and developers will mostly spend their time in the backoffice instance, I thought it would be very convenient if the logs of all instances were visible within the Logviewer of that instance. Of course there are a lot of alternative ways to centralize logging, using Microsoft's Application Insights or SEQ for example, but I like the way the Logviewer in Umbraco is nearby, since you are already spending most of your time in the backoffice. Since I deemed creating my own implementation of ILogViewer "too much of a hassle", I eventually ended up settling with mounting an Azure File share.
Before you read:
The principles of this article can be applied to numerous hosting options (like AWS or on-premise servers), but since I am surrounded by Microsoft tech in my day-to-day work, this article focuses on a solution using Azure File share and Azure Web Apps.
Under the hood 👀
Let us start with investigating how the logviewer within Umbraco works.
Umbraco has been using Serilog since version 8 to handle logging. By default it uses the SerilogJsonLogViewer class to write JSON files to the file system. When accessing the Logviewer in the backoffice, the LogViewerController.GetLogs() is called. This controller injects an implementation of ILogViewer to read from the logs and return them to the backoffice. By default this implementation will be SerilogJsonLogViewer, which determines the location of the logging using ILoggingConfiguration.LogDirectory.
Serilog Sinks:
With Serilog you can easily configure one or more "sinks" to write your logs to additional destinations. Take a look at Umbraco's documentation on adding Sinks and the list of available sinks.
Where to start? 🤔
After understanding the underlying workings of logging within Umbraco, an obvious solution would be to just create an implementation of ILogViewer yourself, using the SerilogLogViewerSourceBase. You can view Umbraco's documentation here. A big advantage being that you have full control over where the Logviewer reads from and writes to, as well as controlling any transformation of the logging. One of the downsides of this solution is that an upgrade of Umbraco, Serilog or .NET may require adjustments being made in your implementation. Since I did not want to stray too far from the default implementation of Umbraco, a solution where the amount of custom code is minimized was prefferable.
The ideal solution would be to simply change the output-path of the Logviewer using the available AppSettings.json configuration Umbraco.CMS.Logging.Directory. This configuration is by default set to the application's umbraco-folder: ~/umbraco/Logging. But what if you could point this to a "virtual" directory that is shared between the instances? This is when I stumbled accross this part of Microsoft's documentation, which explains how to mount an Azure File share to your Azure Web Apps. This can be used for a plethora of use cases, including pointing the logging-directory of all my Web Apps to this mounted Azure File share.
Create an Azure File share ➕
An Azure File Share can be created by using the Azure portal and following the steps below.
Storage Account:
It is quite common to already have an Azure Storage Account when hosting your Umbraco website on Azure. Mostly for the purpose of storing media of the CMS, it is common to have a Blob Storage underneath the Storage Account. Because of this, I will not go into creating a Storage Account in this article. Fortunately, Microsoft has some clear documentation on this topic.
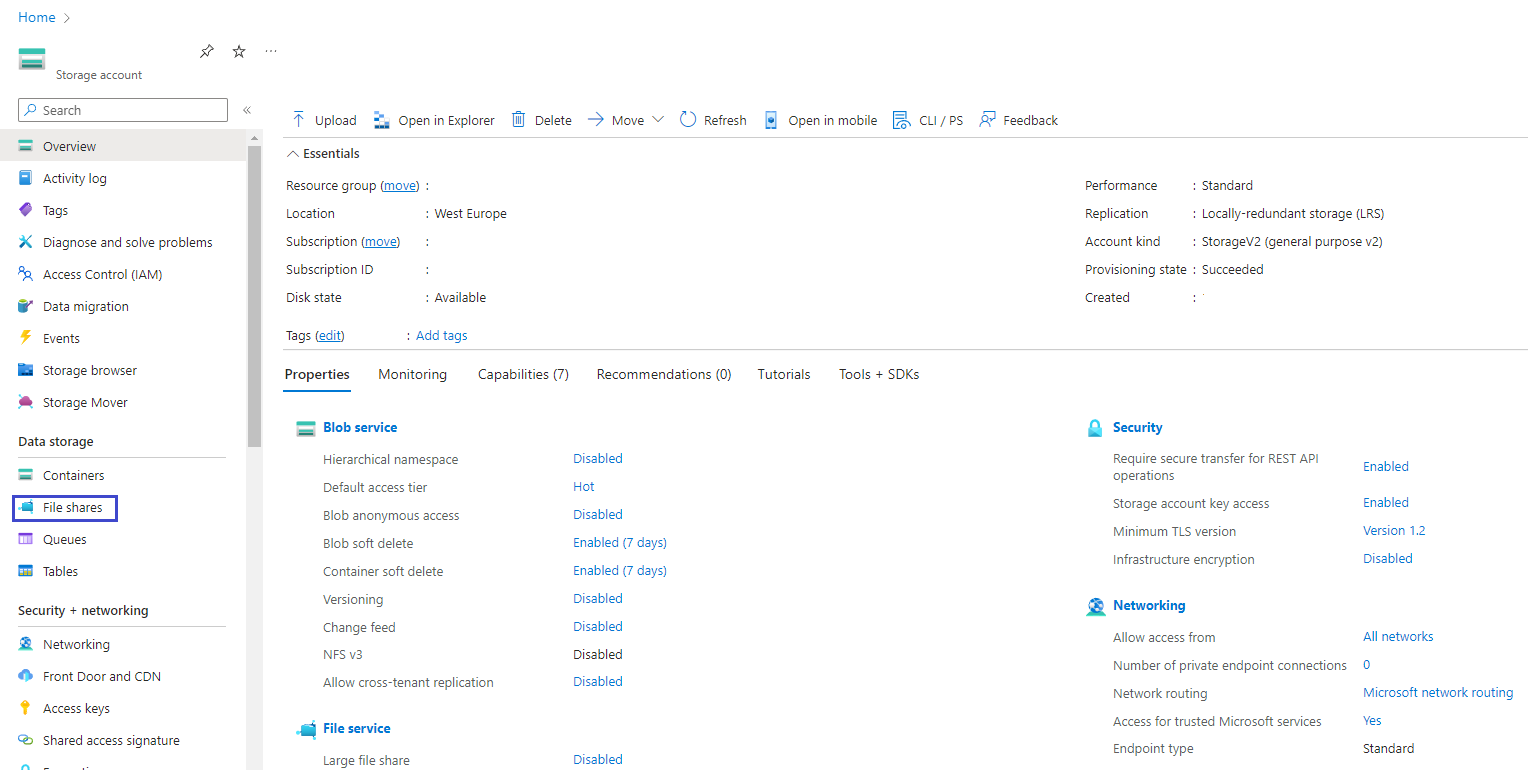
Step 1: Navigate to "File shares" under the Storage Account
To create a file share, you have to navigate to the Storage Account under which the File share will live, and select "File shares" under "Data storage" as shown in the image below.
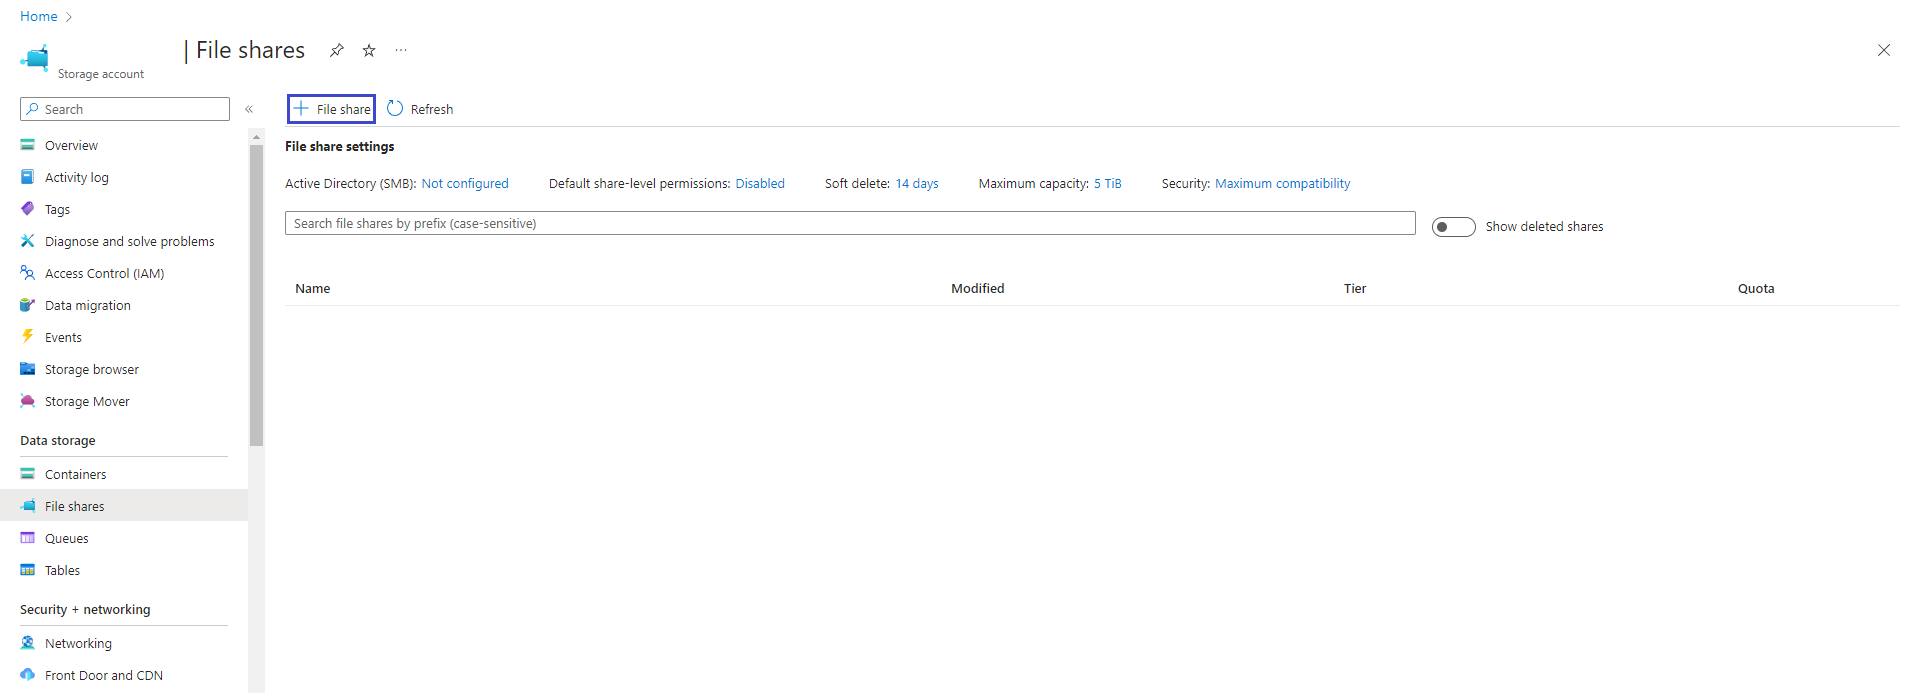
Step 2: Creating the File share
After navigating to the "File shares" page within the Azure portal, add a File share by clicking on "+ File share" as shown in the image below.
Step 3: Configuring the File share
After clicking the button, an overlay will appear where you can configure the File share. Microsoft recommends the configuration as shown below.
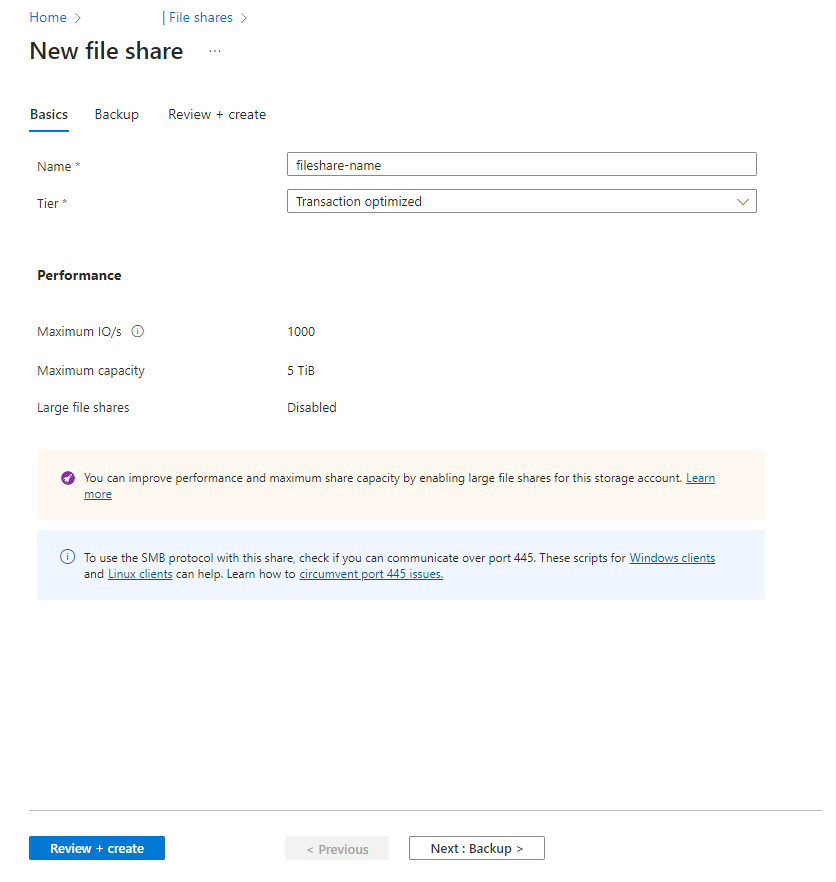
To create the File share, click on "Review + create", review the selected configuration, and click on "Create".
Of course you can decide to tweak and adjust the configuration based on the sizing and performance needs of you or your client.
Retention period:
For the sizing take into account the retention period of the logging, which is 31 days by default for Umbraco. This is because the maximum lifetime of a logfile is 24 hours and the file count limit is set to 31 by default.
The configuration of the lifetime can be found in theUmbraco.CMS.Logging.MaxLogAgeappsetting. The file count limit is configured in theSerilog.WriteToappsetting section, which contains the sinks Serilog writes to. To overwrite this you have to adjust theRetainedFileCountLimitproperty of the Sink that has "UmbracoFile" asName. Both configurations can be overwritten using yourAppSettings.json.
Mounting the Azure File share ⚙️
Once you have created the File share, we can starting looking into mounting it on your Web Apps. To mount the File share, navigate to "Settings" > "Configuration" > "Path mappings" of your desired Web App in the Azure portal. Your screen should look like the image below.

Under "Mount storage" you can add a storage mount on the Web App by clicking on "New Azure Storage Mount". This opens an overlay with the required settings for the storage mount, as shown in the image below.
These settings consist of the following fields:
- Name
- The name of your storage mount. For this use case it does not really matter what you enter here. I went with "Umbraco-Logging".
- Configuration options
- Here you have the option between "Basic" and "Advanced". "Basic" contains no specific security measures and "Advanced" gives the possibility to access the File share through an Access key. For now we are going with "Basic" to keep things simple, but for a production environment I recommend exploring the "Advanced" option.
- Storage accounts
- Select the Storage account - under which your recently created File share falls - here.
- Storage container
- Select your recently created File share here.
- Mount path
- Fill in a path that starts with
/mounts/, for example:/mounts/umbraco-logging. This path will be used in the configuration later.
- Fill in a path that starts with
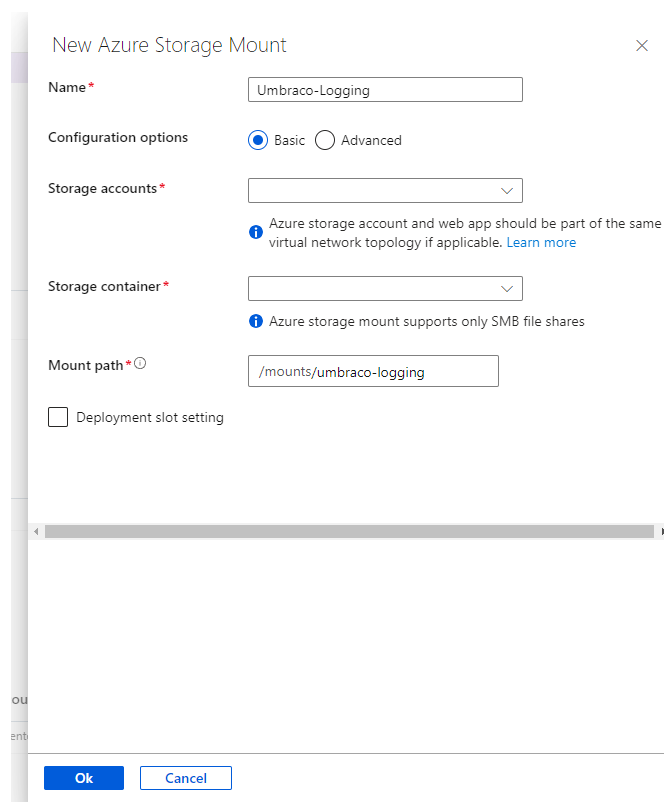
After you have configured the settings, press "OK" and do this for the other Web App(s). It is important to configure the same File share for each Web App.
Once the File share is mounted correctly to your Web App, you should be able to view the folder it is mounted to in the SCM (Kudu). The SCM can be viewed by going to "https://{appservice-name}.scm.azurewebsites.net", then clicking on "Debug console" > "CMD" or "PowerShell" in the main navigation. Then click on the drive icon (see below) and navigate to the "mounts" folder.

The "mounts" directory should contain a folder matching the name you used earlier for the "Mount path" when mounting the file share to the Web App (in the examples: "umbraco-logging").
Do not forget:
Save the configuration of your Web App after you have added the storage mount!
Configuration 🛠️
After ensuring the mounting has been done correctly, the Umbraco logviewer should be configured to watch the mount path instead of the default path to ensure each Web App reads from and writes to the same location.
Fortunately, Umbraco provides an appsetting that can be used for this: Umbraco.CMS.Logging.Directory. Based on the steps before, this appsettings needs to be set to C:/mounts/umbraco-logging.
When this configuration is done to all relevant Web Apps, the logging from all Web Apps should be visible through the Logviewer on all instances.
Virtual folder:
Additionally, it is possible to create a virtual folder to the mount path, in case there is a need to adjust the location the Logviewer reads/writes the logging from/to.
Identifying different instances 👓
One of the downsides of using the default logviewer, is that it shows the name of the machine (server) that the application is running on, as shown in the screenshot below. Which in most cases is not very recognizable for someone using the logviewer.

A more familiar name that could be used here is the actual name of the Web App in Azure. Fortunately, Umbraco uses Serilog. Serilog adds the posibility to enrich your log messages by implementing ILogEventEnricher.
Since we are relying on the default logging implementation of Umbraco, the simplest solution is to adjust the value that is used in the MachineName column of the Logviewer. To adjust this, implement the ILogEventEnricher in the following way:
public class MachineNameEnricher : ILogEventEnricher
{
    private readonly string _defaultAppName;

    public MachineNameEnricher()
    {
        _defaultAppName = "local";
    }

    public MachineNameEnricher(string defaultAppName)
    {
        _defaultAppName = defaultAppName;
    }

    public void Enrich(LogEvent logEvent, ILogEventPropertyFactory propertyFactory)
    {
        var Web AppName = Environment.GetEnvironmentVariable("WEBSITE_SITE_NAME") ?? defaultAppName;
        var machineNameProperty = propertyFactory.CreateProperty("MachineName", Web AppName);

        logEvent.AddOrUpdateProperty(machineNameProperty);
    }
}
What this does: it takes the WEBSITE_SITE_NAME environment variable which is a variable that is set on the Web App by Azure by default and contains the name you have given to the Web App. If this environment variable does not exist, because the code is running on your local machine for example, the code above defaults to "local" as a value.
The properties of a LogEvent are a Dictionary<string, LogEventPropertyValue> that contains all the properties relevant to this log. To update the property, we need to create the key-value pair containing the new value we want the property to have.
These properties can be manipulated using the AddOrUpdateProperty(), AddPropertyIfAbsent() or RemovePropertyIfPresent() methods. Since we know that the MachineName property already exists, because Umbraco adds this in the default implementation, we need to use the AddOrUpdateProperty() method. This method executes the code below and thus replaces the existing value for the MachineName property with our own.
_properties[property.Name] = property.Value;Do mind:
The logic in your implementation ofILogEventEnricheris applied to the actual log-message, not exclusively to the logviewer in Umbraco. It will adjust the actual properties of the logging that is persisted, whether that is to the disk or an external location.
Wrapping up 🙌
When all configuration mentioned above is done, we end up with logging similar to what is shown in the screenshot below. Both the logging of the "admin"-instance, as well as the "web"-instance are visible in a single place!
 Be aware, this solution might not be for everybody and there are plenty alternatives. Furthermore, this article is focused on solving the problem of logging in load-balanced enviroments which cannot be viewed from a single instance.
Sources and interesting articles 🔍
Sources
-
Umbraco
- Logging in Umbraco: https://docs.umbraco.com/umbraco-cms/fundamentals/code/debugging/logging
- Logviewer configuration: https://docs.umbraco.com/umbraco-cms/reference/configuration/loggingsettings
-
Microsoft
- Creating an Azure file share: https://learn.microsoft.com/en-us/azure/storage/files/storage-how-to-use-files-portal?tabs=azure-portal
- Mounting a file share to a Web App: https://learn.microsoft.com/en-us/azure/app-service/configure-connect-to-azure-storage?tabs=basic%2Cportal&pivots=code-windows
- Available environment variables: https://learn.microsoft.com/en-us/azure/app-service/reference-app-settings?tabs=kudu%2Cdotnet#app-environment
-
Serilog
- Enriching the Logevent: https://github.com/serilog/serilog-aspnetcore#injecting-services-into-enrichers-and-sinks
Read more
- Creating an Azure storage account: https://learn.microsoft.com/en-us/azure/storage/common/storage-account-create?tabs=azure-portal
- Creating a custom implementation of the Logviewer: https://docs.umbraco.com/umbraco-cms/fundamentals/backoffice/logviewer
- Serilog configuration: https://docs.umbraco.com/umbraco-cms/reference/configuration/serilog
- Available Serilog sinks: https://github.com/serilog/serilog/wiki/Provided-Sinks