


In today’s digital world, websites need to be both responsive and reliable, regardless of where users access them from. One approach to achieving this is load balancing, which distributes traffic efficiently across multiple servers in different regions, improving both performance and reliability. In this article, we'll walk through the process of setting up load balancing for an Umbraco Cloud based website across multiple regions.
We will configure two environments: a Development environment and a Production environment. Only the Production environment will be load-balanced. Before diving into the setup, let’s start by covering some fundamental concepts of scaling compute resources and answering some common questions.
What are the different ways of scaling compute resources?
There are two key types of scaling:
1. Scale Up / Down (Vertical Scaling):
Vertical scaling involves adding additional resources, like CPU or RAM, to your existing server/instance. While this approach can help improve performance, it does have its own limitations. Eventually, you will reach a point where no additional resources can be added to the server.
2. Scale Out / In (Horizontal Scaling):
In contrast, horizontal scaling involves adding additional servers to handle the load. Traffic is split between these additional servers, and could theoretically grow to meet any demand.
How do you allocate the amount of compute resources for your website built on Umbraco?
Traditionally, you would measure the amount of compute resources required for the web server based on the maximum number of concurrent visitors expected to visit. This can be done using tools such as LoadNinja. After you build your website and before you launch it, you would perform a load test that will match the real-world expected usage / traffic of your website. Based on the performance of your web & database server, you can decide if you need to scale up or scale down your servers.
This is an example of vertical scaling, so if you use a hosting service such as Umbraco Cloud, you could choose from the various dedicated web server options: Umbraco Cloud - Dedicated Resources to scale vertically.
But keep in mind that vertical scaling comes with some limitations. What if you need more resources than the highest dedicated resource option, and what if you only need it for a few hours in a year? This is where you may want to explore the option of Load balancing.
Load balancing is a supported feature of the Umbraco CMS, but it can be more complex to configure than vertical scaling. The benefits of load balancing make up for this, as you would only be paying for the compute resources used, thus saving costs by avoiding paying for unused resources.
What is Load Balancing?
Load balancing is a method used to distribute incoming network traffic across multiple servers. This ensures no single server bears too much load, which helps in maintaining the website's performance and availability. This is relevant for Horizontal Scaling.
What is Dynamic Horizontal Scaling?
Dynamic horizontal scaling is the process of scaling out automatically based on the amount of compute resources required and scaling in as this requirement reduces.
Why do you need Dynamic Horizontal Scaling?
Dynamic horizontal scaling becomes important when your site needs to efficiently handle fluctuating traffic or workloads. Dynamic scaling can automatically add or remove instances based on your site’s performance and ensure that it always stays responsive without over-provisioning resources.
For example, suppose your website experiences a sudden surge in traffic. In that case, dynamic scaling allows new instances to spin up automatically, ensuring your site continues to run uninterrupted.
This means that not only does dynamic scaling add resources when your website is under a heavy load, but it can also ensure you are not overpaying for resources that may not always be needed.
What is Cross-Region Load Balancing?
Cross-region load balancing distributes traffic across multiple geographic regions. This is particularly useful for global applications, as it helps reduce latency by directing users to the closest server. Additionally, it adds another layer of redundancy, ensuring that even if one region goes down, your website remains operational.
It is important to note here, each region can scale horizontally independently of the other. So an increase in traffic in one region will not affect other instances.
How can a website built on Umbraco be Load Balanced?
When setting up a website on Umbraco, the architecture typically consists of two main components:
1. The Backoffice server (Admin panel):
- The role name for this server is SchedulingPublisher.
- This web server can only be scaled vertically and not horizontally.
- This is the control center for managing website content, user roles, and overall site behavior. The backoffice has certain limitations where it can only be scaled up, not out.
However, scaling limitations for the backoffice usually aren't a problem since most of the heavy lifting is handled by the frontend, which can be scaled out horizontally to manage large volumes of member traffic.
2. The Frontend servers (End user, such as the Member-facing website):
- The role name for this server is Subscriber
- This is what users interact with. It can either be a traditional website or a headless solution where APIs serve the content.
- These servers can be scaled both vertically and horizontally.
- This cannot be used to serve the Umbraco backoffice, and should be blocked from doing so to avoid data integrity and corruption issues.
What is Umbraco Cloud?
Umbraco Cloud is a hosting platform for the Umbraco CMS created and maintained by Umbraco HQ. Umbraco Cloud takes care of installation, infrastructure, and gives access to an easy-to-use deployment pipeline using Umbraco Deploy.If you’d like to learn more about Umbraco Cloud, or start your free trial, please check this link for more details.
Why did we choose Umbraco Cloud to host the SchedulingPublisher?
At the time of writing this article, Umbraco Cloud does not support load balancing, but it has it in its upcoming roadmap.
Since Umbraco Cloud only supports vertical scaling and not horizontal scaling, it is a perfect choice for hosting the SchedulingPublisher.
What is GCP CloudRun?
Google Cloud Platform’s CloudRun, the best way to know more is to hear it directly from Google:
Why did we choose GCP CloudRun to host the Subscribers?
Google Cloud Platform’s CloudRun is an easy to setup hosting solution for dynamic horizontal scaling across multiple regions. Just by setting a minimum and maximum number of instances, Google takes care of orchestrating the number of instances required per region based on the compute required for the incoming traffic.
- For example, if there is no traffic for a specific region and the minimum is set to zero, all subscribers for that region will be turned off, saving costs.
- Also, if the maximum is set to, for example, to 10, and all resources are utilized, it will ensure not to spin up an 11th subscriber, thus ensuring you can keep your costs in check.
The other reason we chose CloudRun is that it utilizes Docker, which makes it very easy to host anywhere and prevents vendor lock-in. This means that if you later want to host on other platforms, such as Azure / AWS or your basement, you can do so. This also means that we can make use of CloudRun’s build pipeline, which will let us build our site directly from a GitHub repository.
What is Our Load Balanced Configuration?
As we’ve mentioned, it is not currently possible to host a load balanced project directly on Umbraco Cloud. However, we wanted a set up that could still take advantage of Umbraco Cloud’s strengths, like streamlined setup, and hosting capabilities, while also giving us the ability to dynamically scale for traffic.
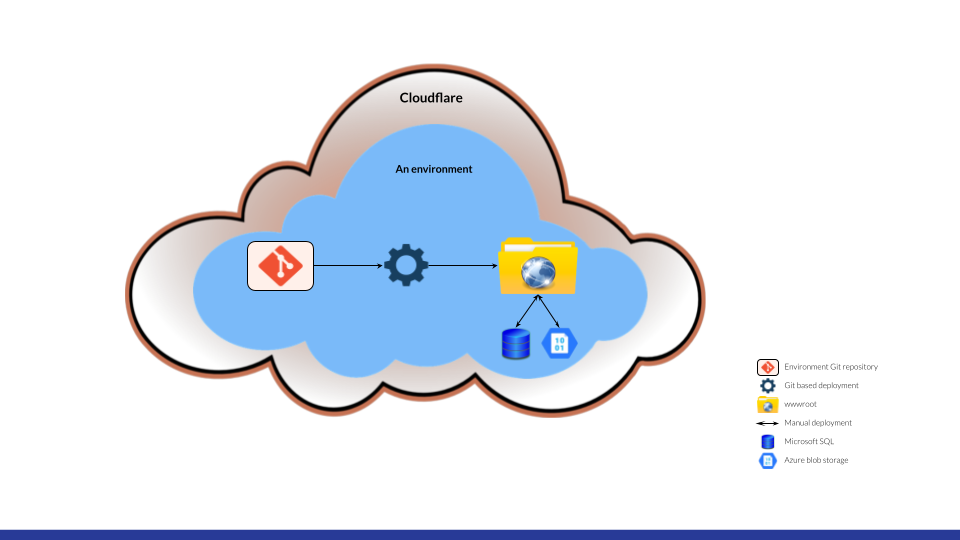
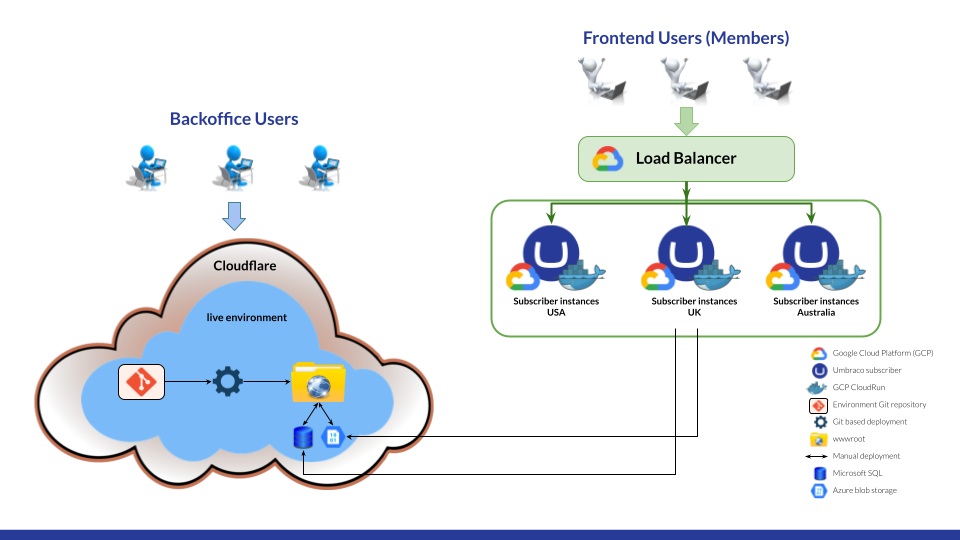
In our approach, we use Umbraco Cloud to host the backoffice instance where all content editing will take place. This way it is kept to a single instance and never scaled out. We pair this with Google Cloud Run where we host our frontend instances. All public traffic will be routed to these instances, which are capable of scaling automatically based on traffic and demand.
We are also making use of both GitHub and GitLab to host our external repositories. Google Cloud Run has the ability to build our frontend instances directly from a Docker container stored in a GitHub Repository. GitLab in our set up forms a bridge between our Umbraco Cloud and GitHub repositories. It allows us to create a bi-directional mirror from the git repository in our Umbraco Cloud environment, as well as a push mirror to our GitHub repository.
This repository setup means that any changes made inside the Umbraco Cloud can be mirrored to GitHub and automatically trigger a new build and deployment for our frontend instances in Cloud Run. This gives us a more automated deployment pipeline without having to manage each front-end build manually.
It’s important to mention here that the front-end instances will still be connected to the Umbraco Cloud project’s database. This will mean that any content changes made in the Umbraco Cloud backoffice will automatically be reflected on the frontend server.
Configuring your Umbraco Cloud and GCP Projects
In this setup we are going to cover the following steps:
- Umbraco Cloud project and source code setup
- Configuring Load Balancing with Umbraco
- Using Gitlab’s bi-directional mirroring
- Setup Google Cloud Run Container for one region I
- Setup Google Cloud Run Container for one region II
- Setup GCP for multiple regions
- Setup GCP Load Balancing
- Working with an Umbraco Cloud Development Environment
Follow the videos or written instructions for each step below to configure your Umbraco Cloud and CloudRun projects for cross-regional load balancing.
I: Umbraco Cloud project and source code setup
Create an Umbraco Cloud project
Create a cloud project on version 15+. If you already have an Umbraco Cloud account, visit https://umbraco.io and create a new project. You can follow the Umbraco Documentation for instructions: https://docs.umbraco.com/umbraco-cloud#umbraco-cloud-portal-project.
If you are new to Umbraco Cloud, you could start by creating a free trial project by filling the form at https://try.umbraco.com/. All you need for the beginning of this guide is a Live Environment.
Clone the Cloud project locally and arrange its source code
- Clone your Umbraco Cloud Project using the Umbraco Cloud Tool template package. This package helps you do the initial clone of your project, and also runs through a CLI wizard to help you set up your project locally.
When running this command, you will be prompted with a set of questions related to how your project should be cloned locally. You can choose “yes” to all options and add a hostname where you are asked to. - Push your local git changes to Umbraco Cloud.
II: Configuring Load Balancing with Umbraco
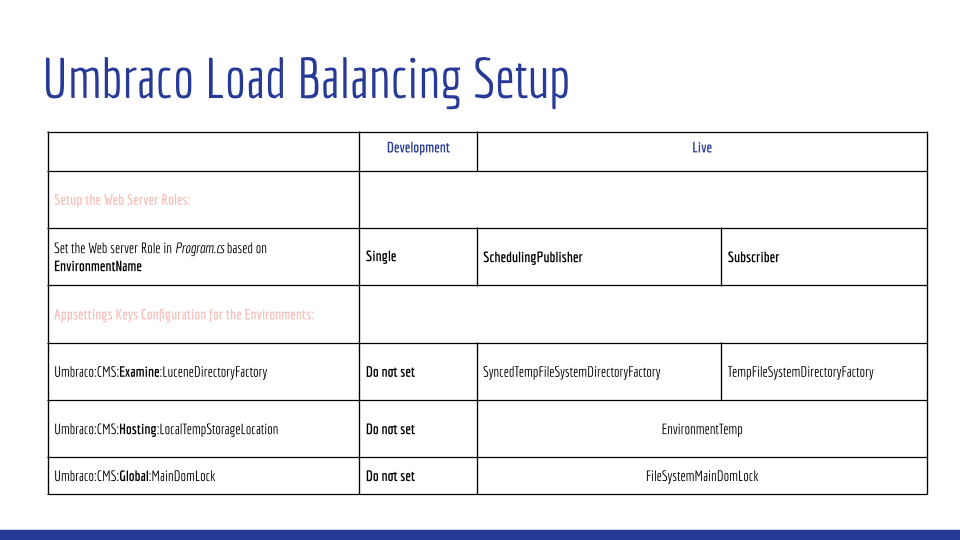
The main steps involve setting up the web server roles in the Program.cs file based on the environment name. In this case:
- For the development environment, we’ll use a role called "Single".
- For the live environment, we split the roles:
- The subscriber represents the frontend of the Umbraco project.
- The scheduling publisher represents the backoffice.
Next, we’ll configure a few appsettings keys for the environments. For development, we don’t need to set anything special. But for the frontend and backoffice, there are a few required settings we’ll need to define.
We won’t go too deep into the explanations for each step here, but you’re more than welcome to check out the Umbraco documentation or explore the Load Balancing and Azure training course to learn more.
Configure Load Balancing Subscriber part 1
- Add to appsettings.Subscriber.json in the Umbraco>CMS the following:
"Examine": {
                "LuceneDirectoryFactory" : "TempFileSystemDirectoryFactory"
} - Add to appsettings.Production.json in the Umbraco>CMS the following:
"Global": {
        "MainDomLock": "FileSystemMainDomLock"
      },
"Examine": {
        "LuceneDirectoryFactory": "SyncedTempFileSystemDirectoryFactory"
      },
"Hosting": {
        "LocalTempStorageLocation": "EnvironmentTemp"
      }
Setting the Distributed Session Cache
For the sake of this article, and to keep things simple, we’ll use the central SQL database to persist sessions across all Subscribers.
However, in real-world scenarios where customers require cross-regional load balancing, it’s recommended to configure a Redis distributed cache per region.
To learn more about setting up Redis in code, you can refer to the official Umbraco documentation, or even better, sign up for the official Umbraco Load Balancing & Azure training course.
Note: When running locally with SQLite, we’ll skip this configuration.
- Create a class called IUmbracoBuilderExtensions at the root of the web project. This is related to the SQL statement on one of the next steps, and allows session data to be stored in a SQL Server database rather than in-memory.
using Umbraco.Cms.Core;

namespace CrossCloudLoad.Web;

public static partial class IUmbracoBuilderExtensions
{
    public static IUmbracoBuilder AddSqlServerCache(this IUmbracoBuilder builder)
    {
        builder.Services.AddDistributedSqlServerCache(options =>
        {
            options.SchemaName = "dbo";
            options.TableName = "SessionCache";
            options.ConnectionString = builder.Config.GetConnectionString(Constants.System.UmbracoConnectionName);
        });

        return builder;
    }
}
- Create a class called MySurfaceController at the root of the project. This is the controller that reads/writes session data to the database table that we create on the next step.
using Microsoft.AspNetCore.Mvc;
using Umbraco.Cms.Core.Cache;
using Umbraco.Cms.Core.Logging;
using Umbraco.Cms.Core.Routing;
using Umbraco.Cms.Core.Services;
using Umbraco.Cms.Core.Web;
using Umbraco.Cms.Infrastructure.Persistence;
using Umbraco.Cms.Web.Website.Controllers;

namespace CrossCloudLoad.Web;

public sealed class MySurfaceController : SurfaceController
{
    IHttpContextAccessor _httpContextAccessor;
    private readonly string mySessionKey = "mySessionKey";
    public MySurfaceController(IUmbracoContextAccessor umbracoContextAccessor, IUmbracoDatabaseFactory databaseFactory, ServiceContext services, AppCaches appCaches, IProfilingLogger profilingLogger, IPublishedUrlProvider publishedUrlProvider, IHttpContextAccessor httpContextAccessor) : base(umbracoContextAccessor, databaseFactory, services, appCaches, profilingLogger, publishedUrlProvider)
    {
        _httpContextAccessor = httpContextAccessor;
    }

    [HttpGet]
    public IActionResult Index()
    {

        var mySessionValue = _httpContextAccessor.HttpContext.Session.GetString(mySessionKey);

        if (string.IsNullOrWhiteSpace(mySessionValue))
        {
            mySessionValue = Guid.NewGuid().ToString();
            _httpContextAccessor.HttpContext.Session.SetString(mySessionKey, mySessionValue);

        }
        return Content(mySessionValue);
    }
}
- Connect to cloud DB and add execute this table:
/****** Object:  Table [dbo].[sessionCache] ******/
SET ANSI_NULLS ON
GO

SET QUOTED_IDENTIFIER ON
GO

CREATE TABLE [dbo].[SessionCache](
	[Id] [nvarchar](449) NOT NULL,
	[Value] [varbinary](max) NOT NULL,
	[ExpiresAtTime] [datetimeoffset](7) NOT NULL,
	[SlidingExpirationInSeconds] [bigint] NULL,
	[AbsoluteExpiration] [datetimeoffset](7) NULL,
PRIMARY KEY CLUSTERED
(
	[Id] ASC
)WITH (STATISTICS_NORECOMPUTE = OFF, IGNORE_DUP_KEY = OFF, OPTIMIZE_FOR_SEQUENTIAL_KEY = OFF) ON [PRIMARY]
) ON [PRIMARY] TEXTIMAGE_ON [PRIMARY]
GO
Here we are creating a table to store session data across subscribers. In a production environment, it is recommended that you configure a redis cache instead.
Note: Every time a new environment is created, you need to manually execute the table above.
Configure Load Balancing Subscriber part 2
- Create a folder called ServerRoleAccessors at the root of the .Web project.
In this folder we are going to create ServerRoleAccessor classes are used to explicitly define the server role. This way it reduces the complexity of the server election process.
With this approach, our subscribers will not attempt to run the automatic server role election process or task scheduling and will always be spun up as subscribers.
More information about the different server roles can be found on the documentation. - Create the following ServerRoleAccessors classes in the newly created folder:
- SchedulingPublisherServerRoleAccessor.cs
using Umbraco.Cms.Core.Sync;

namespace ReplaceThisWithYourNameSpaceName.Web.ServerRoleAccessors;

public sealed class SchedulingPublisherServerRoleAccessor : IServerRoleAccessor
{
    public ServerRole CurrentServerRole => ServerRole.SchedulingPublisher;
}
- SingleServerRoleAccessor.cs
using Umbraco.Cms.Core.Sync;

namespace ReplaceThisWithYourNameSpaceName.Web.ServerRoleAccessors;

public sealed class SingleServerRoleAccessor : IServerRoleAccessor
{
    public ServerRole CurrentServerRole => ServerRole.Single;
}
- SubscriberServerRoleAccessor.cs
using Umbraco.Cms.Core.Sync;

namespace ReplaceThisWithYourNameSpaceName.Web.ServerRoleAccessors;

public sealed class SubscriberServerRoleAccessor : IServerRoleAccessor
{
    public ServerRole CurrentServerRole => ServerRole.Subscriber;
}
Note: Make sure to replace the namespace with the one from your project.
- Install the following packages using NuGet Package Manager in Visual Studio (make sure they are on the latest Version 15):
- Umbraco.StorageProviders.AzureBlob
- In Load Balancing, this package centralizes media file storage in Azure Blob Storage so all servers have consistent access.
- Umbraco.StorageProviders.AzureBlob.ImageSharp
- In Load Balancing, this package ensures on-the-fly image processing works with Blob storage, avoiding issues with local caching.
- In Load Balancing, this package ensures on-the-fly image processing works with Blob storage, avoiding issues with local caching.
- Umbraco.StorageProviders.AzureBlob
- Add the services in the Program.cs file by replacing its current file content with the following:
using ProjectName.Web;
using ProjectName.Web.ServerRoleAccessors;
using Umbraco.Cms.Infrastructure.DependencyInjection;

WebApplicationBuilder builder = WebApplication.CreateBuilder(args);

var umbracoBuilder = builder.CreateUmbracoBuilder()
    .AddBackOffice()
    .AddWebsite()
    .AddDeliveryApi()
    .AddComposers();

if (builder.Environment.EnvironmentName.Equals("Subscriber"))
{
    umbracoBuilder.SetServerRegistrar<SubscriberServerRoleAccessor>()
        .AddAzureBlobMediaFileSystem()
        .AddAzureBlobImageSharpCache()
        .AddSqlServerCache(); // make a redis cache per region instead
}
else if (builder.Environment.IsProduction())
{
    umbracoBuilder.SetServerRegistrar<SchedulingPublisherServerRoleAccessor>();

}
else if (builder.Environment.EnvironmentName.Equals("Local"))
{
	umbracoBuilder.SetServerRegistrar<SingleServerRoleAccessor>();
}
else
{
    umbracoBuilder.SetServerRegistrar<SingleServerRoleAccessor>()
        .AddSqlServerCache();
}

umbracoBuilder.Build();

WebApplication app = builder.Build();

await app.BootUmbracoAsync();

app.UseHttpsRedirection();

app.UseUmbraco()
    .WithMiddleware(u =>
    {
        u.UseBackOffice();
        u.UseWebsite();
    })
    .WithEndpoints(u =>
    {
        u.UseBackOfficeEndpoints();
        u.UseWebsiteEndpoints();
    });

await app.RunAsync();
Note: Make sure to replace the ProjectName with your own project name.
Setup NuCache InMemory
Note: This is not needed on projects on Version 15 and above.
Follow the documentation to add the additional NuCache Settings to a newly created class at the root of the web project called DisableNuCacheDatabaseComposer.
Setup Output Caching
Using Output Caching will help in cost saving in case the website gets a lot of concurrent visitors, since without this optimization we would need to scale up more servers horizontally when the traffic goes up.
- Install the Output Caching package: https://marketplace.umbraco.com/package/umbracooutputcache
- To test the output caching you can for example add <h1>@DateTime.UtcNow</h1> in your template and then refresh your frontend to see that caching works.
- Push your changes to Umbraco Cloud.
Configure Dockerfile
Next we need a Dockerfile so that we are able to run each Subscriber in GCP CloudRun.
Note that you already have a dockerfile called Subscriber_Dockerfile with all necessary setup. This docker file was generated by the umbracocloud package that we used to clone the project.
III: Using Gitlab’s bi-directional mirroring
Setup a Gitlab repository with bidirectional mirroring
Follow this Skrift Article to setup a Gitlab repository with bidirectional mirroring. The purpose of this repository is only to automatically deploy the changes from Umbraco Cloud to a Github repository.
So in this case you will need to setup a pull mirroring from Umbraco Cloud, and a push mirroring back to Umbraco Cloud as well.
Setup a Github repository with a push mirror from the Gitlab repository
In the same Gitlab repository, setup a push mirroring for a github repository as well.
- Create an empty private Github repository.
- Setup a push mirroring in Gitlab for the newly created Github repository with the following:
- For the URL, add the HTTPS clone link from the Github repository.
- The Authentication method can be setup to use the “Username and Password”.
- In the Username, add your Github Username.
- In the Password, you will need to add one of your Personal access tokens from Github.
- For this you will need to go to this link https://github.com/settings/tokens, then “Generate new token (classic)” and enable the “repo” scope and save.
- Then you will get a token which you can use as the password in the push mirroring for the Github repository.
- Before proceeding with next steps, let´s test that the connection between GitLab, GitHub and Umbraco Cloud works.
- For this, you can add some text to one of your templates in Gitlab and push your changes. Then the mirroring repository will push your changes to Umbraco Cloud and GitHub.
Once you confirm that your change is both on GitHub and Umbraco Cloud, then you can proceed with the next step.
IV: Setup Google Cloud Run Container for one region I
Google Cloud Run Containers are used to set up containers for the subscribers/regions we want to load balance. We are using Google Cloud Run for this article, but any provider that can build from a Docker file could be used.
Note: We won't go over the specific features from Google Cloud that we are using in the next steps, however, if you are interested in knowing what they are, feel free to explore the Google Cloud documentation.
- Start by creating a trial on https://console.cloud.google.com/ (if you do not have a subscription available).
- Enable the Secret Manager API, as we will need it before we create a Cloud Run Service.
- In the search bar of Google Cloud (https://console.cloud.google.com/), search for “Secret Manager” and click on the first result “Secret Manager”
- Then click “Enable”.
- Click on the “Navigation menu” on the left side or use the search bar from https://console.cloud.google.com/ to create a Cloud Run service.
- Click on the dropdown of “Deploy container” and then on “Service”.
- Click on the Github option and then follow the steps mentioned from “Set up with cloud build”:
Note: For the “Build Configuration” step, change the branch name to ^master$ and then choose Dockerfile as the “Build Type”. The dockerfile created by the Umbraco Cloud package that we used previously to clone down our Umbraco Cloud project, has already added a docker file for us by default, called Subscriber_Dockerfile.
What we are doing here is similar to Github Actions. Github Actions is pushing to Umbraco Cloud, and now we are trying to do the same here, but pushing to Google Cloud. - Scroll down to configure the service with a name, region, allow unauthenticated invocations, request-based billing, and checkmark to ingress all.
- Click on the dropdown "Container(s), Volumes, Networking, Security”.
- Under “Container(s)”, change the options to look like this:
- Under “Settings”: set container port to 8080, change the resources to use 2 gib Memory and 2 CPUs
- Under “Variables & Secrets”:
- Here you will need to add as an Environment Variable: ASPNETCORE_ENVIRONMENT with value of Subscriber.
- Then Click to “create new secret” and add the following 3 secrets:
"Umbraco__Storage__AzureBlob__Media__ConnectionString": "BlobEndpoint=AddURLFromYourCloudProject" ,
"Umbraco__Storage__AzureBlob__Media__ContainerName": "AddContainerNameFromYourCloudProject",
"ConnectionStrings__umbracoDbDSN": "Server=tcp:AddServerNameFromYourCloudProject;Initial Catalog=AddDatabaseNameFromYourCloudProject;Persist Security Info=False;User ID=AddLoginNameFromYourCloudProject;Password=AddPasswordFromYourCloudProject;Encrypt=True;TrustServerCertificate=true;Connection Timeout=30;" - Still under “Variables & Secrets” scroll down to “Revision autoscaling” and set the maximum number of instances to 1 or 2.
- Click “Create” button to create the service.
- After creating your service you may see some build errors, this is expected. We must grant the default service account permission to access the secrets we created during the previous step.
- To do this search for “Secret Manager” in the Cloud Console and click on the first result “Secret Manager”.
- Click on one of the created secrets and then navigate to the “Permissions” Tab, and then “Grant Access”.
- Copy the Principal account with the name “Default compute service account”. Then click on “Grant Access” button.
Note: If the “Grant access” button is greyed out and cannot click on it, then it is because you do not have assigned to your user the “Secret Manager Admin” role. - Paste the name for the default service account as the principal, and then choose the role “Secret Manager Secret Accessor”, and then save.
- Copy the Principal account with the name “Default compute service account”. Then click on “Grant Access” button.
- Repeat step 10.2. for all secrets.
- Head back to the cloud run and click to “edit & deploy new revision”. You will notice that there are still some errors, and this is expected as we have not fully connected our Cloud Run service to the Umbraco Cloud Project. The errors will be resolved in the next steps.
So now we have setup the container for one of the three regions: Europe, USA and Australia. However, we will need to create a container for each, so let´s look at how we can achieve this in the next steps.
V: Setup Google Cloud Run Container for one region II
Our main goal with the next steps is to get a single IP address that we can add to the Umbraco Cloud portal so the subscribers are able to access the database.
Setup a VPC Network and Subnet
- Head to homepage of Google Cloud (https://console.cloud.google.com/) and find the “VPC Network” Product and click to “Create VPC Network”:
- Create the VPC Network with these options:
- Add a name.
- Create a new subnet by: adding a name, picking a region for the container, and adding an IPv4 address. Example of an IPv4 address: 10.8.7.0/28
Note: To have our subnet corresponding to VPC connector, the IPv4 range needs to be in this “/28” format at the end. These addresses should be unique compared to other subnets to not clash with each other. - Allow the “container-name-vpc-network-allow-custom” under the “IPV4 Firewall Rule” so we are able to connect our container from the Internet.
- Click to “Create” the VPC Network.
Create VPC Serverless Connector
- Navigate to “VPC Network” > “Serverless VPC access” and click on “create connector”.
- Create the connector with these options:
- Add a name.
- Pick the same region you have chosen for the container and subnet.
- For Network, choose the previously created VPC Network.
- As for the Subnet, choose the newly created one. Note: If no subnets appear, you may need to refresh the page.
- Click Create.
Create Router
- In the search bar of Google Cloud (https://console.cloud.google.com/) look for “cloud routers” and click on the first result “Cloud routers”.
- Click to “Create Router”.
- Add a name and choose the previously created VPC Network and the region that the container is using.
Create IP Address
- Head to the “VPC Network” > “IP addresses” and click on “Reserve external static IP address”.
- Add a name, choose “Standard” Network Service Tier, add the specific region for this VPC network you are currently setting up, and click “Reserve”.
Create Cloud NAT Gateway
- Head to the “Network Services” > “Cloud NAT” and click to “Get started”.
- Add a name, choose the previously created VPC network, router, and region.
- Scrolling down to “Cloud NAT mapping” change the “Cloud Nat IP addresses” to “Manual”.
- Then change the “Network Service Tier” to “Standard” and add as an IP address 1, the IP address that you have previously created for this region.
Connect container to the VPC Network
- Head to the “VPC Network” > “IP addresses” and copy the IP address.
- Add it to Umbraco Cloud project > “Configuration” > “Connections”.
- The name can be anything. Then add in the IP address and click to “Add new IP address”.
Update the Container to use the VPC Network
Now that we have created the VPC network, we will update the container to use it:
- Navigate to your container that you have previously created under “Google Cloud Run” and click on “Edit & Deploy New Revision”.
- Click on “Networking” > “Connect to a VPC for outbound traffic” > “Use Serverless VPC Access connectors” > Pick the VPC network that you have created > “Route all traffic to the VPC” > Click “Deploy”.
VI: Setup GCP for multiple regions
Follow the same steps as before this part, in this order:
- Create “Google Cloud Run” container for the other regions: for example US and AU. Note: you can reuse the secrets already created from the first container.
- Head to “VPC Network” to add a new Subnet for the other two different regions.
- Head to “VPC Network” > “Serverless VPC access” and click on “create connector” to create connectors for the other regions using the existing VPC Network with the corresponding subnet for the regions.
- Create cloud router for the other regions.
- Head to the “VPC Network” > “IP addresses” and click on “Reserve external static IP address” to add new external IP address for the other regions.
- Head to the “Network Services” > “Cloud NAT” and click to “Create Cloud NAT Gateway” for the other regions.
- Head to the “VPC Network” > “IP addresses”, copy the IP address and add it to the Umbraco Cloud project > “Configuration” > “Connections”.
- Update the Google Cloud Run container to “Connect to a VPC outbound traffic” using the same VPC network for all regions (you can only choose 1 which will automatically detect what connector for the region is set up with).
Currently, each region has its own link, so the next step is to put all these region containers behind the load balancer so that we have one link that will serve the frontend to frontend users.
VII: Setup GCP Load Balancing
- Head to the “Network Services” > “Load Balancing” and click to “Create Load Balancer”.
- Configure the Load Balancer with these options, which are related to the fact that we use various regions:
- Type of Load Balancer: Application Load Balancer
- Public facing or internal: Public facing (external)
- Global or single region deployment: Global workloads
- Load balancer generation: Global external Application Load Balancer
- Click “Configure”.
- Then you will be prompted to “Frontend configuration”. Configure it with the following options:
- Firstly, add: a name, choose HTTPS Protocol, click to create a new IP Address. Then create a new certificate using the option “Create Google-managed certificate” where you will need to add a name and domain.
The domain needs to be the same as the one that you have added when you have used to clone down your Umbraco Cloud Project using the Umbraco Cloud package. If you haven´t added one, then make sure to add it in the web.config file on your Umbraco Cloud project. - Secondly, after you have configured an IP address, checkmark to “Enable HTTP to HTTPS redirect” and click “Done”.
- Firstly, add: a name, choose HTTPS Protocol, click to create a new IP Address. Then create a new certificate using the option “Create Google-managed certificate” where you will need to add a name and domain.
- Let's setup the backend configuration now. Click on “Backend configuration” and then on “Create a backend service”.
- Create the backend service with these options:
- The “new backend” option needs to be created for each container region, so you will need to create 3 of them using the “Cloud Run” group type.
- Moving on to the last options, disable the “Cloud CDN”, select none for “Security”, and click “Create”.
- Once the backend configuration is set up, the routing rules configuration is automatically set up based on the backend configuration so there is no need for any change in this case.
- Add a Load Balancer name and click to “Create” the load balancer to finish the setup.
Note: Once the load balancer is created, you might notice that one more balancer has been created automatically with the same name we gave to our load balancer but has a “redirect” in the name. This is because the one we have created is for HTTPS however, we need all the HTTP requests to be forwarded to HTTPS.
Once done you will need to wait up to 24h for the SSL certificate to be provisioned before you can access your domain URL. - Meanwhile, you will also need to add an A record on your hostname/domain DNS settings from your domain provider to point to the IP address provided by the load balancer (which is found under the LoadBalancer > Frontend details).
Note: make sure to add only the IP without the port (:443). For example only the bolded part: 34.144.242.124:443
VIII: Working with an Umbraco Cloud Development Environment
Create an Umbraco Cloud Dev Environment in the same Umbraco Cloud project
- Create a development environment to see if our project still works. It is also recommended to work on this environment going forward.
- Once you have created the development environment, you will need to execute the script in the Database from the “Configure Load Balancing Subscriber part 1” so that you can access the database.
Test out the Subscriber Region
- In one of your templates on the development environment, define a variable to display the subscriber region on the frontend:
@using ProjectName.Web
@using Umbraco.Cms.Core.Sync
@using Umbraco.Cms.Web.Common.PublishedModels;
@inherits Umbraco.Cms.Web.Common.Views.UmbracoViewPage<ContentModels.Home>
@using ContentModels = Umbraco.Cms.Web.Common.PublishedModels;
@inject IServerRoleAccessor serverRoleAccessor

@{
	Layout = null;
	var region = Environment.GetEnvironmentVariable("Subscriber_Region");
}

<div>
    <h1>
        @Model.Body
    </h1>
    <h2>
        Current Subscriber Region: @region
    </h2>
    <p>
        Currently it is @DateTime.UtcNow
    </p>
</div>
Note: Make sure to replace the ProjectName with your project name.
- The subscriber region is taken from the container. Update each region container by adding a new environment variable like so:
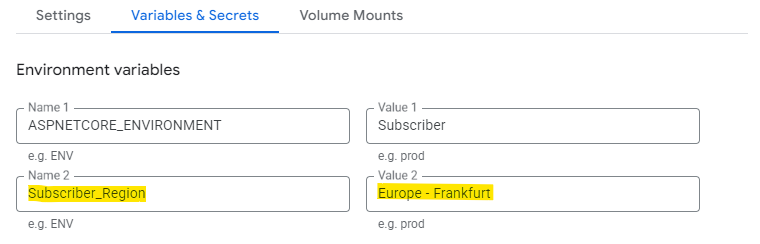
- Push your changes to Live Environment and check the frontend of the Live Environment to see what subscriber you will get.
Advantages of using this workflow
Dynamic Scaling for Performance and Cost Efficiency
With Cloud Run handling the frontend (Subscribers), your site can automatically scale based on demand. This means no more overprovisioning resources during quiet periods or scrambling to handle unexpected traffic spikes. You only pay for the compute resources you use, which helps keep costs predictable and under control.
Global Reach with Regional Independence
Cross-region load balancing in Cloud Run means your site can serve users from the closest region, reducing latency and improving load times. Plus, each region can scale independently, so a traffic spike in one region doesn’t impact performance in others.
Resilience and High Availability
Because your frontend instances are spread across multiple regions and dynamically managed, your site can remain operational even if one region experiences downtime. Meanwhile, Umbraco Cloud’s managed infrastructure ensures your backoffice stays reliable and secure.
Avoid Vendor Lock-In
By containerizing your frontend with Docker, you're not tied to a single hosting provider. If your infrastructure needs change down the line, you can move your containers to another platform, whether it’s Azure, AWS, or even on-premises without needing to rewrite your setup.
Cross-Platform Deployment with a Unified Codebase
Thanks to .NET’s cross-platform capabilities, the same codebase runs seamlessly on both Publisher (hosted on Umbraco Cloud using Windows) and Subscribers (hosted on Cloud Run using Linux). This ensures consistency across environments, reduces development overhead, and leverages the flexibility of modern .NET to deliver a truly platform-agnostic solution.
Going further
As a going further, you could take a look at how to setup the following:
- Setup CI/CD.
- Setup an external search index for the Subscribers like https://examinex.online/.
- Setup a Redis Distributed cache per region using Redis Cloud
- Move the subscriber setup to other popular hosting providers, such as AWS, Azure and so on.
What about the Umbraco configurations for new major releases?
This article focuses on configuring load balancing in Umbraco 15, which is the latest version at the time of writing. However, Umbraco 16 is expected to be released in June. You can find the official release schedule and long-term support details here: Umbraco LTS and Release Schedule
As the platform evolves, configuration patterns may change or improve. To keep this guidance relevant and community-driven, we’ve created a public GitHub repository: Community Maintained Umbraco Cloud Cross Region Load Balancing Configuration.
Here you’ll find the latest version of the recommended configuration files. You’re welcome to suggest improvements, provide feedback, or contribute updated configurations for future Umbraco versions. Whether it's a minor tweak or a complete config for a new version, your contribution helps future readers and the broader community.
Does Azure / AWS have a similar hosting service like GCP’s CloudRun that is managed hosting from a DockerFile?
Let us know in the comments below, or even better, if you are up for a challenge, feel free to create another Skrift article about how this works in these other hosting providers.