
Displaying geographic data visually can have a powerful impact on user experience. Whether you're showcasing your company’s offices, franchise locations, project sites, or community initiatives, having an interactive map is an intuitive and user-friendly solution. In this guide, we'll walk through how to dynamically embed a Google Map into your Umbraco website using the Our.Umbraco.GMaps package.
We’ll fetch and render content data directly from your Umbraco nodes—allowing you to maintain full editorial control through the Backoffice. Each marker on the map will be populated based on content editors’ inputs, including coordinates, images, titles, and addresses.
By the end of this tutorial, you’ll have a dynamic and extendable map component that stays in sync with your content.
💡 How This Idea Came About
This tutorial was inspired by a client to build an interactive map feature for the website. The goal was to display multiple locations visually, with each marker showing an image, title, and address—fully manageable through the Umbraco Backoffice.
The requirements included:
- “We need an interactive map showing all our branches.”
- “Can editors manage the locations from the backoffice?”
- “We want to add or remove locations without involving developers.”
- “Can the marker show an image, address, and link to the detail page?”
- “Can we update both areas from just one detail? For example, when updating the details, a small map on the sidebar should also update the map overview.”
✨ Features
Here’s what this integration allows you to do:
- Dynamic Location Rendering: Automatically pull coordinates and metadata (such as images and addresses) from your ProjectDetailPage content nodes.
- Custom Info Windows: Clicking a marker shows a styled info window with an image, location title, and address—editable from the CMS.
- Map Viewport Control: The map will automatically zoom and pan to fit all loaded markers using Google’s LatLngBounds utility.
- Editor-Friendly Setup: Content editors simply select a location from a friendly UI—no need to enter lat/lng manually.
This setup blends low-code CMS configuration with high-quality frontend results.
Benefits of This Implementation
Integrating a dynamic map using content data offers both technical and practical benefits:
1. Improved User Experience
Interactive maps help users instantly understand where locations are relative to them. Whether for travel, planning, or context, this is far more engaging than just a list of addresses.
2. Content-Driven Configuration
All map marker data is managed from the Umbraco backoffice. Editors can update coordinates, change images, and correct titles without needing a developer.
3. Performance Optimized
Instead of loading a bloated dataset or hitting external APIs repeatedly, all markers are rendered once using Umbraco’s published content. The viewport adjusts automatically to show all points.
4. Extendable
This approach sets you up for more advanced features later on, like clustering, filtering by category, or showing location-specific call-to-actions.
Prerequisites
To follow along, make sure you have:
-
A working Umbraco site (v10+ recommended)
-
A Google Maps API key (with Maps JavaScript API and Geocoding API enabled)
-
The Our.Umbraco.GMaps package installed from the Umbraco Marketplace
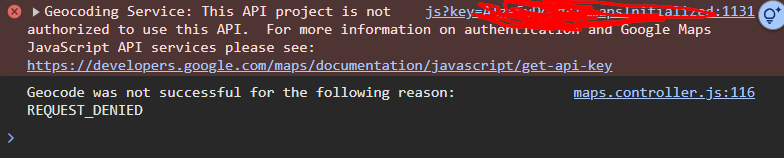
If a marker doesn't appear or update, check the browser console for any issues.
Example error:
1. Setup the Content Structure in Umbraco
In Umbraco, ensure you have a content type (e.g., ProjectDetailPage) that represents your individual locations or offices. To that document type:
-
Add a location picker property using the Our.Umbraco.GMaps editor.
-
(Optional) Add an image picker and rich text field for additional marker info.
Make sure the property is required or at least well-documented for content editors. If a marker doesn’t appear on the map, the first thing to check is whether a valid coordinate is assigned.
2. Google Cloud Console: Enable Required APIs
Before your map loads, the browser will request Google’s JavaScript Maps API. To prevent errors or blank maps:
✅ Enable the following APIs:
-
Maps JavaScript API
-
Geocoding API
You can do this from the Google Cloud API Library.Also make sure to restrict your API key to trusted domains to avoid abuse.
3. Query Content with Coordinates
Query and filter visible ProjectDetailPage content:
var allProjects = Umbraco.ContentAtRoot()
    .DescendantsOrSelf<ProjectDetailPage>
    ()
    .Where(x => x.IsVisible())
    .ToList();
Each ProjectDetailPage should now have location data and (optionally) an image or custom title.
4. Add the HTML Markup
You’ll need a container for the map on your page.
<div class="google-map-section">
    <div id="googleMap" style="width: 100%; height: 400px;"></div>
</div>
5. Generate Markers with JavaScript and Razor
This is where the dynamic behavior happens. You’ll loop over your C# content and inject it into a JavaScript array that Google Maps will consume:
  window.initMap = function () {
      const map = new google.maps.Map(document.getElementById("googleMap"), {
  zoom: 7,
  });

  const bounds = new google.maps.LatLngBounds();

  const buildingIcon = {
  url: "/favicon.ico",
  scaledSize: new google.maps.Size(40, 40)
  };

  const locations = [
  @{
      var culture = System.Globalization.CultureInfo.InvariantCulture;
      foreach (var project in allProjects)
      {
          var coords = project.Location?.Address?.Coordinates;
          var fullAddress = project.Location?.Address?.FullAddress;
          if (coords?.Latitude != null && coords?.Longitude != null)
          {
              var lat = coords.Latitude.ToString(culture);
              var lng = coords.Longitude.ToString(culture);
              var title = project.Title ?? project.Name;

              var address = fullAddress;
              var imageUrl = project.Image?.Url();

              <text>    {
                                      lat: @lat,
                                      lng: @lng,
                                      title: "@title",
                                      content: `<div class="info-window">
                      @if (!string.IsNullOrEmpty(imageUrl))
                      {
                          <text><img src="@imageUrl" alt="@title" style="width: 100px; height: auto;" /></text>
                      }
                                                  <h3>@title</h3>
                                                              <p>@address</p>

                                                </div>`
                                  },</text>
          }
      }
  }
      ];

      if (locations.length > 0) {
          locations.forEach(function (location) {
              const position = { lat: location.lat, lng: location.lng };
              const marker = new google.maps.Marker({
                  position,
                  map,
                  title: location.title,
                  icon: buildingIcon
              });

              bounds.extend(position);

              const infoWindow = new google.maps.InfoWindow({
                  content: location.content
              });

              marker.addListener('click', function () {
                  infoWindow.open(map, marker);
              });
          });

          map.fitBounds(bounds);
          google.maps.event.addListenerOnce(map, 'bounds_changed', function () {
              if (map.getZoom() > 10) map.setZoom(10);
          });
      } else {
          new google.maps.Marker({
              position: mapCenter,
              map: map,
              title: "Fallback Location"
          });
      }
  };
6. Load the Google Maps API
Add the following tag right before your closing:
<script async defer
        src="https://maps.googleapis.com/maps/api/js?key=YOUR_GOOGLE_MAPS_API_KEY&callback=initMap">
</script>
Security Tip: Do not commit this key to public repositories. Make sure your key has usage restrictions
Final Result – A Live Map of Your Content Nodes.
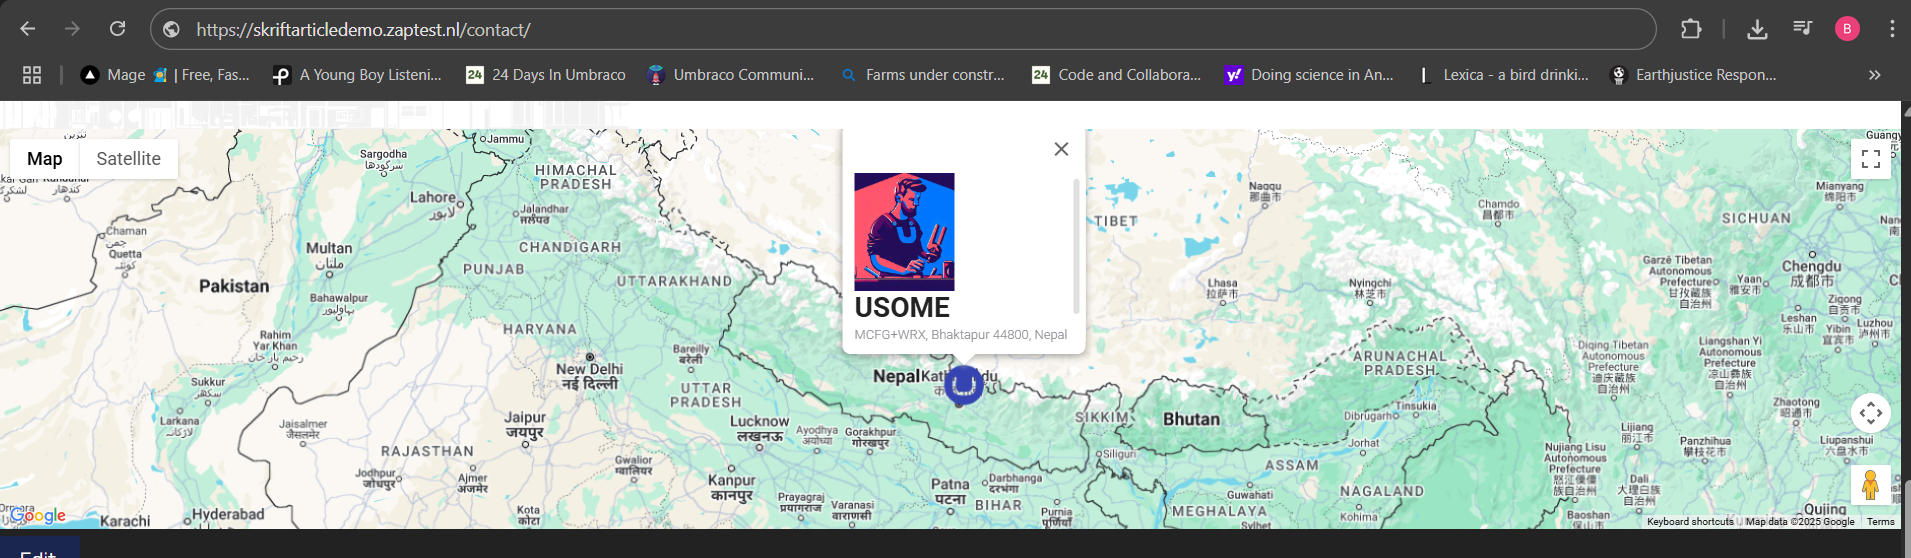
Once everything is set up, your website will display a fully functional, zoomable map with markers rendered from your Umbraco content. Each location marker includes image thumbnails, labels, and addresses—all editable from the CMS.
Wrapping Up
This tutorial demonstrates how powerful a dynamic CMS-integrated Google Map can be when paired with Umbraco’s flexible content structure. By using Our.Umbraco.GMaps, you empower content editors to manage locations visually and efficiently without needing to touch a single line of code.
There are plenty of ways you can take this even further:
-
Group markers by category (e.g., office type or region)
-
Add map themes or dark mode styling
-
Integrate marker clustering for performance on dense maps
-
Add real-time search or filtering
-
Use ViewModels and Headless APIs for decoupled frontends
The approach covered here provides a future-proof pattern. if you’re working on a local business directory, a real estate site, or an international brand locator, this integration pattern ensures that your map remains content-driven and easy to manage.
If you're new to Umbraco or just getting started with packages like Our.Umbraco.GMaps, be sure to explore the documentation, community forums for further support.
For questions or feedback, feel free to contact me or leave a comment below, and I’ll make sure to respond!