
By utilising the possibilities that open up with the Discord API in combination with the Umbraco CMS, you will have all the tools available to fully customise and empower your online communities! What does that even mean? Why should you care? And what even is Discord? Let’s start at the beginning, and work our way towards the technical side of things!
What is Discord?
Before we can get started, let’s get the basics out of the way first. What is Discord? Discord is a free voice, video, and text chat app that's used by tens of millions of people around the world to talk and hang out with their communities, family and friends. Initially released in 2015, Discord’s goal was to become a user-friendly social platform targeting gaming communities.
Over the years, when the audience of Discord expanded outside of gaming, Discord changed its motto from being “Chat for Gamers” to “Chat for Communities and Friends”. Now people use Discord on a daily basis to talk about a variety of subjects, ranging from creative outlets, study groups, mental health support, and even anything Umbraco related!
Discord as a Developer
When looking at Discord from a developers perspective, there are several kinds of integrations & applications you can work with.
First of all, as an Application or Game developer you have the option to provide additional information about your platform’s current state through the profile of the user that is currently using your application. This could be the song you’re currently listening to through Spotify, the dimension you’re currently in through Minecraft, or the programming language you’re currently working on through your IDE, just to give some examples!
Second of all, as a Web developer you could use Discord to sign into your application (like the Umbraco back-office) using OAuth2. This will allow you to authenticate your users on your platform through their Discord credentials as a Single Sign-On option, for example in the Umbraco back-office. You are able to configure the various Discord scopes that you wish your application to have access to, like being able to see what Discord Servers a user is in, or the ability to perform various server actions, when authenticating.
And lastly, the third integration option that we have is using Discord for Bots. Bots are a powerful addition to your discord server, that present themselves like fake user-like members, but with an extensive programmable API behind them. Today we will be focusing on bots, how to create them, integrate them with Umbraco, and how to perform a wide range of actions with them!
Getting Started
To get started using Discord and Umbraco, you will need to install the .NET 7 SDK (For use with Umbraco 11), and a code editor or IDE of your choosing (like Jetbrains Rider, Visual Studio or VS Code). Besides that, the use of git is recommended both for version control, and the ability to clone either Umbraco 11 or the example bot project that this article is based on! To make use of the Discord API, we will be using the unofficial open-source .NET API Wrapper called Discord.Net, which will help us with the API, webhooks, and various Discord interaction services.
To go over the various use-cases and example implementations of what you can do with Discord & Umbraco, I have prepared an example project over on GitHub that we will be using and elaborating in this article. Please follow the instructions as specified in the README file on how to clone and get the solution running on your machine. If you’re running into any problems while using it, please submit an issue over on GitHub.
Once you have the solution up and running, and have the Umbraco back-office in front of you, we will need to retrieve an API Token for use with our bot! To do so, head over to the Discord Developer Portal and sign in with your Discord credentials. From here, you will create a new Application, head over to the “Bot” tab, and click on “Add Bot”, which will configure your application to be used as a bot. Next, head over to URL Generator, specify “Bot” as the scope, and then check the various permissions you wish your Bot to have on your Discord server(s).
Be careful to only give your bot the permissions it needs! Once that’s done, copy the URL to a new tab in your browser, and you will be prompted by a screen where you can select which server you wish to add your bot to. Now that your Bot has been added to your Discord server, head back to the “Bot” tab, and copy the Token for later use in our application. Consider this token a secret and don’t share it with anyone, as it provides full access to your bot (and all the permissions you’ve given it)!
When you have your token, head over to the Umbraco back-office and create a new “Umbraco Discord Client” content node, in which to fill in your Token. Underneath that create an Umbraco Discord Server Instance, in which to fill in the server ID of the server your bot is in. To retrieve the server ID, go to your Discord Settings -> Advanced, and enable Developer Mode. After that you can right click on your Server and the option “Copy ID” should become available”. Lastly we create a Command Collection node underneath our Discord Server Instance. All that’s left to do is reboot our application, and we should see our Bot come online!
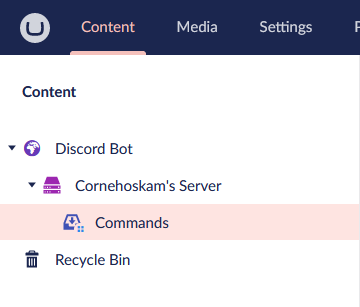
A preview of the Umbraco content tree displaying the Bot, Server and Command structure
At this point, your imagination is the limit. Let’s take a look at a couple common scenarios and use-cases, and see what challenges arise when implementing them!
Custom Message Handlers
One of the most commonly used features within utility Discord Bots would be the ability to create and respond to user input messages (further: commands). The Discord.NET library offers some useful boilerplating to help with the handling of these commands.
We’re starting off with the DiscordSocketClient object (further: client), the heart of our Discord connection. This client instance offers a variety of different methods & events we can hook into, including but not limited to the MessageReceived event. Registering a new method to this event will give us an async method which accepts a SocketMessage object, being the message the event receives, with all its meta-data. Out of the box the Discord.NET library offers the ability to automatically register predefined commands, classes that implement the ModuleBase<SocketCommandContext> base class, as implemented in the example project.
The challenge lies when we want to work with commands dynamically, using Umbraco as the heart and soul of the operation. Instead of creating a command with a specific trigger, we’ll create a “Catch All” command that we will always execute on a command. For this to work, a new SocketCommandContext needs to be created based on our client & input message. The CommandService can then search for our specific command through reflection, afterwards we can execute it using our SocketCommandContext.
Now let’s bring Umbraco into the picture! Within the CatchAll method of our UmbracoCatchAllCommand we’ll start by creating an UmbracoContextReference, in which we can access the Umbraco Content nodes. By fetching the content root node, and doing some navigation through the content tree, we end up with the CommandCollection Content Node, with all Umbraco’s CustomCommands as its children. We can then fetch the values for each of the commands, being the trigger and response, and store them in a dictionary for later use.
Once that’s done, we can compare our Command Context’s message (aka the command the user triggered) and check if our dictionary contains such a key. If we do, we can reply to the command with our response as defined in Umbraco, sending our message through our Bot back to Discord, and we’re set!
To extend on this, we can add some additional features like only having the commands work on a specific Discord server, by adding the Discord Server ID as part of the key-value pair so that it can only be triggered from within that specific server. Another addition could be to add various placeholder tokens into our command response, which we replace at runtime with variables based on the token. Properties like the command authors’ username, streaming status, channel name, server membercount, the possibilities are endless!
Creating Umbraco Content
With everything in place and configured to handle the registration and processing of commands, the ability to create custom command content Nodes in Umbraco straight from Discord isn’t much of a challenge anymore either! Per this being a new command with a custom code-behind, start off by creating a new class that once again inherits from the ModuleBase<SocketCommandContext> base class. In its constructor, inject an instance of IUmbracoContextFactory & IContentService, and create a method with the [Command("addCommand")] attribute that accepts two strings as parameters in order to register our command.
For the commands functionality, start off by using the umbracoContextFactory instance to ensure we have an Umbraco Context, and then get the Commands collection from the contexts’ Content. Make sure to grab the Discord server content node that matches the one where the command gets sent in, in case your bot is used in multiple Discord servers. An example of what this could look like would be as follows:
var context = _umbracoContextFactory.EnsureUmbracoContext();
var rootNode = context.UmbracoContext.Content?.GetAtRoot().FirstOrDefault();
var commandCollection = rootNode?
   .ChildrenOfType(UmbracoDiscordServer.ModelTypeAlias)
   ?.FirstOrDefault(x => (x as UmbracoDiscordServer)?.ServerID == Context.Guild.Id.ToString())
   ?.FirstChildOfType(CommandCollection.ModelTypeAlias);
Now that we have the command collection, we can use the ContentService.Create method to create the actual command underneath the collection. The first Create parameter will be the name of our command, the second will be the id of the commandCollection node, and the third will be the alias of our item, in our example project being customCommand.
After that, set the command & response properties of our newly created node to be the parameters of our method we’re calling this in, SaveAndPublish using the ContentService, and we’re done!
TIP: Want the second parameter of our method to be not only the second word/string of our Discord message, but the rest of the message? Use the [Remainder] attribute before declaring the parameter!
Custom Notifications
When looking at underrated Umbraco code features, the ability to create & send custom Notifications throughout your application has to be in the top 10! We can extend upon the various events that get triggered by Discord’s API by combining them with Umbraco’s EventAggregator & NotificationHandlers. In this example scenario, we’ll be sending a notification whenever a user joins a Voice Channel for the first time, starting off the same way as we did with the custom message handlers, by getting our DiscordSocketClient object.
The Discord.NET API allows us to hook into a wide range of different events, of which in this case we will be using the _client.UserVoiceStateUpdated event. We’ll register a function to this event, in which we will get an instance of IEventAggregator that will be responsible for Publishing our custom Notification. In this specific scenario, we want to send a Notification whenever a user joins a Voice Channel for the first time, meaning that we’ll have to check the old and new voiceChannel state when the event gets triggered.
Simply put, if the old voiceState (being the first argument) is null, and the new voiceState (being the second argument) isn’t null, we can conclude the user has joined a channel (instead of moved, left, muted, etc.). If that scenario is met we can publish a custom Notification through the eventAggregator using a new class that contains the properties of our choosing, as long as it inherits from the INotification interface.
Now that our Notification is being sent, time to handle it! By creating a new class that implements the INotificationHandler<T> interface, where T is the Notification we’ve previously created, and implementing the required Handle method that comes with the interface, you can let your creativity roam free with what you can do to process the notification! All that’s left is to register your NotificationHandler using the Services of your startup class, or through a composer, and your Umbraco notification is now decoupled from Discord and can be handled any way you see fit.
Gamification
And last but certainly not least on the list of popular Discord bot features, would be the addition of some form of gamification to your Discord server. Gamification can take many shapes and forms, but for our example project we’ll be taking a look at a system that encourages server activity by awarding experience points combined with a level system and an Umbraco dashboard to accommodate said system.
To get started, we’ll be creating a new (in this case SQLite) database, in which we’ll create a Stats table. The Stats table will contain the columns needed for storing our levelling system, being a ServerID (int), UserID (string), ServerName (string), UserName (string), the date of the last processed message (DateTime), and the amount of Experience points said user has (Int/Long).
To make working with said database easier, we’ll be using Entity Framework Core to generate a Database-First DbContext, so that we can easily access our records from our code. Be sure to take a look in the UmbracoDiscord.Domain project within the example solution on how you could set up such a database connection through EFCore!
For our levelling system, we’ll be making use of the _client.MessageReceived event triggered from our client. Whenever we receive a message, we want to connect to our database through the DbContext, and check if it contains a record for the user that sent the Discord message within that specific Discord server (as long as said user isn’t a bot, as we don’t want our bots’ messages to trigger itself). If a record exists, we can increase the amount of experience points stored on that user by a given increment, and if it doesn’t exist we create a new record.
To discourage spamming, we can add a timeout period between messages by storing the DateTime of the last processed message, and add a time-out period within the initial processing condition so that messages sent in rapid-succession aren’t counted towards the levelling system. To make the system more lively, we can bind rewards to be granted on specific amounts of experience points, like for example custom Discord roles! After increasing a users’ experience, we can check if the value lies in-between a given threshold for a role (like “Level 1”, “Level 2” etc.), and if the user doesn’t already have that role assigned, assign it! To make the system more lively, we can have our bot reply with a Congratulations message as a form of positive reinforcement for the users’ activity!
Now that we have the levelling system in place, we can create a dashboard within Umbraco to be able to manage the data stored in our systems’ database. For this, we’ll be making use of a package called Konstruct, a back-office UI builder that allows us to easily create custom back-office integrations using a fluent API.
Install the package in your solution, and use the AddKonstruct IUmbracoBuilder extension method within your startup class to get started. Next step will be to create a new configuration for our dashboard that utilises the KonstructConfigBuilder class, which in the case of the provided example project is stored in the KonstructConfiguration class.
The configuration starts by creating a new section, which will be a new tab shown at the top of our Umbraco navigation tree. Within this section, we configure a new Tree, to which we add a Collection of a given entity type, in this case being of type Stats (the class that matches the columns of our EFCore’s DbContext Stats table). From here you can also specify the various properties of the collection like the display name, icon, description etc.
The next step will be to bind a repository (our database) to the collection, by creating a class that implements the KonstruktRepository<Stats, int> base class, where the first generic is our database entity type, and the second generic is the type of unique identifier used in said database entity.
Doing so will force us to implement a handful of methods that interact with data, like the implementation of a Get, GetId, GetPaged, GetCount, Save, and Delete method. We can inject our DbContext in the Repository’s constructor, and implement the various methods that Konstruct needs to interact with our context, like returning a Stats object by an ID in the Get method.
With the repository configured, we can specify the rest of the Konstruct configuration like the various fields to display in a listView and to which Stats property they map. We can add an editor view so that we can not only view our repositories data but also edit the individual rows, and we can Cards which allow us to accumulate data and display useful statistics like the total experience & user count! To quickly gets started, you can copy-paste the following Konfiguration and make it your own!
public static class KonstructConfiguration
{
    public static void GetConfig(KonstruktConfigBuilder cfg)
    {
        cfg.AddSection("Repositories", sectionConfig =>
            sectionConfig.Tree(treeConfig => treeConfig
                .AddCollection(x => x.Id, "Stat", "Stats", "A person entity", "icon-umb-users", "icon-umb-users",
                    collectionConfig => collectionConfig
                        .SetRepositoryType()
                        .DisableCreate()
                        .SetNameProperty(x => x.UserName)
                        .ListView(listViewConfig => listViewConfig
                            .AddField(p => p.Id).SetHeading("ID")
                            .AddField(p => p.ServerName).SetHeading("Server Name")
                            .AddField(p => p.Experience).SetHeading("Experience")
                        ).Editor(editorConfig =>
                        {
                            editorConfig.AddTab("General", tabConfig =>
                            {
                                tabConfig.AddFieldset("General", fieldsetConfig =>
                                {
                                    fieldsetConfig.AddField(p => p.UserName).SetLabel("Username")
                                        .SetDescription("The username of the user");
                                    fieldsetConfig.AddField(p => p.ServerName).SetLabel("Server Name")
                                        .SetDescription("The name of the server the user is on");
                                    fieldsetConfig.AddField(p => p.Experience).SetLabel("Experience")
                                        .SetDescription("The amount of experience the user has");
                                });
                            });
                        })
                        .AddCard(typeof(TotalServers))
                        .AddCard(typeof(TotalExperienceCard))
                        .AddCard("Total Users", "icon-umb-users", x => true, cardConfig =>
                        {
                            cardConfig.SetColor("blue");
                        })
                )
            ));
    }
}
All that’s left is to register the created configuration in the startup class’ AddKonstruct method, and we’re done! Now you can head over to the Umbraco back-office, and you’ll see a brand new tab called Repositories, a tree item called Stats, in which our database contents’ are displayed!
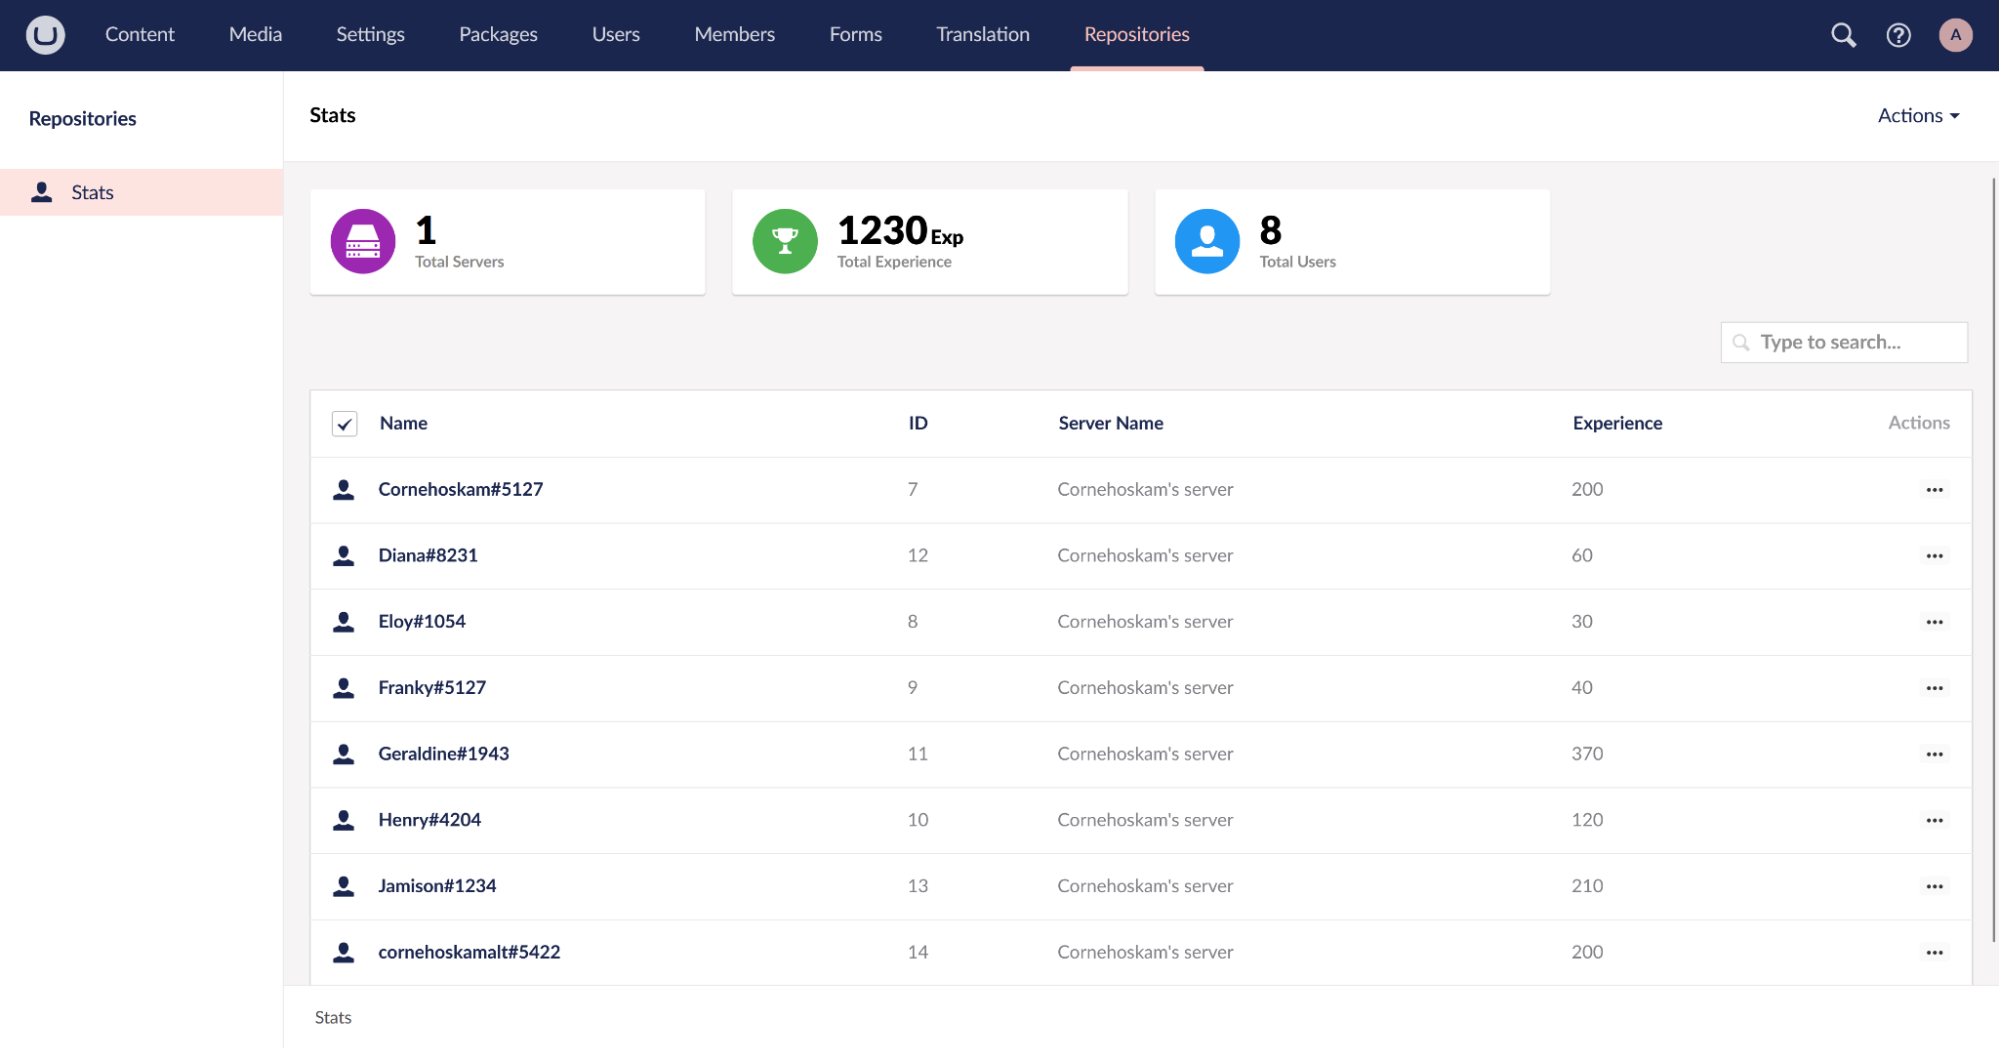
A preview of the Umbraco back-office showcasing the custom Konstruct section filled with dummy-data.
Summary
After everything that’s showcased and explained today, we have only scratched the surface of what is possible using the Discord API in combination with Umbraco. You have not only learned to get familiar with the Discord Developer Portal, but also learned to create your own Discord bot that you can use to empower your own communities by responding to messages, creating Umbraco content from within discord, handling various events & notifications, and by adding gamification to your Discord server.
With the use of Konstruct you are able to manage your gamification system from within the Umbraco back-office, and bring it all together into one cohesive project.
If you are running into any issues or would like to look at various examples, I recommend taking a look at the provided example project over on GitHub to help you get started and guide you along your journey!