

This article is about configuring Azure Active Directory B2C with Umbraco backoffice Users and frontend Members.
Traditionally, a backoffice user or members should first exist before linking their user account to an external login provider. However, in many instances, the external login service that you set up will be the truth for all of your users/members.
This is where this article will come in handy, it will provide a guide on how to set up your external login and automatically link your users/members to the backoffice in Umbraco CMS v10.
What you should expect to get from this article is a functional solution connected to Azure AD B2C, that automatically auto-links and creates your users/members with your Umbraco instance.
You’ll go through three phases during this article:
- The Azure AD B2C setup, done in the Azure Portal
- The creation of your web application (installing the Umbraco CMS / necessary packages)
- And finally the code configuration
Let's dive in!
Configure Azure Active Directory B2C
1. Create your Azure AD B2C tenant
Before your applications https://localhost:44361/signin-oidc can interact with Azure Active Directory B2C (Azure AD B2C), they must be registered in a tenant that you manage.
Follow the official tutorial on creating an Azure Tenant:
https://docs.microsoft.com/en-us/azure/active-directory-b2c/tutorial-create-tenant
In case you don’t have a resource group you’ll be asked to create one.
2. Register your web application in Azure Active Directory B2C
Before your applications can interact with Azure Active Directory B2C (Azure AD B2C), they must be registered in a tenant that you manage.
You’ll have to add a domain that should look similar to this: https://localhost:44361/signin-oidc
This will be the localhost development domain of your Umbraco website.
This is the CallbackPath which represents the URL to which the browser should be redirected to and the default value is /signin-oidc This should be unique! And remember no “/” at the end of the URL)
Next, make sure the permission “Grant admin consent to openid and offline_access permissions” is checked:

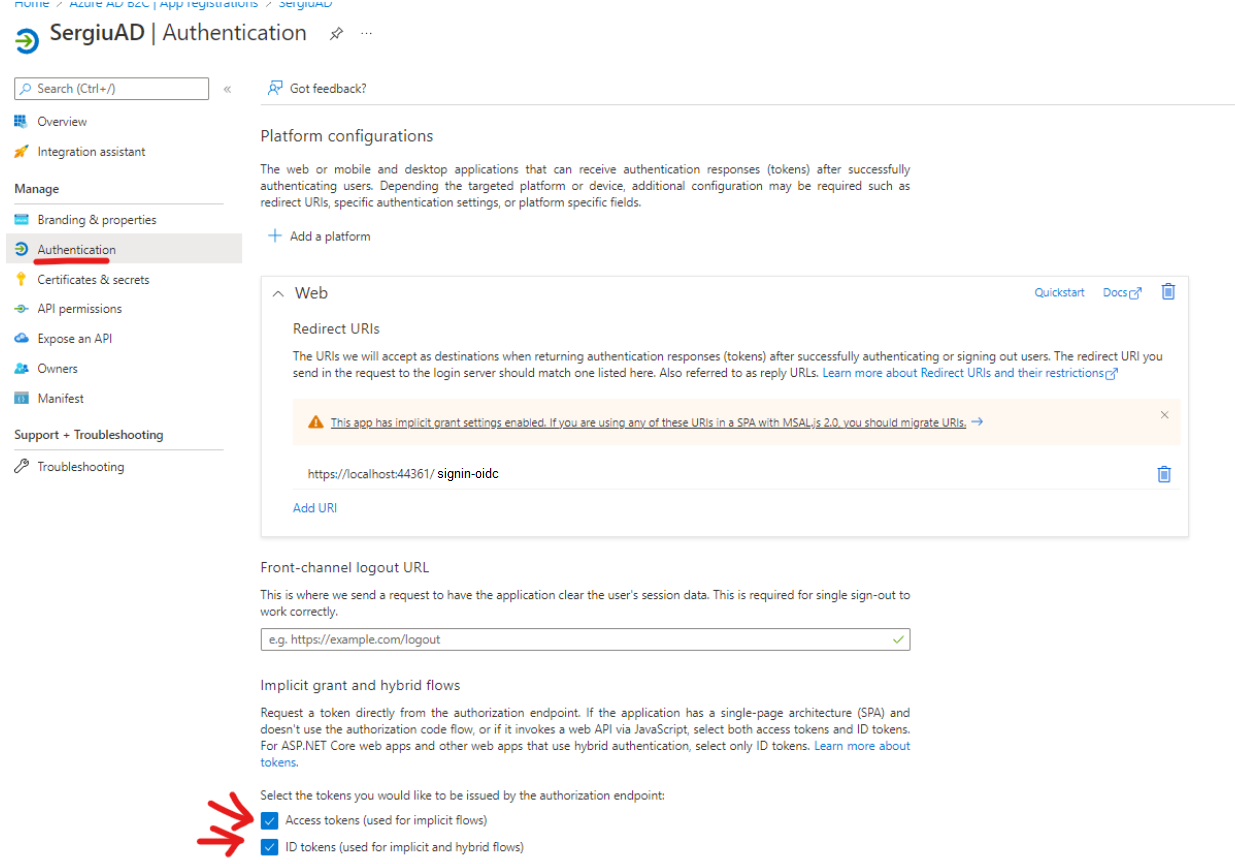
Once the web application is created, go to the Authentication menu and check the following:
Access tokens (used for implicit flows)
ID tokens (used for implicit and hybrid flows)
Now it’s time to generate a client secret:
For a web application, you need to create an application secret. The client secret is also known as an application password. The secret will be used by your application to exchange an authorization code for an access token.
Note: It’s important that the client secret is not to be committed publicly into git repositories. Remember to use environment variables or a secret service or similar to manage this: https://docs.microsoft.com/en-us/azure/active-directory-b2c/tutorial-register-applications?tabs=app-reg-ga#create-a-client-secret
The next step will be configuring scopes:
Scopes provide a way to govern access to protected resources. Scopes are used by the web API to implement scope-based access control. For example, users of the web API could have both read and write access, or users of the web API might have only read access. https://docs.microsoft.com/en-us/azure/active-directory-b2c/add-web-api-application?tabs=app-reg-ga#configure-scopes
Then we have to grant permissions to the API:
To call a protected web API from an application, you need to grant your application permissions to the API. https://docs.microsoft.com/en-us/azure/active-directory-b2c/add-web-api-application?tabs=app-reg-ga#grant-permissions
3. Create user flows and custom policies in Azure Active Directory B2C
In your applications you may have user flows that enable users to sign up, sign in, or manage their profile. You can create multiple user flows of different types in your Azure Active Directory B2C (Azure AD B2C) tenant and use them in your applications as needed. User flows can be reused across applications.
A user flow lets you determine how users interact with your application when they do things like sign-in, sign-up, edit a profile, or reset a password. Follow: https://docs.microsoft.com/en-us/azure/active-directory-b2c/tutorial-create-user-flows?pivots=b2c-user-flow
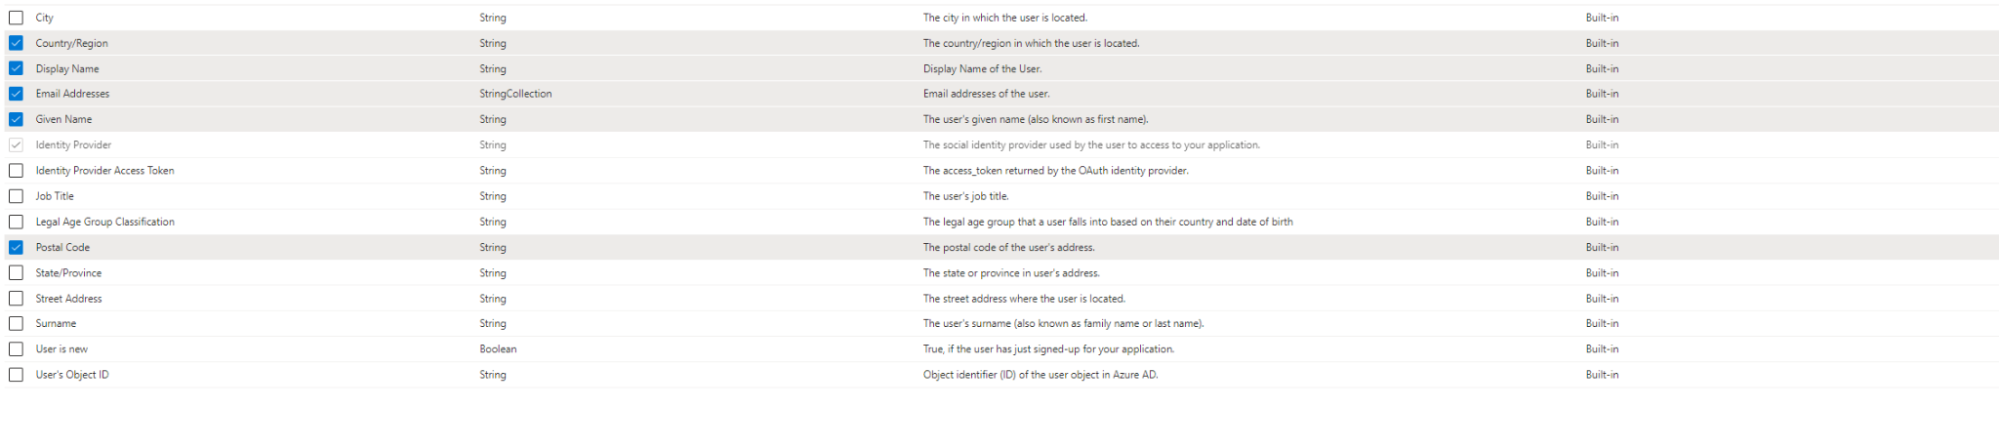
When assigning the application claims, make sure to choose “Given name” and “Email Addresses” because Umbraco is using this information to create a local user or member that is linked to the Azure B2C user to create & recognize the user in the Backoffice. (these will be shown later in the code)
Create and configure your web application
1. You’ll need to create a Umbraco CMS project
Create a new v10.1.0 project:
dotnet new umbraco -n AzureAD
2. Install NuGet package called Microsoft.Identity.Web
This package enables ASP.NET Core web apps and web APIs to use the Microsoft identity platform (formerly Azure AD v2.0).
For .Net CLI:
dotnet add package Microsoft.Identity.Web
For Package Manager:
Install-Package Microsoft.Identity.Web
3. Install NuGet package called Microsoft.AspNetCore.Authentication.MicrosoftAccount
ASP.NET Core middleware that enables an application to support the Microsoft Account authentication workflow.
For .Net CLI:
dotnet add package Microsoft.AspNetCore.Authentication.MicrosoftAccount
For Package Manager:
Install-Package Microsoft.AspNetCore.Authentication.MicrosoftAccount
Start/Install Umbraco for the first time
You can do it via Visual studio or via CLI: https://our.umbraco.com/documentation/Fundamentals/Setup/Install/install-umbraco-with-templates#run-umbraco
dotnet build
dotnet run
Time to create the authentication for Azure AD B2C with backoffice users
Most of it is explained in these links:
- https://our.umbraco.com/Documentation/Reference/Security/Auto-linking/
- https://our.umbraco.com/Documentation/Reference/Security/External-login-providers/
The code is also the same as in the article above, but it has a few adjustments like the claims, and autoLinkUser.IsApproved value set to true, for avoiding getting a blank backoffice.
It’s time to create our BackofficeAuthenticationExtensions.cs Which should contain:
https://gist.github.com/sergiutesu/1f97b6c98b7ef219bc4cca83c91d65a7
using Microsoft.AspNetCore.Authentication.Cookies;
    using Microsoft.AspNetCore.Authentication.MicrosoftAccount;
    using Microsoft.AspNetCore.Authentication.OpenIdConnect;
    using Microsoft.Identity.Web;
    using Microsoft.IdentityModel.Protocols.OpenIdConnect;
    using System.Security.Claims;

    namespace AzureAD
    {
        public static class BackofficeAuthenticationExtensions
        {
            public static IUmbracoBuilder ConfigureAuthentication(this IUmbracoBuilder builder)
            {
                builder.Services.ConfigureOptions();


                builder.AddBackOfficeExternalLogins(logins =>
                {
                    //const string schema = MicrosoftAccountDefaults.AuthenticationScheme;

                    logins.AddBackOfficeLogin(
                        backOfficeAuthenticationBuilder =>
                        {
                            backOfficeAuthenticationBuilder.AddOpenIdConnect(
                        backOfficeAuthenticationBuilder.SchemeForBackOffice(AzureB2CBackofficeExternalLoginProviderOptions.SchemeName),
                        options =>
                        {
                            //options.ResponseMode = "query";
                            options.ResponseType = "id_token token";

                            options.Scope.Add("https://sergiuazureadb2c.onmicrosoft.com/api/demo.read");
                            options.Scope.Add("https://sergiuazureadb2c.onmicrosoft.com/api/demo.write");
                            options.Scope.Add("email");
                            options.Scope.Add("openid");
                            options.Scope.Add("offline_access");


                            options.RequireHttpsMetadata = true;


                            //Obtained from the AZURE AD B2C WEB APP
                            options.ClientId = "";
                            //Obtained from the AZURE AD B2C WEB APP
                            options.ClientSecret = "";
                            //Callbackpath - Important! The CallbackPath represents the URL to which the browser should be redirected to and the default value is /signin-oidc.
                            options.CallbackPath = "/signin-oidc";

                            //Obtained from user flows in your Azure B2C tenant
                            options.MetadataAddress = "https://sergiuazureadb2c.b2clogin.com/sergiuazureadb2c.onmicrosoft.com/v2.0/.well-known/openid-configuration?p=B2C_1_signin";

                            options.TokenValidationParameters.SaveSigninToken = true;
                            options.SaveTokens = true;
                            options.GetClaimsFromUserInfoEndpoint = true;

                            // It's important to have the correct claims set up in Azure.
                            // Once you are authenticated to Azure AD B2C, it validates the request. If the token is validated it triggers this event.
                            // The token coming back from Azure AD B2C, contains several properties and one of the properties is the claims, containing information about the email address and name, and these are used by Umbraco to create and link the user.

                            options.Events.OnTokenValidated = async context =>
                            {
                                ClaimsPrincipal? principal = context.Principal;
                                if (principal is null)
                                {
                                    throw new InvalidOperationException("No claims found.. :(");
                                    return;
                                }

                                var claims = principal.Claims.ToList();

                                Claim? email = claims.SingleOrDefault(x => x.Type == "emails");
                                if (email is not null)
                                {
                                    claims.Add(new Claim(ClaimTypes.Email, email.Value));
                                }

                                Claim? name = claims.SingleOrDefault(x => x.Type == "name");
                                if (name is not null)
                                {
                                    claims.Add(new Claim(ClaimTypes.Name, name.Value));
                                }

                                var authenticationType = principal.Identity?.AuthenticationType;
                                context.Principal = new ClaimsPrincipal(new ClaimsIdentity(claims, authenticationType));
                            };
                        });
                        });
                });

                return builder;

            }
        }
    }
Use the .AddOpenIdConnect method, the only method in the builder that can be used to connect to Azure AD B2C web app.
- Get the ClientID from the AzureADb2c tenant
- Get the secret ID that you created on the tenant page
- Get Metadata address from user flows in your Azure B2C tenant
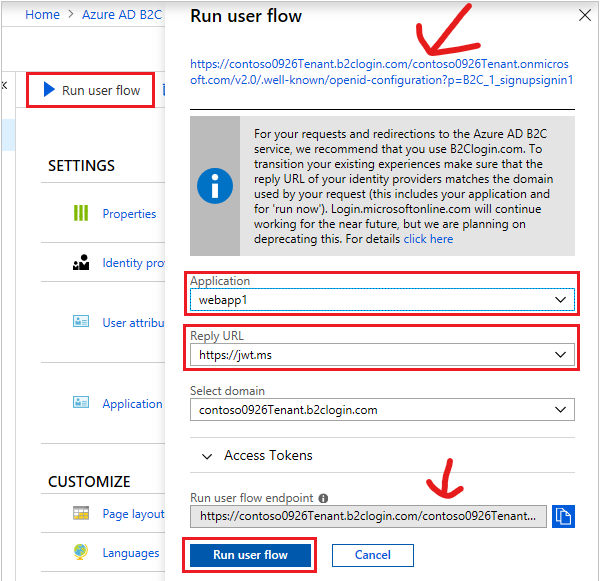
Endpoint for the user flow: options.MetadataAddress = ""
This can be obtained from user flows in your Azure B2C tenant:
The next step will be calling our extension .ConfigureAuthentication() from the Startup.cs under ConfigureServices:
https://gist.github.com/sergiutesu/9ce68e588719ebc0d7f64fb2998d9bfe
public void ConfigureServices(IServiceCollection services)
        {
            services.AddUmbraco(_env, _config)
                .AddBackOffice()
                .AddWebsite()
                .AddComposers()
                .ConfigureAuthentication()
                .Build();
        }
Now let’s add AzureB2CBackofficeExternalLoginProviderOptions.cs:
https://gist.github.com/sergiutesu/bf60c5d4d8f31478877687e367118a94
using Microsoft.Extensions.Options;
using Umbraco.Cms.Core;
using Umbraco.Cms.Web.BackOffice.Security;


namespace AzureAD
{
    public class AzureB2CBackofficeExternalLoginProviderOptions : IConfigureNamedOptions
    {
        public const string SchemeName = "OpenIdConnect";
        public void Configure(string name, BackOfficeExternalLoginProviderOptions options)
        {
            if (name != Constants.Security.BackOfficeExternalAuthenticationTypePrefix + SchemeName)
            {
                return;
            }

            Configure(options);
        }


        public void Configure(BackOfficeExternalLoginProviderOptions options)
        {
            options.ButtonStyle = "btn-danger";
            options.Icon = "fa fa-cloud";
            options.AutoLinkOptions = new ExternalSignInAutoLinkOptions(


                // must be true for auto-linking to be enabled
                autoLinkExternalAccount: true,

                // Optionally specify default user group, else
                // assign in the OnAutoLinking callback
                // (default is editor)
                defaultUserGroups: new[] { Constants.Security.AdminGroupAlias },

                // Optionally specify the default culture to create
                // the user as. If null it will use the default
                // culture defined in the web.config, or it can
                // be dynamically assigned in the OnAutoLinking
                // callback.

                defaultCulture: null,
                // Optionally you can disable the ability to link/unlink
                // manually from within the back office. Set this to false
                // if you don't want the user to unlink from this external
                // provider.
                allowManualLinking: false
            )
            {
                // Optional callback
                OnAutoLinking = (autoLinkUser, loginInfo) =>
                {
                    //This has to be set! Or else when the user is created it will be marked as disabled!

                    autoLinkUser.IsApproved = true;


                    // You can customize the user before it's linked.
                    // i.e. Modify the user's groups based on the Claims returned
                    // in the externalLogin info
                },
                OnExternalLogin = (user, loginInfo) =>
                {
                    // You can customize the user before it's saved whenever they have
                    // logged in with the external provider.
                    // i.e. Sync the user's name based on the Claims returned
                    // in the externalLogin info

                    return true; //returns a boolean indicating if sign in should continue or not.
                }
            };

            // Optionally you can disable the ability for users
            // to login with a username/password. If this is set
            // to true, it will disable username/password login
            // even if there are other external login providers installed.
            options.DenyLocalLogin = false;

            // Optionally choose to automatically redirect to the
            // external login provider so the user doesn't have
            // to click the login button. This is
            options.AutoRedirectLoginToExternalProvider = false;

        }
    }
}
It is important that autoLinkUser.IsApproved = true; is set to true,
By design, the new user will be disabled by setting the autoLinkUser.IsApproved to true it will not be disabled.
Note: You could also enable DisableLocalLogin so you can only login with the Azure B2C and even perhaps skip the login as well with the AutoRedirectToExeternalProvider.
Now let’s do the same for Azure AD B2C but with members, this time
The implementation for members is the same, the only difference is that you’ll need to create a login functionality for your front-end and make sure you have a different callbackPath in case you are using it for backoffice users as well.
- Follow below to create the out-of-the-box login functionality:
- New partition view from snippet.
- Choose login.
- Click the Login Macro and toggle on “Use in rich text editor and the grid”.
- Add a Rich text Editor to one of your document types.
- Create the content and insert the created Login macro: https://our.umbraco.com/documentation/Tutorials/Members-Registration-And-Logins/#create-the-necessary-macros-and-partial-files
- Create MemberAuthenticationExtensions.cs
https://gist.github.com/sergiutesu/29c16ba76a8a0047d5f7cd2a1c20a84b
using System.Security.Claims; namespace AzureAD { public static class MemberAuthenticationExtensions { public static IUmbracoBuilder ConfigureAuthenticationMembers(this IUmbracoBuilder builder) { builder.Services.ConfigureOptions(); builder.AddMemberExternalLogins(logins => { //const string schema = MicrosoftAccountDefaults.AuthenticationScheme; logins.AddMemberLogin( membersAuthenticationBuilder => { membersAuthenticationBuilder.AddOpenIdConnect( membersAuthenticationBuilder.SchemeForMembers(AzureB2CMembersExternalLoginProviderOptions.SchemeName), options => { options.SaveTokens = true; //Obtained from the AZURE AD B2C WEB APP options.ClientId = ""; //Obtained from the AZURE AD B2C WEB APP options.ClientSecret = ""; //Callbackpath - Important! The CallbackPath represents the URL to which the browser should be redirected to and the default value is /signin-oidc This should be unique!. options.CallbackPath = "/umbraco-b2c-members-signin"; //Obtained from user flows in your Azure B2C tenant options.MetadataAddress = ""; options.Events.OnTokenValidated = async context => { ClaimsPrincipal? principal = context.Principal; if (principal is null) { throw new InvalidOperationException("No claims found.. :("); return; } var claims = principal.Claims.ToList(); Claim? email = claims.SingleOrDefault(x => x.Type == "emails"); if (email is not null) { claims.Add(new Claim(ClaimTypes.Email, email.Value)); } Claim? name = claims.SingleOrDefault(x => x.Type == "name"); if (name is not null) { claims.Add(new Claim(ClaimTypes.Name, name.Value)); } var authenticationType = principal.Identity?.AuthenticationType; context.Principal = new ClaimsPrincipal(new ClaimsIdentity(claims, authenticationType)); }; }); }); }); return builder; } } } - Get the ClientID from the AzureADb2c tenant.
- Get the secret ID that you created on the tenant page.
- Get Metadata address from user flows in your Azure B2C tenant.
The next step will be registering our .ConfigureAuthenticationMembers() method under the Startup.cs ConfigureServices:
https://gist.github.com/sergiutesu/67aa5f905bdda06536e3012189208241
        public void ConfigureServices(IServiceCollection services)
        {
            services.AddUmbraco(_env, _config)
                .AddBackOffice()
                .AddWebsite()
                .AddComposers()
                .ConfigureAuthentication()
                .ConfigureAuthenticationMembers()
                .Build();
        }
Do note that if you want Azure AD B2C for both users and members you’ll need to create a unique CallbackPath for each.
Create AzureB2CMembersExternalLoginProviderOptions.cs:
https://gist.github.com/sergiutesu/1a2783210f2b24cd7c2924e0458d76b3
namespace Azure AD
{
    using System.Collections.Generic;
    using Microsoft.Extensions.Options;
    using Umbraco.Cms.Web.Common.Security;
    using Umbraco.Cms.Core;

    public class AzureB2CMembersExternalLoginProviderOptions : IConfigureNamedOptions
    {
        public const string SchemeName = "OpenIdConnect";
        public void Configure(string name, MemberExternalLoginProviderOptions options)
        {
            if (name != Constants.Security.MemberExternalAuthenticationTypePrefix + SchemeName)
            {
                return;
            }

            Configure(options);
        }

        public void Configure(MemberExternalLoginProviderOptions options)
        {
            options.AutoLinkOptions = new MemberExternalSignInAutoLinkOptions(
                // Must be true for auto-linking to be enabled
                autoLinkExternalAccount: true,

                // Optionally specify the default culture to create
                // the user as. If null it will use the default
                // culture defined in the web.config, or it can
                // be dynamically assigned in the OnAutoLinking
                // callback.
                defaultCulture: null,

                // Optionally specify the default "IsApprove" status. Must be true for auto-linking.
                defaultIsApproved: true,

                // Optionally specify the member type alias. Default is "Member"
                defaultMemberTypeAlias: "Member"

                // Optionally specify the member groups names to add the auto-linking user to.
                //defaultMemberGroups: new List { "Group1" } --> Issue on github: https://github.com/umbraco/Umbraco-CMS/issues/12853
            )
            {
                // Optional callback
                OnAutoLinking = (autoLinkUser, loginInfo) =>
                {
                    // You can customize the user before it's linked.
                    // i.e. Modify the user's groups based on the Claims returned
                    // in the externalLogin info
                },
                OnExternalLogin = (user, loginInfo) =>
                {
                    // You can customize the user before it's saved whenever they have
                    // logged in with the external provider.
                    // i.e. Sync the user's name based on the Claims returned
                    // in the externalLogin info

                    return true; //returns a boolean indicating if sign in should continue or not.
                }
            };
        }
    }
}
That's It
Once everything is configured, if you click on the new login button from your backoffice or from your frontend to log in as a backoffice user or a frontend member, you’ll be brought to the Azure Active Directory user flow, and can proceed to log in or create a user/member.
By checking the User tab/members tab from the backoffice you’ll be able to see the newly created user/member.
Hope this article will help you!