
If you are a .NET developer Blazor could be THE new tech stack on the block which intrigues and excites you. And why not, when we are told that interactive web UIs and Single Page Applications can be built using C# ! Being a back-end developer this statement really intrigued me to have a look into the technology and in my article I will attempt at introducing Blazor and looking at what is currently on offer. I will also talk about how we can set up a shared library for UI components.
Blazor is an open-source, web development framework from Microsoft. It is a client-side UI framework where both client and server code is written in C#. Unlike Silverlight, which required a browser plugin to run on the client, Blazor does not require any plugins or add-ons, it is .NET running in the browser using the latest web standards.
Blazor started off as a project by Steve Sanderson which he presented at the NDC Oslo in 2017. The project was based on Dot Net Anywhere. Since the demo, the project took and experimental form which then culminated in Blazor being rewritten from scratch using Mono, an open source implementation of .NET Framework. There are currently two hosting models or versions of Blazor: Blazor Server Side which was released in September 2019 alongside .NET Core 3.0 and Blazor WebAssembly which was released earlier this year in May. The two hosting models differ so much in the way they communicate to the client and render out the page but it can give you the same user experience - interactive and rich. And rightly, for this reason Blazor projects are quite rightly coined Blazor App. But despite the hosting model you can reuse or even share a lot of your own code between the two hosting models.
Local Development Requirements
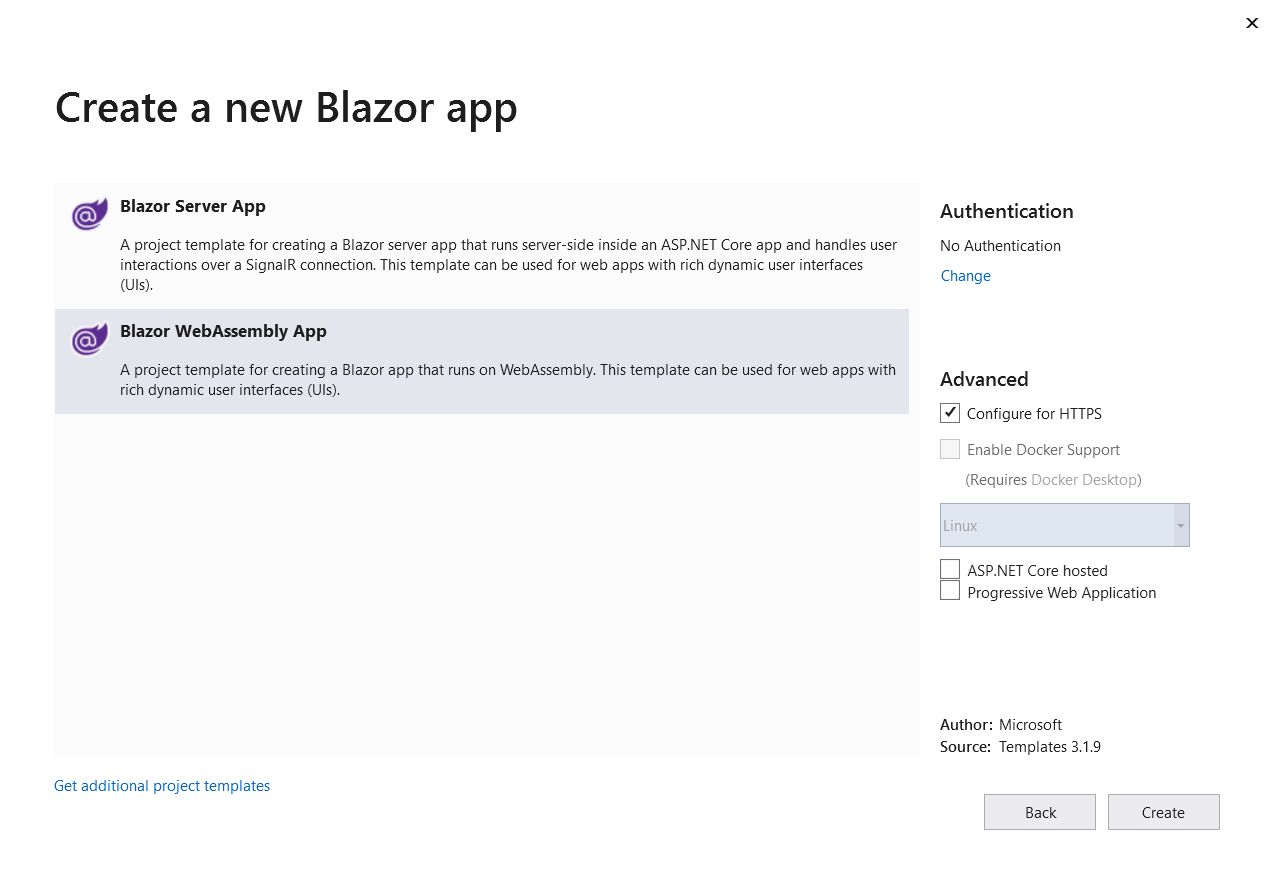
To build Blazor Apps it is always advisable to use the latest Version of Visual Studio 2019. It is also advisable to have the latest version .NET Core on your machine. A File -> New Project on Visual Studio should then give the option to choose a Blazor App template.

Past the configure screen where the project name location details should be entered, Visual Studio will give the option to choose between the two hosting models for your application.
Blazor WebAssembly
The client-side hosting model for Blazor is called Blazor WebAssembly. It uses WebAssembly. According to their website, "WebAssembly (abbreviated Wasm) is a binary instruction format for a stack-based virtual machine. Wasm is designed as a portable compilation target for programming languages, enabling deployment on the web for client and server applications." It is a part of the open web platform and supported by all modern browsers. This is considered the principal hosting model for Blazor.
With Blazor WebAssembly, the Blazor app, its dependencies including the various dlls and the .NET runtime are downloaded to the browser. WebAssembly bootstraps the .NET runtime and helps load the assemblies for the app. The code executed in the browser runs in the browser's JavaScript sandbox to which WebAssembly has access to and makes use of the security it provides against malicious actions on the client machine. All UI updates and event handling occurs on the client. From a hosting perspective this negates the need for a backend ASP.NET Core app as all the assets are deployed as static assets. You can deploy the Blazor App to a CDN, Azure Blob Storage or even host it on GitHub pages. This app is also called a standalone Blazor WebAssembly app.
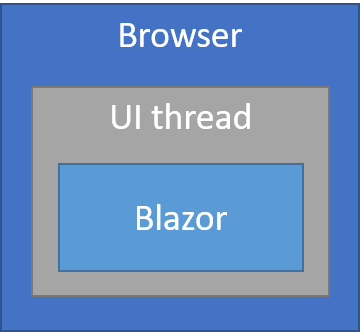
Picture Courtesy : https://docs.microsoft.com/en-us/aspnet/core/blazor/hosting-models?view=aspnetcore-3.1
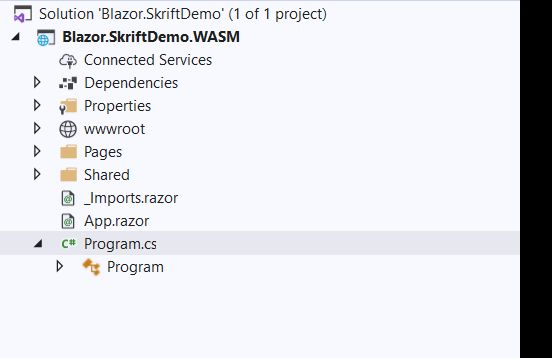
Let us look at the project template available for Blazor WebAssembly. In my example, continuing from the screen to choose the hosting model, I have selected Blazor WebAssembly and I end up with a project structure as shown below.
 The entry point to the app is the
 Program.cs file. This file sets up the WebAssembly host. The root component of the app is also specified. Services are also injected and in this case it's an HttpClient that is injected.
namespace Blazor.SkriftDemo.WASM
{
    public class Program
    {
        public static async Task Main(string[] args)
        {
            //create the web assembly host
            var builder = WebAssemblyHostBuilder.CreateDefault(args);

            //root component
            builder.RootComponents.Add<App>("app");

            //inject the HttpClient Service
            builder.Services.AddScoped(sp => new HttpClient { BaseAddress = new Uri(builder.HostEnvironment.BaseAddress) });

            await builder.Build().RunAsync();
        }
    }
}
The next important file is the App.Razor which is the root component for the app. All the routing is specified in this file. Whenever a user navigates around the app, this component intercepts the request, routes it correctly and renders the requested page.
<Router AppAssembly="@typeof(Program).Assembly">
    <Found Context="routeData">
        <RouteView RouteData="@routeData" DefaultLayout="@typeof(MainLayout)" />
    </Found>
    <NotFound>
        <LayoutView Layout="@typeof(MainLayout)">
            <p>Sorry, there's nothing at this address.</p>
        </LayoutView>
    </NotFound>
</Router>
The wwwroot folder contains all the static assets like css and any imagery used. The folder also contains an index.html file. When the app is requested this page is rendered. This file contains the reference to blazor.webassembly.js which is used to download the .NET runtime, the app and its dependencies.
<!DOCTYPE html>
<html>

<head>
    <meta charset="utf-8" />
    <meta name="viewport" content="width=device-width, initial-scale=1.0, maximum-scale=1.0, user-scalable=no" />
    <title>Blazor.SkriftDemo.WASM</title>
    <base href="/" />
    <link href="css/bootstrap/bootstrap.min.css" rel="stylesheet" />
    <link href="css/app.css" rel="stylesheet" />
</head>

<body>
    <app>Loading...</app>

    <div id="blazor-error-ui">
        An unhandled error has occurred.
        <a href="" class="reload">Reload</a>
        <a class="dismiss">🗙</a>
    </div>
    <script src="_framework/blazor.webassembly.js"></script>
</body>

</html>
Blazor Server
Blazor Server model was the first hosting model of Blazor to be released. And as the name suggests, the app is executed on the server. Usually it is an ASP.NET Core app which hosts the Blazor Server App. Any UI updates and interaction are handled over a SignalR connection. Blazor Server uses UI graph of the components to serve up HTML in response to a request. Every time a user interaction happens this graph is rerendered and the UI difference is recalculated. This diff is the smallest set of amends needed to update the client which is then applied by the browser.
Let us look at the project template in Visual Studio for Blazor Server Side. I added a new project to my solution choosing Blazor App as the template and then selecting Blazor Server App as the hosting model. The project structure is as shown below.
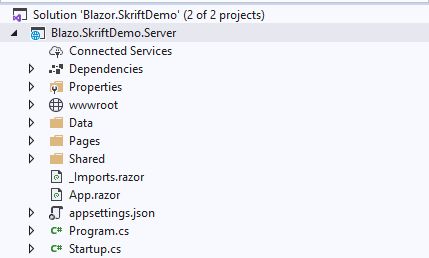
The Program.cs file is again the starting point and sets up the Blazor Server.
namespace Blazo.SkriftDemo.Server
{
    public class Program
    {
        public static void Main(string[] args)
        {
            CreateHostBuilder(args).Build().Run();
        }

        public static IHostBuilder CreateHostBuilder(string[] args) =>
            Host.CreateDefaultBuilder(args)
                .ConfigureWebHostDefaults(webBuilder =>
                {
                    webBuilder.UseStartup<Startup>();
                });
    }
}
The Startup.cs contains the startup logic with some services injected into the DI container. The real-time connection between the browser and server is established using the MapBlazorHub() method. SignalR is used for this.
The MapFallbackToPage("/_Host") method sets up the root of the app.
namespace Blazo.SkriftDemo.Server
{
    public class Startup
    {
        public Startup(IConfiguration configuration)
        {
            Configuration = configuration;
        }

        public IConfiguration Configuration { get; }

        // This method gets called by the runtime. Use this method to add services to the container.
        // For more information on how to configure your application, visit https://go.microsoft.com/fwlink/?LinkID=398940
        public void ConfigureServices(IServiceCollection services)
        {
            services.AddRazorPages();
            services.AddServerSideBlazor();
            services.AddSingleton<WeatherForecastService>();
        }

        // This method gets called by the runtime. Use this method to configure the HTTP request pipeline.
        public void Configure(IApplicationBuilder app, IWebHostEnvironment env)
        {
            if (env.IsDevelopment())
            {
                app.UseDeveloperExceptionPage();
            }
            else
            {
                app.UseExceptionHandler("/Error");
                // The default HSTS value is 30 days. You may want to change this for production scenarios, see https://aka.ms/aspnetcore-hsts.
                app.UseHsts();
            }

            //redirect HTTP to HTTPS
            app.UseHttpsRedirection();

            //static file serving enabled
            app.UseStaticFiles();

            app.UseRouting();

            app.UseEndpoints(endpoints =>
            {
                //set up the Blazor Hub endpoint to establish SignalR connection
                endpoints.MapBlazorHub();

                //Map the fallback page to Pages/_Host.cshtml
                endpoints.MapFallbackToPage("/_Host");
            });
        }
    }
}
The /_Host is a reference to the _Host.cshtml file which resides in the Pages folder. This file is similar to the index.html in the WebAssembly. Upon initial request of the app this page is rendered. This file specifies the JavaScript file to set up the SignalR connection. It also specifies the root component App. The App component performs the same functionality as in the WebAssembly version, setting up the client-side routing.
There is also a wwwroot folder which holds the static assets but unlike the WebAssembly version there is no index.html file.
The Pages folder are similar in both versions and contains the Razor components and pages. The Shared folder contains the MainLayout and Navigation. There is also the _Imports.razor where you can specify all the namespaces or directives to include in the app components.
@page "/"
@namespace Blazo.SkriftDemo.Server.Pages
@addTagHelper *, Microsoft.AspNetCore.Mvc.TagHelpers
@{
    Layout = null;
}

<!DOCTYPE html>
<html lang="en">
<head>
    <meta charset="utf-8" />
    <meta name="viewport" content="width=device-width, initial-scale=1.0" />
    <title>Blazo.SkriftDemo.Server</title>
    <base href="~/" />
    <link rel="stylesheet" href="css/bootstrap/bootstrap.min.css" />
    <link href="css/site.css" rel="stylesheet" />
</head>
<body>
    <app>
        <component type="typeof(App)" render-mode="ServerPrerendered" />
    </app>

    <div id="blazor-error-ui">
        <environment include="Staging,Production">
            An error has occurred. This application may no longer respond until reloaded.
        </environment>
        <environment include="Development">
            An unhandled exception has occurred. See browser dev tools for details.
        </environment>
        <a href="" class="reload">Reload</a>
        <a class="dismiss">🗙</a>
    </div>

    <script src="_framework/blazor.server.js"></script>
</body>
</html>
Components
Components are the basic building blocks of Blazor Apps. They are standalone blocks of UI such as pages, forms etc. They are called Razor Components in Blazor and are implemented using Razor component files with .razor extension. Component names must begin with an uppercase letter. Skriftdemo.razor is valid but skriftDemo.razor is invalid. Components are very versatile. They can respond to user interactions, bind data from a model, can be nested and communicate with each other and even call JavaScript functions using JavaScript interoperability.
Razor components are compiled in to partial C# classes of the same name as the file. If you look at some of the Razor Components in the Pages folder of the project they have a @page directive. This suggests to Blazor that there is a route template for the component. When such components are compiled, the generated class gets a RouteAttribute with the route template specified. When the app is requested the router tries to find a match amongst the component classes and return the match.
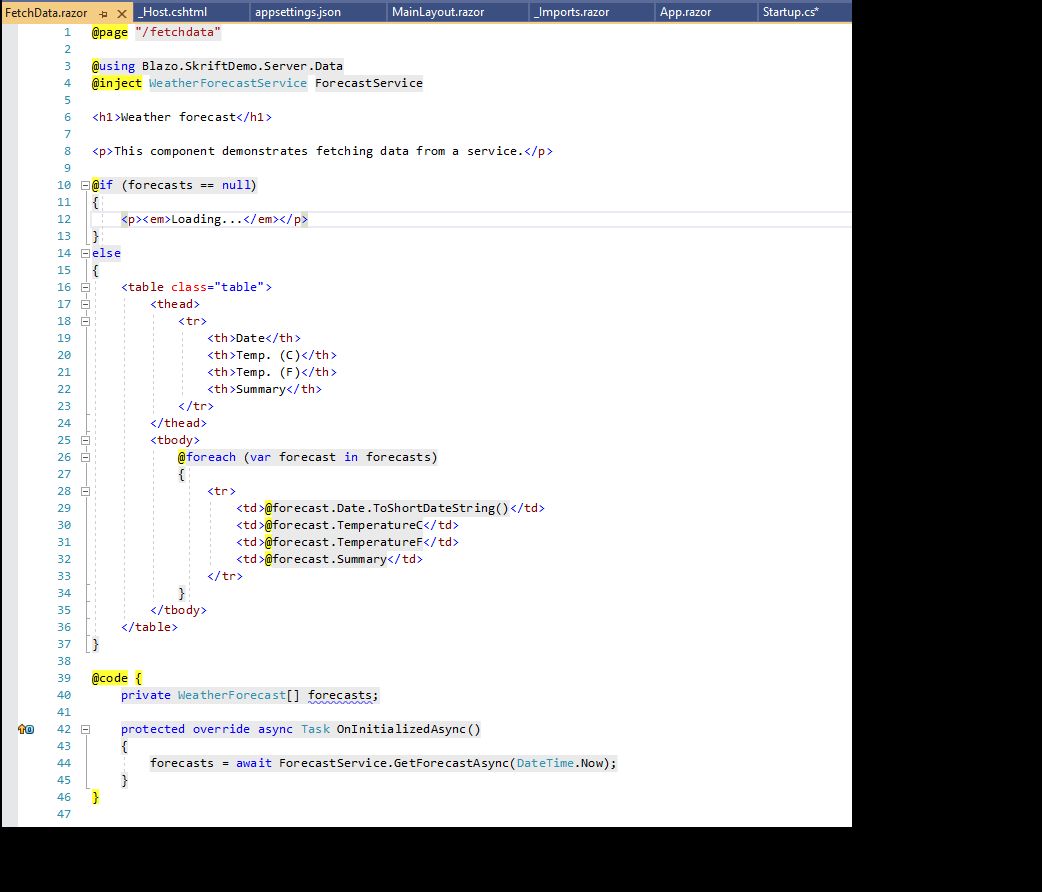
This is a screenshot of the FetchData.razor component which is part of the template. As you can see there is a @page directive with the route specified as /fetchdata. This means you can request this page via the url /fetchdata. If you are familiar with Razor the code will look very familiar to you. The component uses HTML and Razor for UI. You might also have noticed a @code block with some members. As I said earlier, Razor components are compiled into component classes and the @code block is used to define any members, properties, methods for the class. In the above example a private field forecasts have been specified. The method OnInitializedAsync is a lifecycle method of a component which is invoked when a component is initialized.
Let's get started on creating a component. I am going to create a little component that helps me query whether a given latitude and longitude is on land or water. I am going to use a third-party API On Water for this. The API supports a HTTP GET operation passing in comma separated values for latitude and longitude along with a access token and returns a result which tells you whether the co-ordinates are in land or water. I am using a free version of the API which has a rate limit of 15 requests every minute.
Request HTTP GET : https://api.onwater.io/api/v1/results/[latitude],[longitude]?access_token=[your_token]
Response
{
  "query": "42.35,-71.1",
  "request_id": "8c2f5f7d-0fce-4e31-bd7c-27fce7f6e092",
  "lat": 42.35,
  "lon": -71.1,
  "water": false
}
To begin with I need an interface IGetWhereAmIService and its implementation GetWhereAmIService. This implementation has a method which makes the GET request to the API.
namespace Blazor.SkriftDemo.WASM.Services
{
   public interface IGetWhereAmIService
    {
        Task<WhereAmIResponseModel> GetWhereAmI(string latitude, string longitude);
    }
}
Its ASP.NET Core which ships with Dependency Injection, so I need to register my interface and its implementation to the the DI container. This is done in the Program.cs file. The final code is below.
namespace Blazor.SkriftDemo.WASM
{
    public class Program
    {
        public static async Task Main(string[] args)
        {
            //create the web assembly host
            var builder = WebAssemblyHostBuilder.CreateDefault(args);

            //root component
            builder.RootComponents.Add<App>("app");

            builder.Services.AddHttpClient<IGetWhereAmIService, GetWhereAmIService>();

            await builder.Build().RunAsync();
        }
    }
}
I have made a few changes to the default Program.cs, the first one being getting rid of the HttpClient service. This class has many issues and to overcome that Microsoft suggests the use of IHttpClientFactory. This interface helps inject the problematic HttpClient through DI and dispose them off safely. Specifically speaking it is the HttpClientHandler which the HttpClient uses the real issue. Even if the HttpClient is disposed off the HttpClientHandlers can still lie around causing socket exhaustion. The HttpClientFactory monitors the handlers in the background and ensures they are disposed off properly.
To use the inteface in my project I need to install the Microsoft.Extensions.Http Nuget package. I then use what Microsoft calls the Typed Clients using the AddHttpClient() extension method. Typed Client is a class that accepts a HttpClient object. The HttpClient instance could include values such as HTTP headers, base url, timeout etc.
builder.Services.AddHttpClient<IGetWhereAmIService, GetWhereAmIService>();
The above code registers the typed clients. With the above usage a standard HttpClient is made available for my typed client(service) but the problematic HttpMessageHandler is better monitored and disposed off by the HttpClientFactory. The HttpClient is injected to the typed client using Dependency Injection. And my typed client looks like below.
namespace Blazor.SkriftDemo.WASM.Services
{
    public class GetWhereAmIService : IGetWhereAmIService
    {
        private readonly HttpClient _httpClient;

        public GetWhereAmIService(HttpClient httpClient)
        {
            _httpClient = httpClient;
        }

        public async Task<WhereAmIResponseModel> GetWhereAmI(string latitude, string longitude)
        {
            var requestUrl = string.Format($"https://api.onwater.io/api/v1/results/{latitude},{longitude}?access_token=ukb6edPsm6gY6TpajZ7j");

            return await JsonSerializer.DeserializeAsync<WhereAmIResponseModel>(await _httpClient.GetStreamAsync(requestUrl));
        }
    }

}
The returned JSON is deserialized to an instance of the class shown below. Whether the given latitude and longitude is on land or in water is determined the boolean IsWater
namespace Blazor.SkriftDemo.API.Model
{
    public class WhereAmIResponseModel
    {
        [JsonPropertyName("query")]
        public string Query { get; set; }

        [JsonPropertyName("request_id")]
        public string RequestId { get; set; }

        [JsonPropertyName("lat")]
        public decimal Latitude { get; set; }

        [JsonPropertyName("lon")]
        public decimal Longitude { get; set; }

        [JsonPropertyName("water")]
        public bool IsWater { get; set; }
    }
}
This completes my service. Now I can start thinking about my component. In the project template examples C# code is placed into the Razor component using the @code directive. But in real world examples you might not want to do that. Razor components, as I said earlier, are compiled into partial classes. So I can extend this partial class to include our C# code.
Lets start with the partial class first. I want my component to be called WhereAmI.razor. The partial class must have the same name so I create a partial class WhereAmI and put it in a new folder called Components. The idea is that all components I create will live in this folder. My component needs fields to capture the inputted latitude and longitude, so I create two private string fields Latitude and Longitude. I also need a method which will communicate to my service. So I create a method called CheckWhereAmI. This method takes the value from the private fields and passes it on to my service. My service returns a WhereAmIResponseModel, so I also need a field to store the response. I have a private field for this called _whereAmIResponse. Finally I also need to inject my service IGetWhereAmIService into my partial class. I need a private field of type IGetWhereAmIService for this. And I use the [Inject] attribute which injects the service into my class.
namespace Blazor.SkriftDemo.WASM.Components
{
    public partial class WhereAmI
    {
        [Inject]
        private IGetWhereAmIService getWhereAmIService { get; set; }

        private string Latitude;

        private string Longitude;

        private WhereAmIResponseModel _whereAmIResponse;

        private async Task CheckWhereAmI()
        {
            _whereAmIResponse = await getWhereAmIService.GetWhereAmI(Latitude, Longitude);
        }
    }
}
Now I can start thinking about the UI of my component. I need two text fields that can be used by users to input the latitude and longitude. I also need a submit button to submit the data and communicate with the service. But how do we wire up the UI to the partial class so that we can get it functional? In comes data binding and event handling!
Razor components provide two-way data binding using an attribute named @bind on HTML elements. This attribute can bind with a field, property or expression value. So in our case the two text inputs will bind with the fields Latitude and Longitude. Since our HTML elements are input text fields the @bind attribute binds the field with the value attribute. The binding to the fields happen when the HTML element loses focus.
Razor components also provide event handling features. An attribute named @on{EVENT} can be specified on an HTML element and the value of the attribute will be treated as the event handler. In my case I have specified an @onclick attribute on the button and specified a value CheckWhereAmI. So the CheckWhereAmI method in my partial class will be treated as an event handler for the button click event.
We can also specify optional event arguments to event handlers to gain more information about the event that happened. For eg, we might want to know about the key that was pressed when we input a field. We can make use of the KeyboardEventArgs as an event parameter to the event handler which handles a onkeypress or onkeyup or onkeydown event. A full list of event arguments can be found here.
I also need to show the result to the end user. I use the _whereAmIResponse field which I have defined in the partial class for this. The field will be null to begin with but once the input values and the button clicked it gets populated by the value returned from the service. I can query the boolean IsWater to check whether the input latitude and longitude are in water or on land.
<h1>Where am I?</h1>

<div class="row">
    <div class="form-group">
        <label for="Latitude">Latitude</label>
        <input type="text" class="form-control" @bind="@Latitude" name="Latitude" id="Latitude" />
    </div>
</div>
<div class="row">
    <div class="form-group">
        <label for="Longitude">Longitude</label>
        <input type="text" class="form-control" @bind="@Longitude" name="Longitude" id="Longitude" />
    </div>
</div>

<div class="row">
    <button class="btn btn-primary" @onclick="CheckWhereAmI">Check where am I</button>
</div>

@if (_whereAmIResponse != null)
{
    <div class="row">
        @if (_whereAmIResponse.IsWater)
        {
            <h2><em>I am in water!</em></h2>
        }
        else
        {
            <h2><em>I am on land!</em></h2>
        }
    </div>
}
Now I have my component ready it's time to put it on a page and test it. I want to put it on the Index.razor file. As mentioned above my component live in the Components folder and the partial class for my component will live in the Blazor.SkriftDemo.WASM.Components namespace. I want this namespace to be available across all my pages and may be even other components going ahead so I am going to add this namespace to the _Imports.razor file with a @using statement as shown below. This file can be used include all common namespaces which are available across all Razor components.
@using Blazor.SkriftDemo.WASM.Components
Now I can go to the Index.razor file and include my component there. Including the component can be done by declaring them in the format of an HTML tag where the tag name is name of the component type. In my case it will be WhereAmI
@page "/"

<div class="container">
    <WhereAmI></WhereAmI>
</div>
A little demo of my application:
Re-using the code in a server-side Blazor application
I have spoken in length about the Blazor WebAssembly and creating components. But it will be nice if we can re-use component in a Blazor Server Side application or even create components that can be shared across many Blazor applications - server side or WebAssembly. I think this is going to be a common scenario in the real-world. So let us have a look at how we can achieve that.
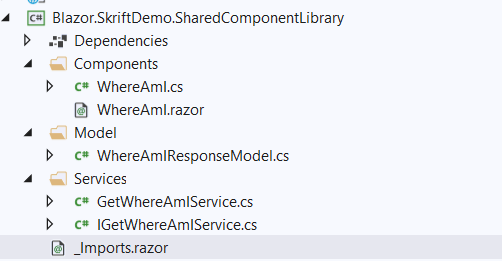
I already have a Blazor Server project called Blazor.SkriftDemo.Server added to my solution. I want to make my component a shared component. So I am going to move all the code associated with it to a newly created Razor Class Library project called Blazor.SkriftDemo.SharedComponentLibrary. This includes the following
- Components folder which contains my component
WhereAmI.razorand the partial classWhereAmI.cs - Services folder which contains my service
IGetWhereAmIServiceand its implementationGetWhereAmIService - My model
WhereAmIResponseModel.cswhich is in the Models folder
My project structure looks as shown below. Once this is in place I can add a project reference to this project from my Blazor server-side project.
The Razor Class Library project has no dependencies configured. I still have to specify my service and its implementing type. This is done in the StartUp.cs file of the Blazor server-side project. I have also installed the Microsoft.Extensions.Http Nuget package to inject HttpClient into my service.
services.AddHttpClient<IGetWhereAmIService, GetWhereAmIService>();
As with my WebAssembly project I want to show my component again on the Index page. Using a component on a Blazor server-side project page is no different from using it in a Blazor WebAssembly project. You can use the component name as a HTML tag after adding a reference to its namespace. So my Index.razor file ends up as shown below.
@page "/"
@using Blazor.SkriftDemo.SharedComponentLibrary.Components


<div class="container">
    <WhereAmI></WhereAmI>
</div>
Note that unlike Blazor WebAssembly project where I added the namespace into the _Imports.razor file I added it to the page itself here. This is purely to demo that this can be done too.
Below is a little demo of my server-side app. It's no different from the WebAssembly app.
Comparision of the hosting models
Blazor WebAssembly, as I said before, has no .NET server-side dependency. All the dependencies are downloaded to the client and all the client resources and capabilities are leveraged. Browser does all the heavy-lifting. But this becomes its downside as well. For large apps the download size is larger and they could take longer to load giving a poor experience to the user. Since it completely runs on the client, it requires modern browsers with WebAssembly support. And being a newer technology, the tooling is less mature and some of the capabilities of .NET are still not supported on Blazor WebAssembly.
Blazor server-side has a significant smaller download size than Blazor WebAssembly app making it load much faster. The app runs on the server and takes full advantage of the server capabilities. .NET tooling for Blazor server app is fully supported and works on client that do not support WebAssembly as well. But the hosting model has its drawbacks too. Every user interaction needs a network hop and causes some latency. There is no offline support which means that if client connection fails the app stops working. Scalability is another concern. In a Blazor server-side app each browser tab which requests the app uses a new SignalR connection to the server. This means the server has to manage multiple client states gracefully.
Hosting
Blazor WebAssembly apps run on the client browser completely and it negates the need for a ASP.NET Core web server. It can be hosted on a CDN. It is fully functional and supported on Azure Static Web Apps too.
Blazor server-side apps can be hosted on an ASP.NET Core Server. Serverless scenario is not possible. Microsoft recommends hosting Blazor server-side apps as a SignalR service on Azure for optimal performance.
Both hosting models have Docker support. Docker support can be added while creating the project or by Right-clicking the project in Solution Explorer and selecting Add-> Docker Support.
Resources
- Official Microsoft Documentation for Blazor https://docs.microsoft.com/en-us/aspnet/core/blazor/?view=aspnetcore-3.1
- Blazor, a new framework for browser-based .NET apps - https://www.youtube.com/watch?v=Khn7sDUSEJM
- Sample Code Repo https://github.com/poornimanayar/Blazor.SkriftDemo