
For the first time in history, this year's edition of Codegarden, the annual conference organized by Umbraco in their hometown Odense, featured a half-day hackathon and I had the chance to co-host it with Sebastian Janssen, aka Umbraco HQ's master of pull requests.
"What's the big deal?" you might ask? Well, that alone is indeed not worth a full featured article, but part of what we put in place to make it enjoyable and a little more entertaining than usual for the participants might well be.
Before going further, it is worth telling that I have been part of one of Umbraco's community teams, the core collaborators team, for several years now. This is a team composed of a few selected community members and one Umbraco HQ steward (yes you guessed it: Sebastiaan!). Those people are mainly responsible for reviewing, commenting and eventually merging the contributions of the community members into the Umbraco CMS code-base.
Umbraco is indeed well aware that one of the challenges of an open-source project is to keep its contributors motivated and enthusiastic about participating to the maintenance and evolution of its code-base. And the daily activities of the core collaborators team are a noticeable expression of that continuous care and attention. But there are also some punctual occasions to embrace things slightly differently, and this article sets the focus on one of them.
Rewinding a few months back, when Umbraco released the Codegarden 23 agenda, I discovered the planned half-day hackathon. I was very excited about it and I reached out to our steward Sebastiaan to tell him that I was available to bring some help around it.
As I already mentioned, I ended up co-hosting the hackathon with him but, more importantly for the scope of this article, Sebastiaan mentioned that he wanted to find a way to add some fun to the event, in order to motivate and attract more people. So, he asked me if I would have time to put together some gimmick based on an article that he had been reading a while ago. After reading the article myself, I thought it was a great and original idea, so I told him I would gladly help him with that.
This article describes the technical aspects of the gimmick that we put in place: The Umbraco Hackathon Issue Receipt Printer. And, beyond that, it will also illustrate the fact that this solution could be integrated without too much trouble within any hackathon or event, but also even on the workplace. Because who would not want to have some fun and entertainment at their workplace as well, right 😁?
Printing Issue Receipts
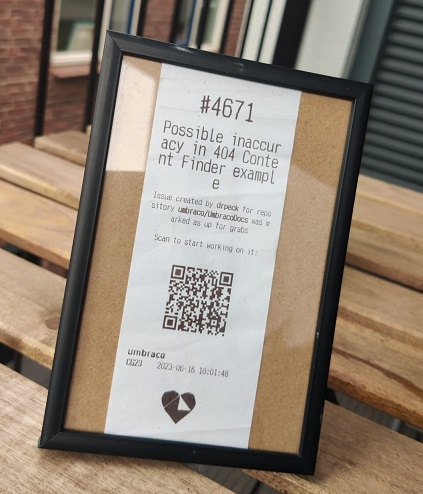
So what is this all about? Well, the global idea of the gimmick was to print a kind of receipt during the hackathon whenever an issue in the Umbraco issues tracker would get labeled with a specific "up-for-grabs" label. And that ticket would then be handed-out to the first participant claiming it.
While not being too complex or too heavy to put in place, it was interesting because it allowed adding some dynamism and interaction amongst the participants and also with the co-hosts, since the participants had to come to the stage and claim their ticket to be able to get started. Also, another objective was that they would be able to keep something tangible from their contributions during the hackathon, something which is not feasible the rest of the time when we are interacting online.
As expected (or should I say "hoped"?), this was very well appreciated by everyone. Some participants asked us if we could share the code (here it comes!!), some even framed their ticket as souvenir. Needless to say that this will be worth a fortune in a few years 😀
The Technical Challenges
In order to get all things working smoothly, there were a few technical caveats that Sebastiaan and I had to cope with or take into account, both on the programming aspects and on the infrastructure at hand. This section describes and explains our choices for the most important ones.
How do we know we need to print something?
We wanted to print a receipt out whenever an issue would get labeled with a specific "up-for-grabs" label. So, the obvious first question was: How do we know an issue got labeled and needs to be printed? The answer depends of course on the system that you use for tracking your issues. In the case of Umbraco, issues are maintained in their GitHub issues tracker and therefore we decided to create a GitHub Webhook that would call an API of ours to push notifications whenever an event would happen on an issue.
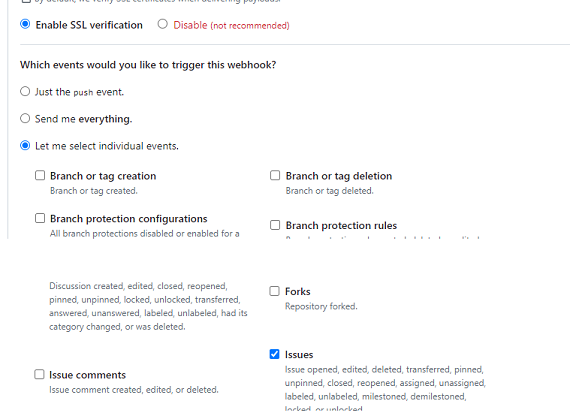
This is the most fine-grained we could get in the Webhook definition itself, but this was too generic for our case, so we ended up adding some extra filtering logic in our API code.
The big advantage of this implementation is that we would automatically get notified when something worthwile was happening. No need to build some kind of scheduled service to monitor issues activity via the GitHub API every minute or so, our service would perform its work only if relevant changes needed to be processed.
Also, missed calls from the Webhook are actually logged in GitHub and could be replayed if anything would not run as expected.
How do we get the ticket printed out?
Once we knew how to get notified about worthwhile changes in the issues tracker, the next tricky part was to decide how we would print the information out. We wanted a physical ticket being printed and it had to be the size of a restaurant receipt in order to keep it both handy and fun. Also, we did not want (nor had time) to learn writing POS commands and our budget was limited. To summarize, we needed to find an inexpensive receipt printer that would have a developer-friendly API.
Luckily, we found one which ticked all the boxes, the HCC-POS58D---WIFI Printing 58MM ESC/POS Thermal Receipt Printer from company Shenzhen HCC Technology in case you might be interested.
How do we get this working in a conference environment?
Now that we had proudly solved our soft/hardware questionings, came the other fun part of making sure that this would actually work within the infrastructure at hand during Codegarden.
Since this was built as a gimmick for the hackathon, we did not want to invest too much time or money in setting up a hosting environment or any similar infrastructure, and we decided to run all this from our laptops.
But wait! While having a Webhook calling our own API sounds so cool, how do we make those two talk to each other when the Webhook is somewhere out there and our API runs on my laptop connected to the (private) Wi-Fi network of the conference, with no DNS, no fixed IP and certainly no way to get direct external access to any of this?
The good news is that there exist software solutions like ngrok, which describe themselves as a "simplified API-first ingress-as-a-service that adds connectivity, security, and observability to your apps in one line".
Basically, you download a tool that you can run on (one of) your local running http(s) ports and it then creates a kind of unique Guid-like public DNS mapping/proxy to that specific port.
All the details can be found on their website: https://ngrok.com/. This is the solution we went for, but there are certainly other alternatives.
Of course, this means that each time you start the ngrok tool again, you get a new API-proxy URL that you need to update into your Webhook, but this was really not an issue for our setup.
A similar, yet somewhat smaller, concern could be made about the interaction with the printer. For this, the solution was quite simple, as the printer we had found featured both physical USB and Wireless Wi-Fi connections. While we would preferably go for the Wi-Fi option because it allowed us to put the printer anywhere in the room (handy as we did not know how we would set things up), we would still have a direct laptop-printer connection backup through the USB port if needed.
Putting it all together
Before leaving this section, let's have a quick look at how we ended up setting things up on stage.
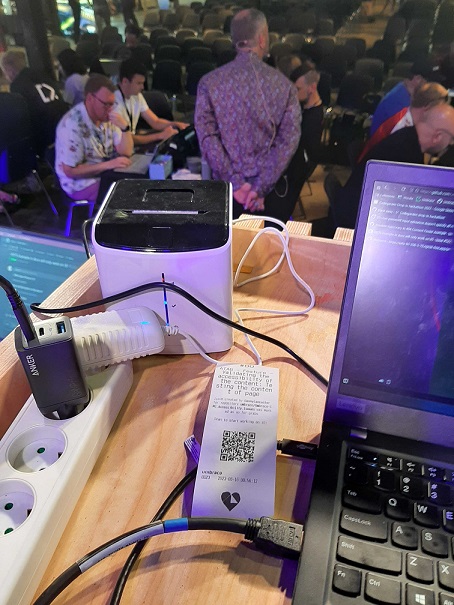
We eventually decided to connect the printer directly to the laptop via its USB port because we had enough space to put it on the stand and because it removed the risk of Wi-Fi connection glitches.
The code
Finally we get there! Let's now have a look at how all of this was implemented! In this chapter, I will focus on discussing the major points of interest or attention, but the full source code of the solution is available for you to get and try out on the following GitHub repository: https://github.com/mikecp/UmbracoHackathonTicketPrinter. The readme.md file contains all the steps needed to be able to run the solution end-to-end.
The big picture
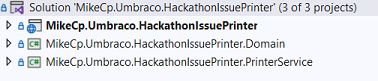
There are two main projects, MikeCp.Umbraco.HackathonIssuePrinter which contains the API that will capture the GitHub Webhook calls and trigger the requests to print, and then MikeCp.Umbraco.HackathonIssuePrinter.PrinterService which is the library to interact with the physical printer. We also have the rather small, but interesting nevertheless, project MikeCp.Umbraco.HackathonIssuePrinter.Domain which we will briefly discuss later.
MikeCp.Umbraco.HackathonIssuePrinterService
I will start with this project without elaborating too much because it handles the printing of the ticket on the physical printer and it is therefore completely depending on the printer that has been chosen. I probably did, however, spend most of my time working on this part, experimenting on API calls and ticket layouts.
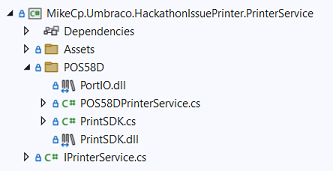
For those interested by our hackathon setup, we used the printer HCC-POS58D as mentioned earlier. It had all the features we needed and provided an API to interact with, as illustrated in the snippet below.
public void Print(IssueDocument issue)
{
    ...

    PrintSDK.CON_PageStart(_printerId, false, 0, 0);
    PrintSDK.ASCII_CtrlReset(_printerId);

    // Global alignment is centered
    PrintSDK.ASCII_CtrlAlignType(_printerId, AlignType.ALIGN_CENTER);

    // Print Issue Id
    PrintSDK.ASCII_CtrlCharSize(_printerId,3, 3);
    PrintSDK.ASCII_PrintText(_printerId, $"#{issue.Id}\r\n\r\n");

    ...
}
You can see the full result in the class POS58DPrinterService. Hopefully, the code to print the receipt will indeed look relatively straightforward thanks to that API.
The rest of the project is mainly an import of the API library from the printer vendor and some helper classes to interact with it. There is also an Assets directory containing the images printed on the receipt.
MikeCp.Umbraco.HackathonIssuePrinter
Since this was kind of a "lab" project, I decided to try some of the features from the latest versions of .Net and I went for a micro-API implementation (I think the official name is minimal API). This approach was in fact inspired by a session presented by Poornima Nayar that I watched earlier in the year.
Why minimal? Because this part is composed of one short Program.cs file where everything is defined and run. How more microscopic can it get?
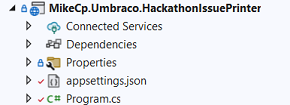
Before jumping into that file, let us first have a quick look at the appsettings.json file in which we define some needed configuration information. OK I lied, it is two files 😅
The two interesting sections are the Github and the Printer ones.
  "GitHub": {
    "LabelsToProcess": [ "community/up-for-grabs" ],
  },
  "Printer": {
    "USB": "USB1",
    "IP": "192.168.0.188:9100"
}-
GitHubLabelsToProcesscontains the list of labels that we actually want to proceed with. Remember that the GitHub Webhook can only be finegrained to sending events that are Issue specific? This list enables us to filter and handle only changes around the labels specified.
-
PrinterUSBcontains the name of the USB port that the printer would be connected to in case of direct printer-laptop connection.IPcontains the current IP address of the printer when connected to the network.
One point to draw your attention to, is the fact that the USB and IP settings are mutually exclusive and that the IP value will prevail the USB value if both are provided. You can see this when opening a connection to the printer in the project
HackathonIssuePrinterService:
var portName = _config.IP ?? _config.USB ?? string.Empty;Now that this has been said, let's go back to the file Program.cs. It starts with the creation of the API and then the build of the configuration.
var builder = WebApplication.CreateBuilder(args);

// Add services to the container.
// Learn more about configuring Swagger/OpenAPI at https://aka.ms/aspnetcore/swashbuckle
builder.Services.AddEndpointsApiExplorer();
builder.Services.AddSwaggerGen();

var config = builder.Configuration;

var app = builder.Build();

...

var githubConfig = config.GetSection("GitHub").Get();
var printerConfig = config.GetSection("Printer").Get();
Then, we declare our API endpoint and we start running the API. The "inline" declaration of the endpoint requires to specify the verb to use, the endpoint pattern and then a Delegate taking the expected parameter type (in our case a class compatible with the GiHub Issue Event model) and providing the actual logic to run. This is very compact again.
app.MapPost("/printGitHubLabeledIssueTicket", (GitHubIssuesService.LabeledIssueDto payload) =>
{
    var labelsToProcess = githubConfig.LabelsToProcess;

    // Make sure it is a trigger we want to handle before printing
    if ("labeled".Equals(payload.Action, StringComparison.OrdinalIgnoreCase) &&
        "open".Equals(payload.Issue.State, StringComparison.OrdinalIgnoreCase) &&
        labelsToProcess.Contains(payload.Label?.Name.ToLowerInvariant() ?? string.Empty)
        )
    {
        // We proceed to print
        var issue = GitHubIssuesService.DtoToRecord(payload.Issue);
        using (var printer = new POS58DPrinterService(printerConfig))
        {
            printer.Print(new
                             (issue.Number.ToString(),
                             issue.Title,
                             string.Empty,
                             issue.Repository,
                             issue.User,
                             issue.Url
                             ));
        }
    }
})
    .WithName("PrintGitHubLabeledIssueTicket");

app.Run();
Note that the WithName statement at the end of the endpoint definition is where we define the endpoint name to the outside world.
Looking at the logic we needed to implement, it is quite short:
- We check some constraints that could not be performed by the Webhook: the issue needs to be open, the actual reason of calling is that a label was added to it and that label has to be present in our configured list of labels to process.
- If the Issue passes the test, then we call our printer service with the appropriate data to get our issue receipt printed out.
With this in place, whenever someone adds the label "community/up-for-grabs" to an open issue in the Umbraco repository, we will trigger the printing of a ticket. And yes, if you remove the label and put it again, you will get a second ticket printed out 😉
This was not an issue for our setup, but it is perfectly possible to put things in place to store which issues were already printed out and avoid duplicate outputs if necessary.
Going further
This wraps up the description of our Codegarden Hackathon Issue Receipt Printer setup. As you could see, one of our main challenges was to identify all the pieces that we needed and then put them all together into something working and robust enough to run and adapt to the potential infrastructure caveats. And once identified, it was actually not too complex to implement and get each of them running.
In the previous chapters, I have focused on the attention points of each part so that, hopefully, you would be able to use the code provided and know where to adapt it to your needs. With that in mind, I would like to mention now some potential extension points.
Adapt to your Issues maintenance tool
It might sound obvious, but it is relatively easy to adapt the API to support other code repositories than GitHub.
If your code-base repository supports Webhooks, or any other means to call a REST API endpoint, the only part that would need to change is the API endpoint implementation. The Type of the endpoint input parameter would differ, and therefore the way you filter on it and map it to the printer input would have to be adapted. The rest could be used as-is.
If your code-base repository does not support Webhooks or similar technologies, it will probably have an API that you can interact with. There would then be quite some more work to get it working, because you would need to implement some kind of recurring task for fetching data through the API and then processing it. But the printing mechanism would remain similar.
You can actually find a very basic version of this approach in the project MikeCp.Umbraco.Hackathon.IssuePrinter.Domain, more specifically in the file GitHubIssuesService.cs.
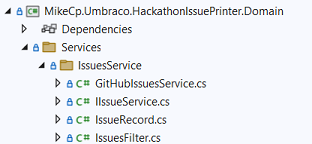
That file contains the definition of some GitHub specific base classes used in our micro-API and also a class encapsulating the calls to the GitHub API to get a list of issues. This class is then used in a second endpoint defined in our micro-API, which can be triggered through a Get call.
app.MapGet("/printIssuesTickets", async (string? label, DateTime? createdSince) =>
    {
        var issuesService = new GitHubIssuesService(githubConfig);

        var issues =  (await issuesService.GetIssues(new IssuesFilter { Labels = new[] { label ?? string.Empty }, CreatedSince = createdSince ?? DateTime.Now })).ToList();

        if (issues?.Count() > 0)
        {
            ... // Similar logic to print each issue returned
        }
    })
    .WithName("PrintIssuesTickets");
I will not elaborate further on this part since we did not effectively used it, but the resources provided can be a starting point to build something that would call the Get API endpoint on regular basis in order to print newly updated Issues.
Have multiple triggering sources
Since we have basically built an API enpoint, it can by design be called from anywhere. In fact, nothing prevents you from having multiple Webhooks calling that same endpoint, so that you can print all your issues tickets on a single printer.
GitHub makes it even very easy. We originally created the Webhook to run only on the Umbraco-CMS repository. Then, while testing the setup at Codegarden, I mentioned to Sebastiaan that Webhooks could be configured to run at repository level but also at company level. A few clicks later, we were able to print Issue receipts from any Umbraco GitHub repository.
Alternatively, if you have code-bases in different systems, you could create a specific endpoint for each of them and keep all the rest identical.
Handle multiple type of data or events
You can of course adapt the filter and conditions for printing to any kind of needs: different types of data, different types of events, etc.
Choose the output you want
This is the part where you can let your imagination wander 😁
We chose a receipt ticket printer as output for our hackathon, but any kind of output is in fact possible!
One point of interest that I did not mention yet resides in the project MikeCp.Umbraco.HackathonIssuePrinterService. It is the file IPrinterService.cs, which contains the definition of a quite generic IssueDocument class and an interface IPrinterServiceInterface.
public record IssueDocument
(
    [Required] string Id,
    [Required] string Title,
    string Details,
    [Required] string Source,
    [Required] string Author,
    [Required] string Link
);

public interface IPrinterService
{
    string PrinterType { get; }

    void Print(IssueDocument issue);
}
If you have a look at the class POS58DPrinterService that we use to print the ticket, it implements that interface.
This means that it should be possible to adapt our endpoint logic and use dependency injection of the IPrinterService interface into our API endpoint. This way, the endpoint would not depend on our specific printer class, but it would automatically adapt to whatever IPrinterService implementation you would configure in the dependency injection engine.
Even further than that, you could provide several implementations of the interface, register them all into the dependency injection engine and then trigger them all at once!
I did not have time to try this out prior to the publication of the article, but if I have time in the coming weeks, I will update the code to integrate that IPrinterService interface.
Now it's time to play!!
Enough said and written, now it is time for you to start imagining what you could do with all this!!
This article was primarly focused on explaining the technical solution that we have put in place for the Codegarden 23 hackathon, but I also tried to emphasize on the perspectives behind our choices, and to highlight alternatives or extension possibilities that might better apply to other situations.
The code is available on Github for you to try out and play with (and maybe contribute, we are published during Hacktoberfest!), and it could serve as starting point for some gimmicks for your next hackathons, events or even at work! Of course, if you have questions about our implementation, I will gladly answer them.
Also, as I described, the fun is not limited to printing out tickets, it is extendable to whatever original idea might come to your imagination: sending emails or text messages, playing sounds, dimming or blinking office lights, or all of this at once! I actually have some nice idea's to submit to Sebastiaan for next year's Codegarden hackathon 😉
In any case, if you do put something in place based on this article, I would be more than happy to hear about it.
Have fun!!
References
Here are a few references:
- Original article that inspired us: I built a receipt printer for GitHub issues by Andrew Schmelyun
- Souce code of the Umbraco Hackathon Issue Receipt Printer on GitHub
- Umbraco Community Teams page https://community.umbraco.com/learn-about-the-community/community-teams/