
Alexa is the cloud based, natural voice service from Amazon. With Alexa, you can create natural voice experience apps, quizzes, games and even chatbots. It's an intuitive way of interacting with technology - using natural spoken language, and once you are past the learning curve, developing for Alexa can be quite fun.
In December 2019 Umbraco HQ introduced "Umbraco Heartcore", the headless CMS. With Umbraco Heartcore, all your content, media etc are exposed via a REST API. Your CMS acts as a data storage for your structured content and the API is managed for you, which means developers no longer need to spend time keeping the API up-to-date. And being a REST API, it can be used to power any front-end - from websites to even IOT devices.
In this article, I will make an attempt at using Heartcore as a data store to my Alexa Skill.
I come from India. Talk about my home country and you just cannot not talk about spices. Spices might be "the ingredient which adds taste and aroma to your food" but they have a variety of uses from cleaning to being used in quick home remedies. So I have designed a Custom Alexa Skill called "Spice It Up" which gives a random fact about spices to the users. All the "facts" are stored in Umbraco Heartcore and my Alexa Skill will give out one randomly picked fact to the user. In addition to the "spice facts" I also store some messaging and images on Heartcore.
Umbraco Heartcore Set Up
Let's start off by looking at the Heartcore set up. I have set up a project in the Umbraco Cloud Portal. More information on how you can set up a trial project can be found here. Although there are some differences, the backoffice of a Heartcore project is very similar to a normal Umbraco backoffice. You can read about the Umbraco Heartcore backoffice here. The biggest difference is the "Headless" tree in the Settings section. This section has the API Browser which can be used to test the endpoints and Webhooks which can be used to post information about an action elsewhere. And of course, being the headless CMS we done have templates either!
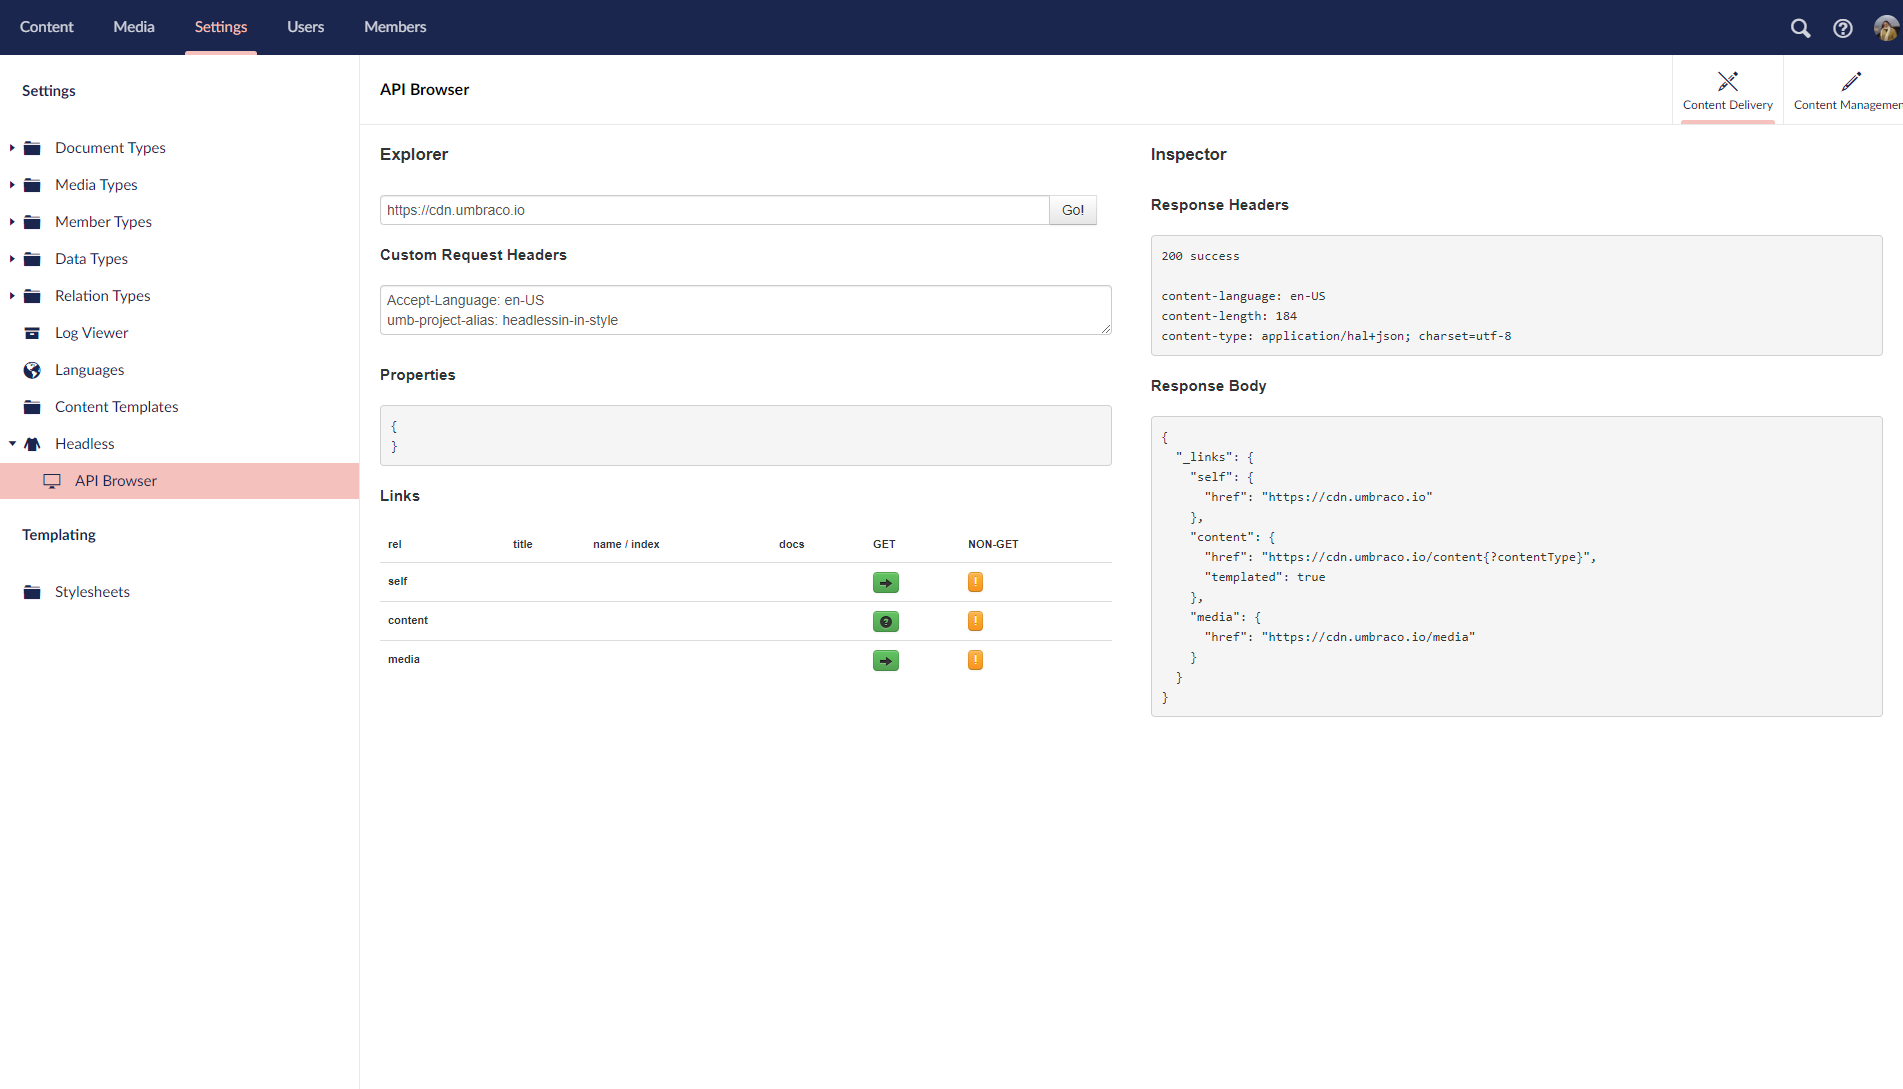
API Browser in Umbraco Heartcore
As mentioned above, I use Umbraco Heartcore to store my "facts" about spices. So that calls for some document types. I have set up 3 document types
- Spice Facts Container - The container for all my facts. It's allowed as root and also holds some information which is quite generic about my skill
- Spice Fact - This is used to store my fact.
I use the above doc types to set up content. And I have my content tree ready now.
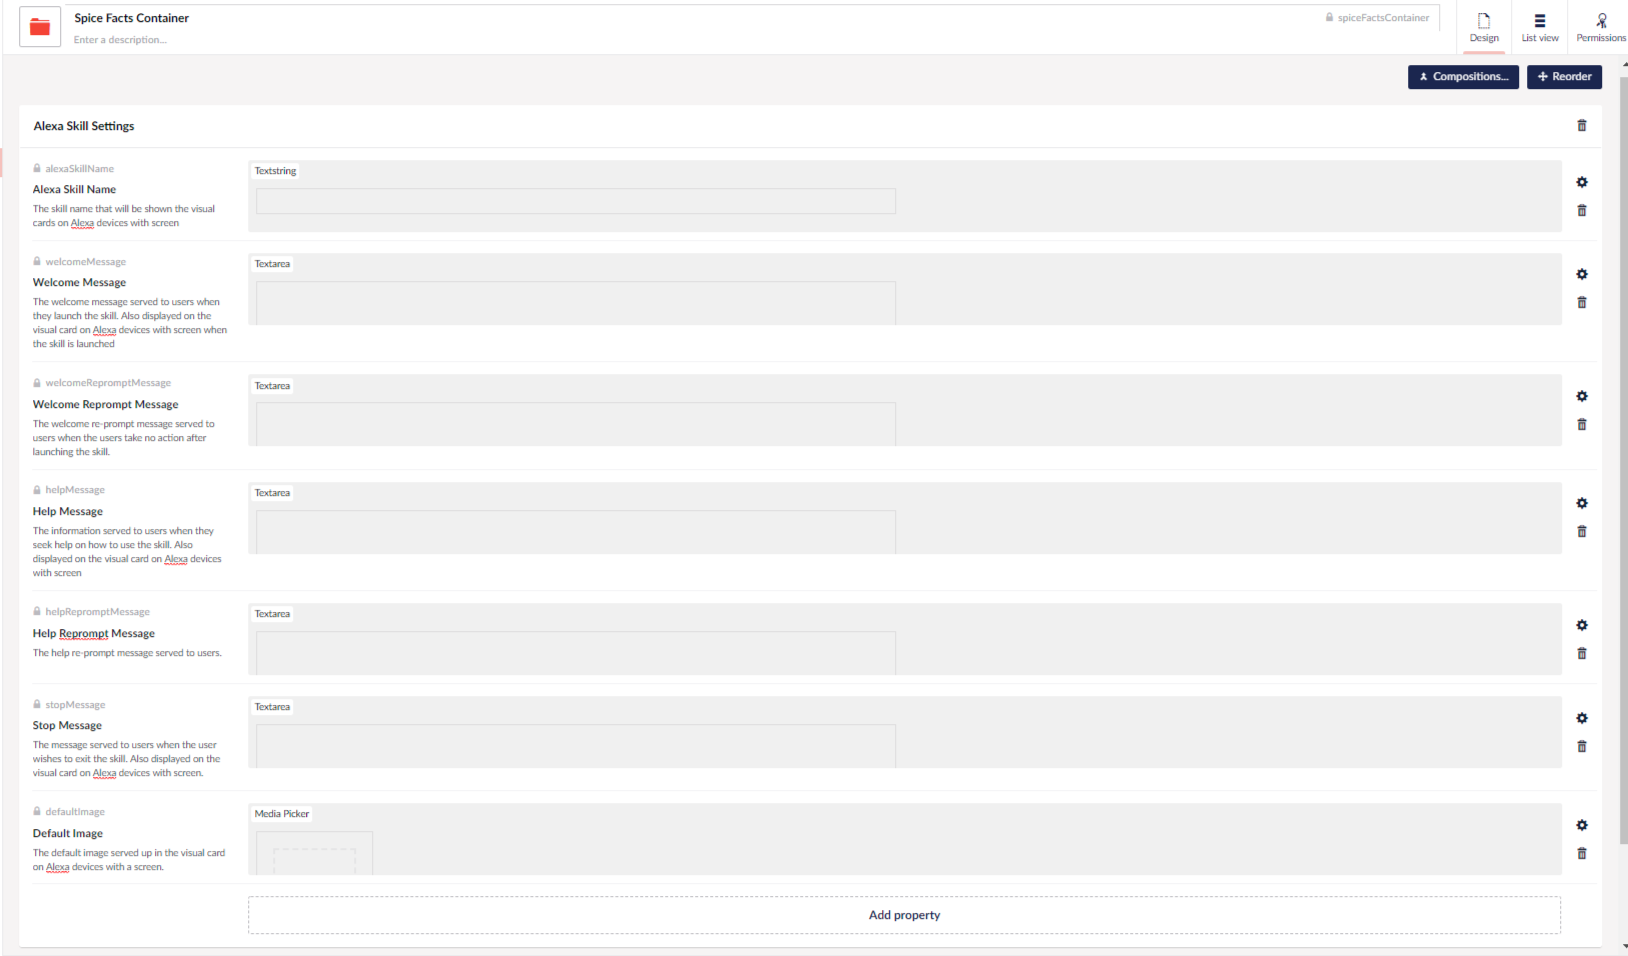
Spice Facts Container Doctype
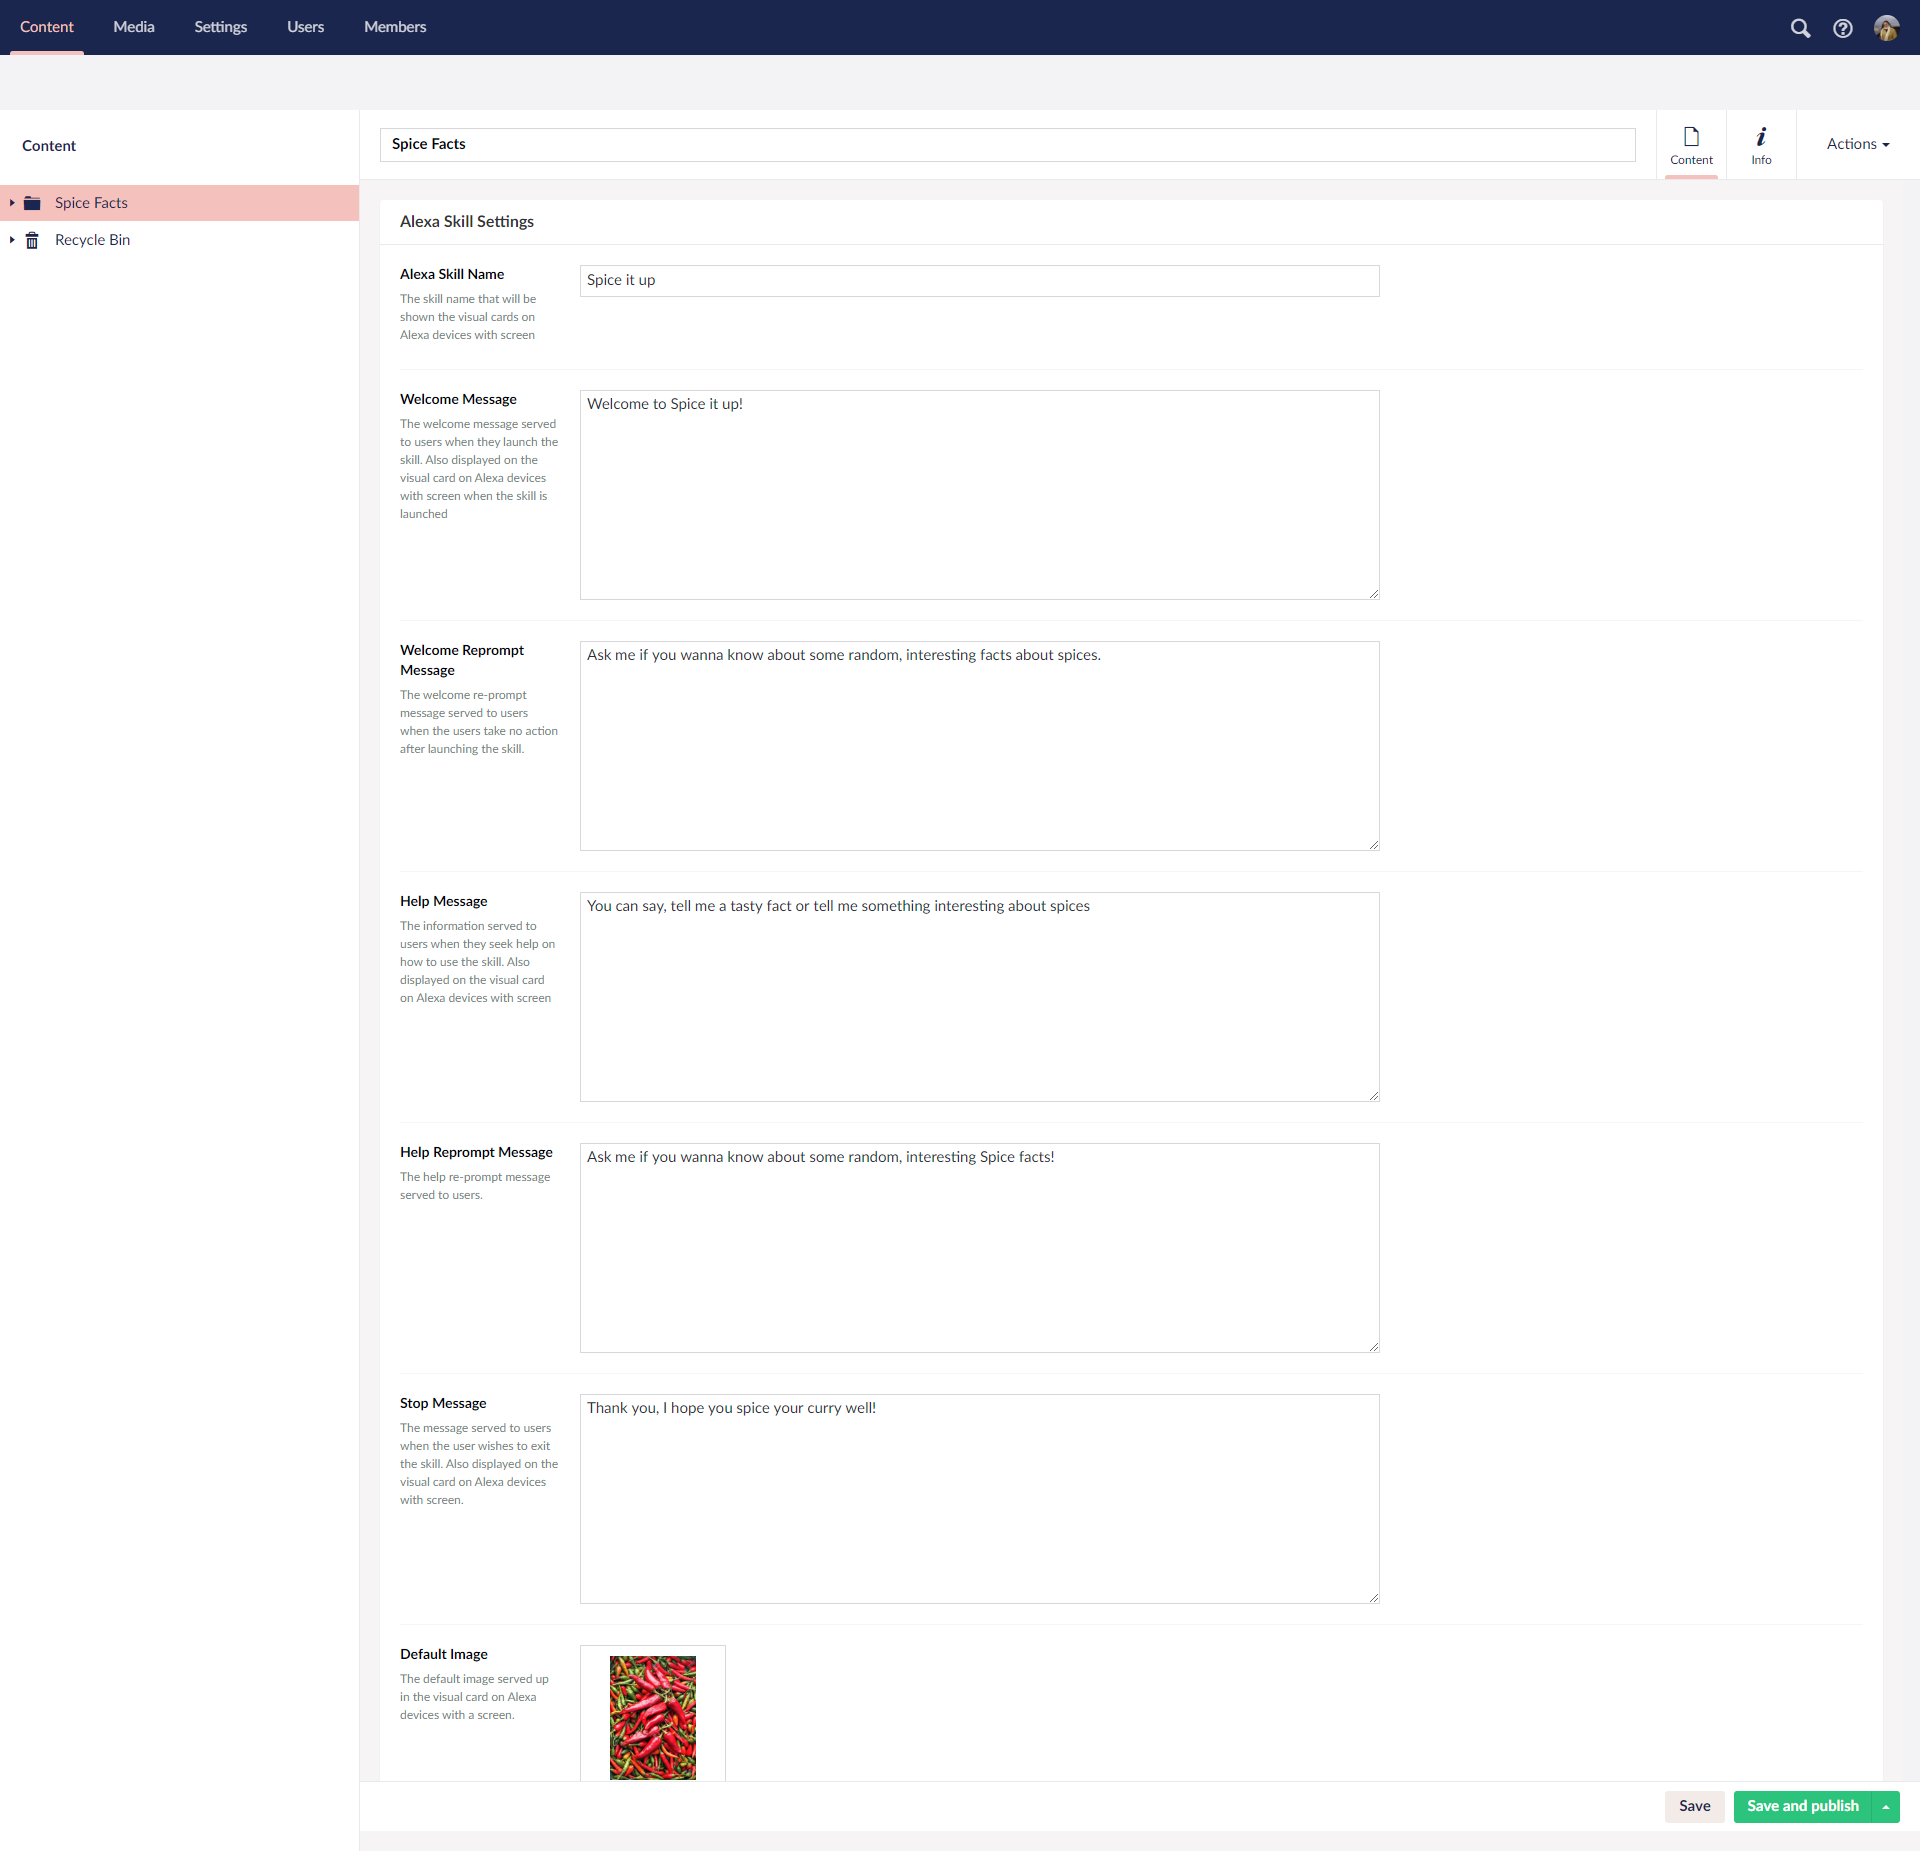
Spice Facts Container Sample Content
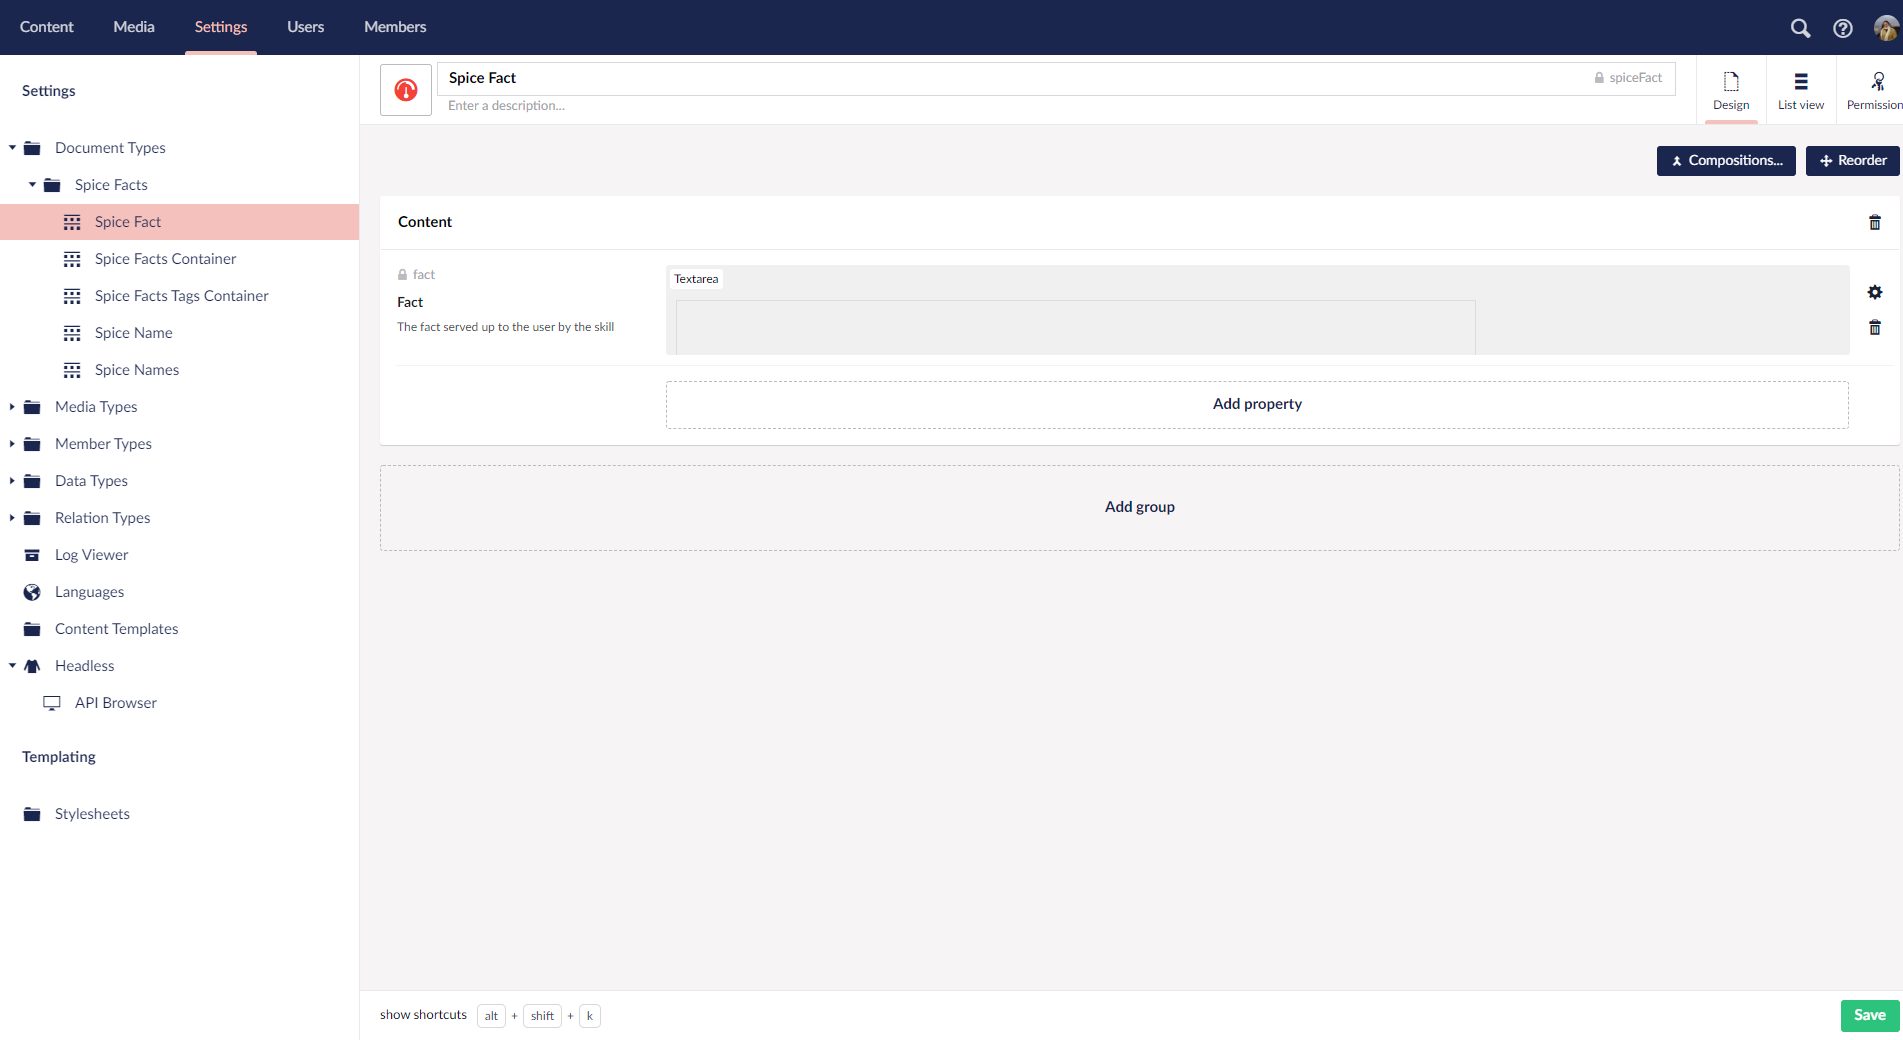
Spice Fact doctype
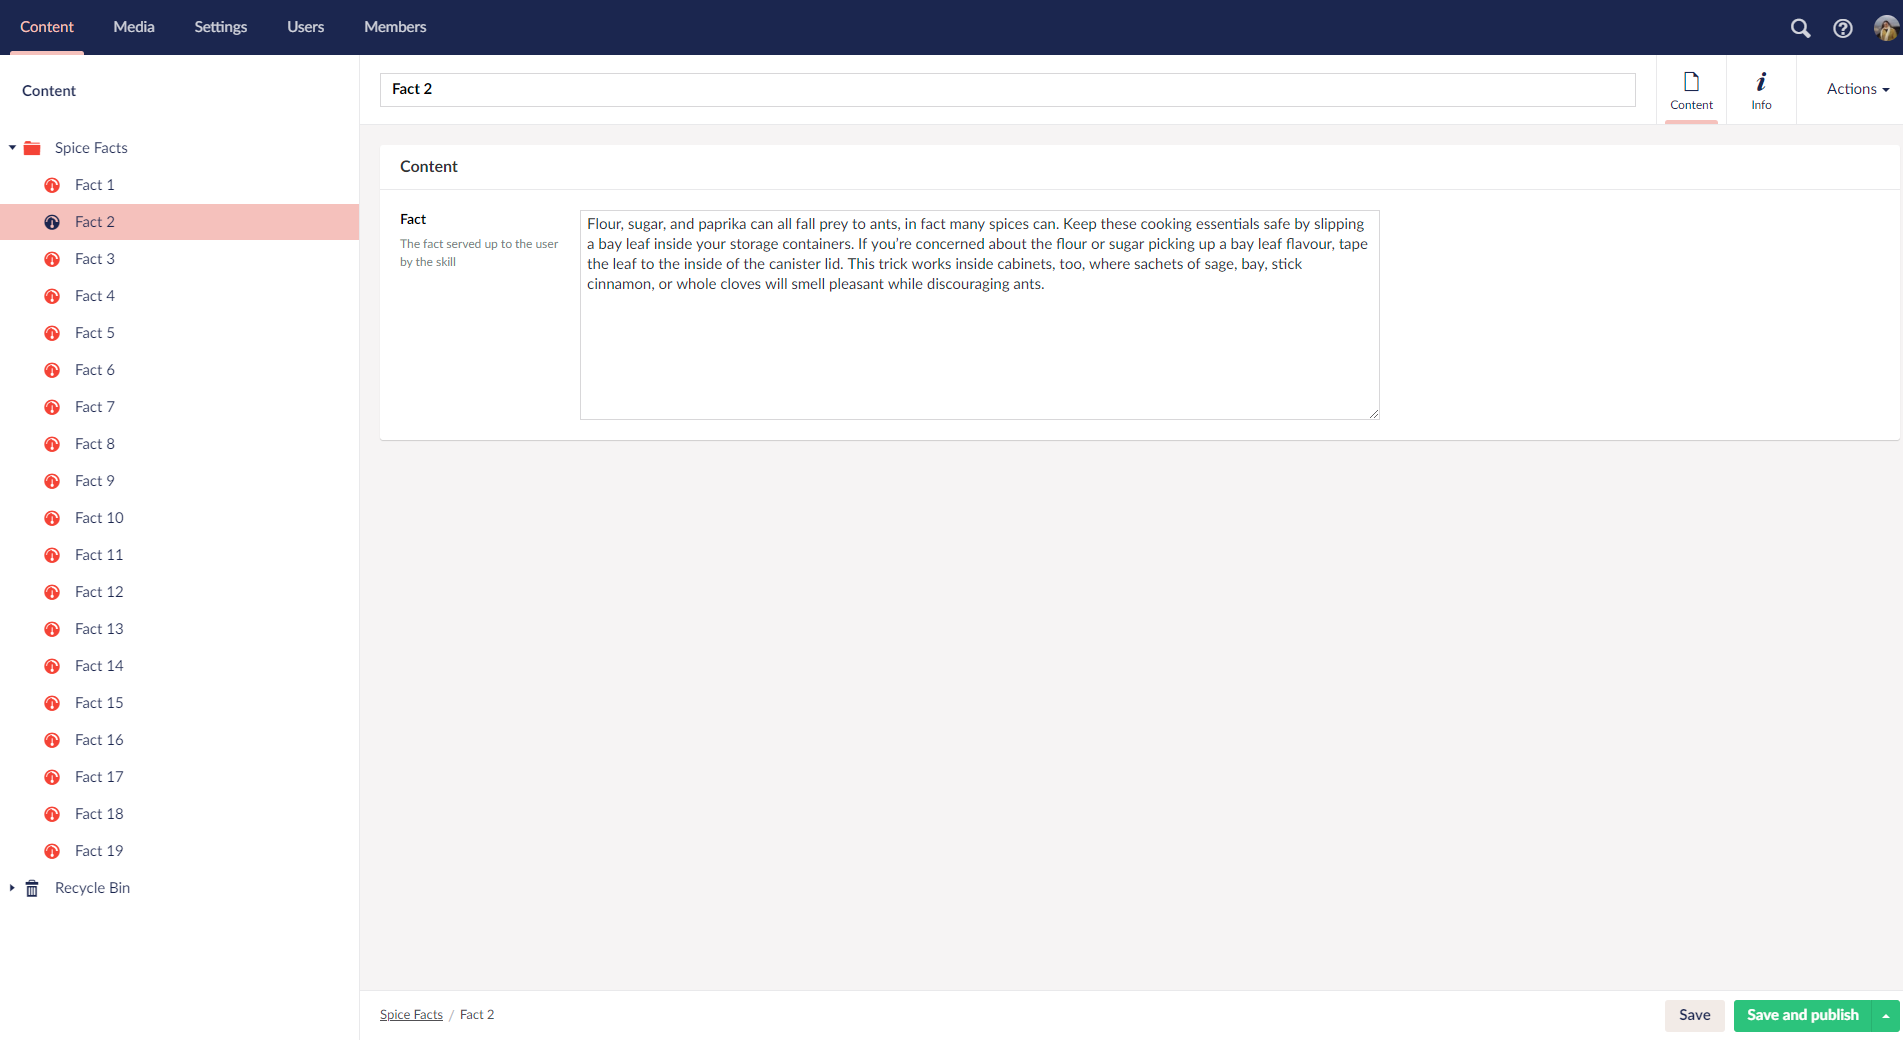
Spice Fact sample content
There are two APIs endpoints available for any Heartcore project
- Content Delivery API - The read only API to query content, media etc
- Content Management API - A protected endpoint for performing CRUD operations on content, media, languages, members etc.
You can also opt to the Content Delivery API endpoint secure. Notes on how you can connect to both these APIs securely can be found here.
To access and use the REST API, the HQ has developed some client libraries. There are client libraries available for .Net Core and Node.js.
Introduction to Alexa Skill Development
The apps you develop for Alexa are called Skills. These skills can be extended using Alexa Skills Kit(ASK), which is a collection of tools, APIs, samples and documentation. There are various types of Alexa Skills. What I am showcasing here is a Custom Skill, which is the most versatile of the lot, where you as a developer exercises fine control over every aspect of the skill.
A custom skill has 4 main components
- Invocation Name - The name which Alexa uses to identify the skill, in my example it's "spice it up".
- Intents - The functionality of the skill or what actions can be performed by the skill. In my example, rendering a random fact about spices is the functionality of my skill and hence an intent. I have named my intent SpiceIntent
- Utterances - These are words or phrases which you as a developer define for every intent in the skill. When user says what they want the skill to do, Alexa tries to match the spoken words/phrases to an intent.
- Your endpoint - It can be a cloud based or hosted API, available over HTTPS.
Invocation name, Intents and Utterances together make what is called the "Interaction Model". Alexa uses AI and Machine Learning behind the scenes to train itself on the interaction model. It is the brain of a skill.
The Amazon Developer Console
Alexa Skill is configured in the Amazon Developer Portal. Let me take you through the configuration of my skill in the portal.
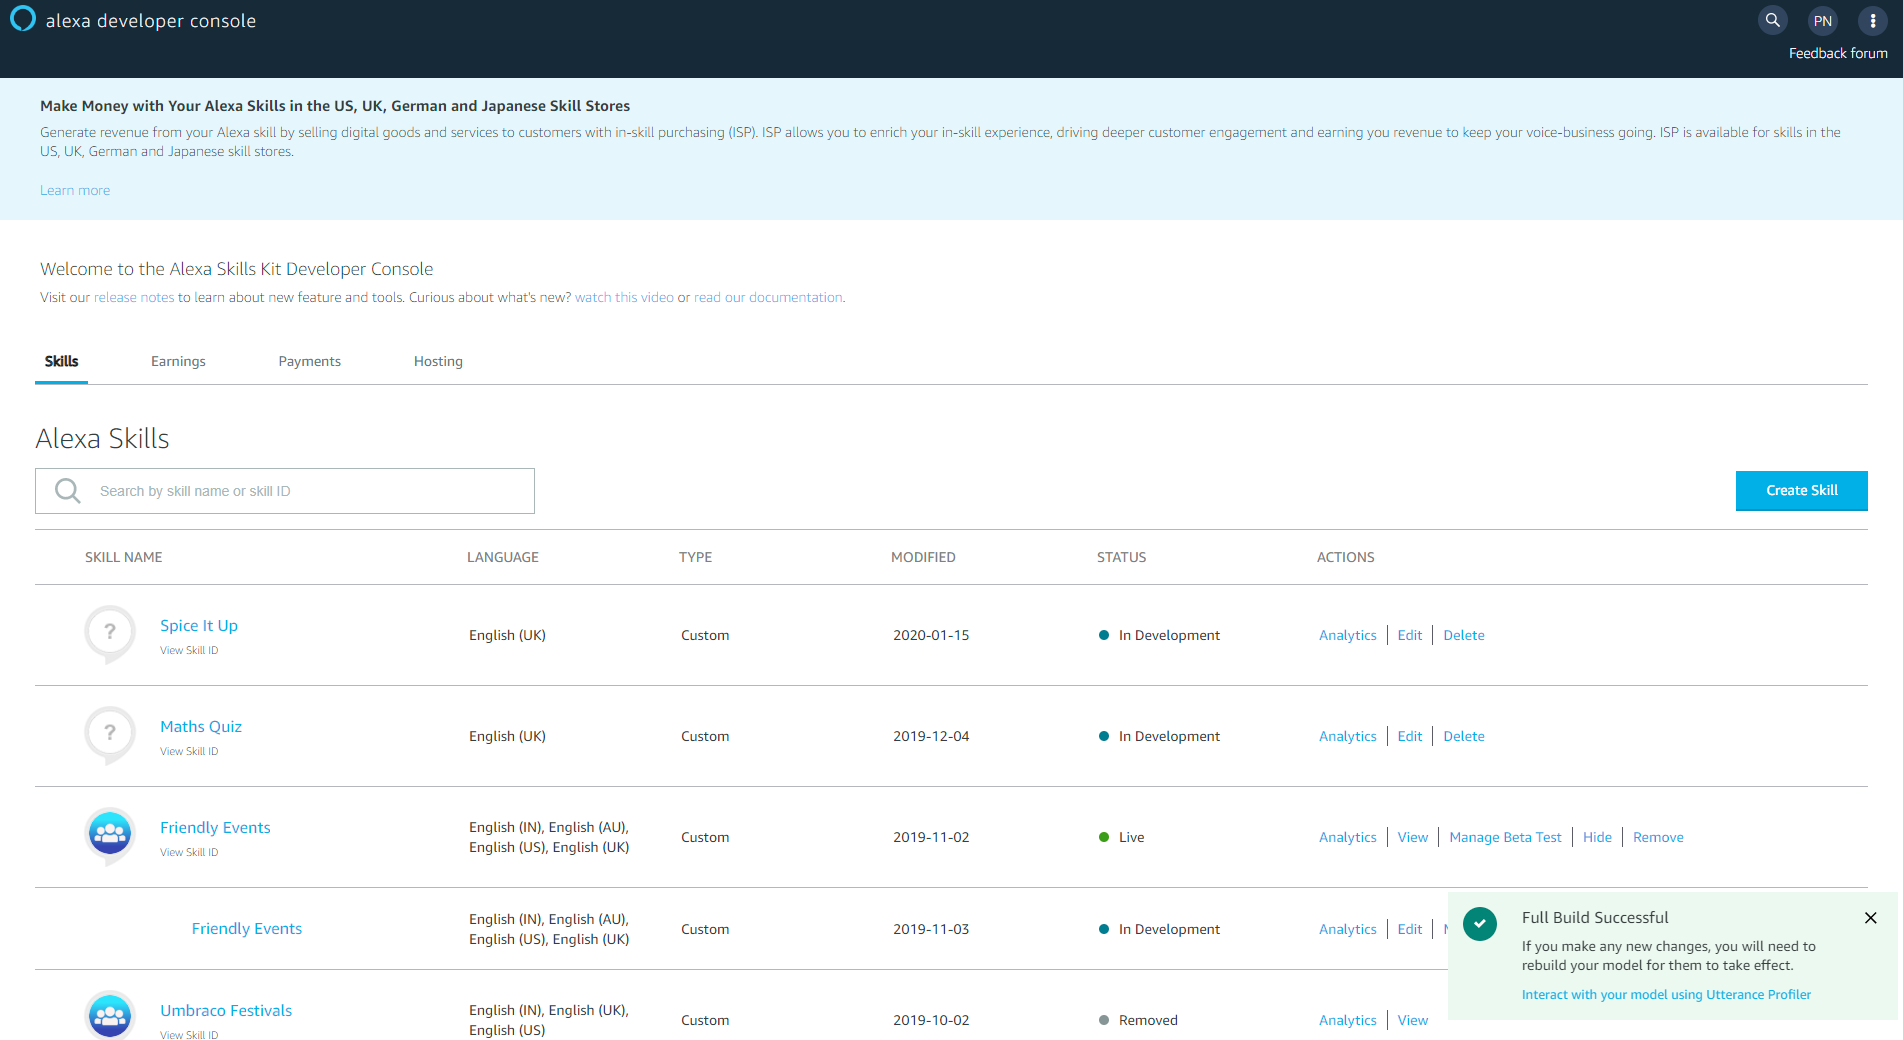
Alexa Developer Console
I start off by creating a skill in the Developer Console. I enter my skill name and choose my default language. Further languages can be added in a later screen. I am creating a custom skill so I choose Custom as the skill model. I plan to host my API in Azure so I choose Provision you own as the method to host my API.
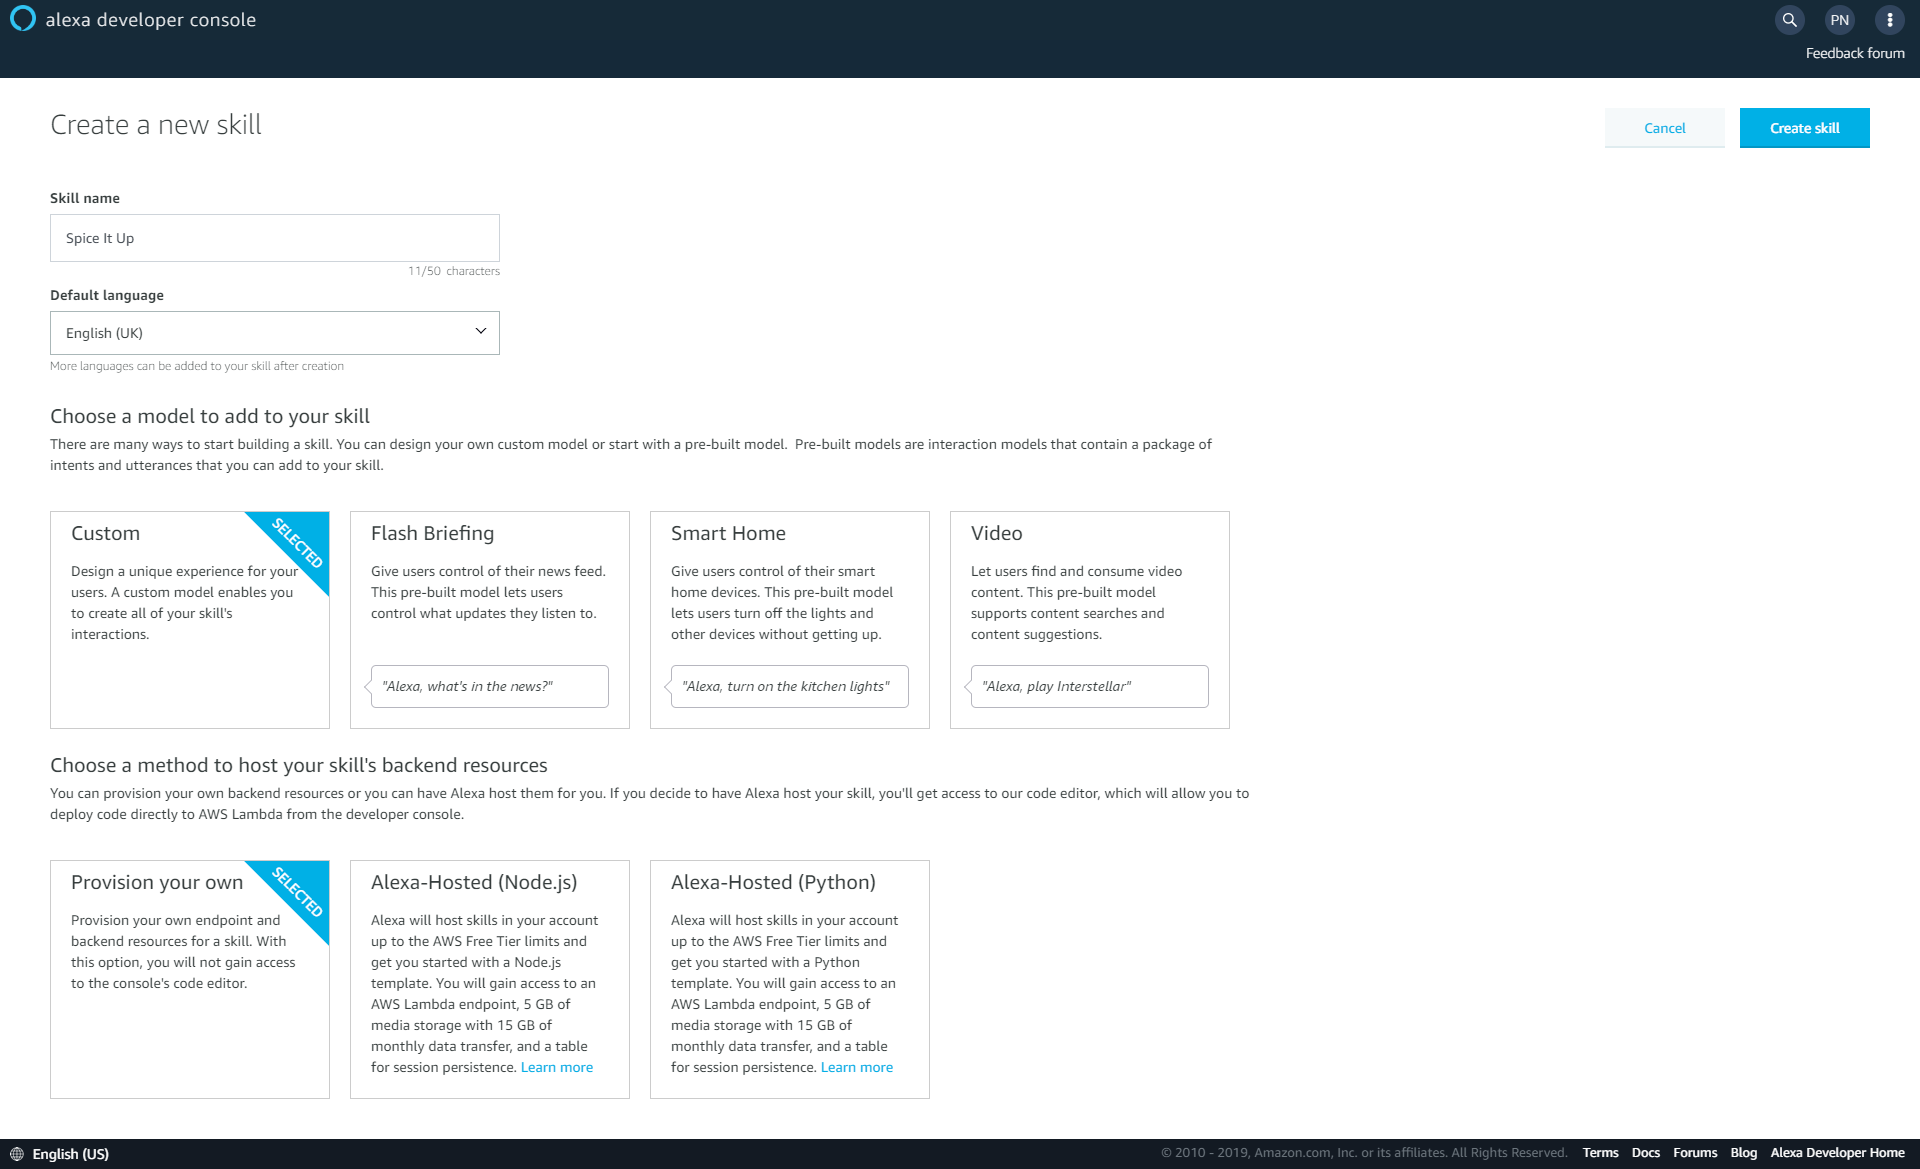
Skill Creation
The next screen is the template selection screen. I prefer to start from scratch. The difference here is that for the available templates some of the built-in intents specific to games, quizzes etc are added for you. When you choose to start from scratch only the compulsory built-in intents are added to your skill model. As you can see a fact skill template is already available, choosing a template from scratch here is purely personal preference. But if you are creating a quiz or a game skill for the first time I would highly recommend choosing a template so that you can see all the right built-intents that needs to be configured and handled for your skill.
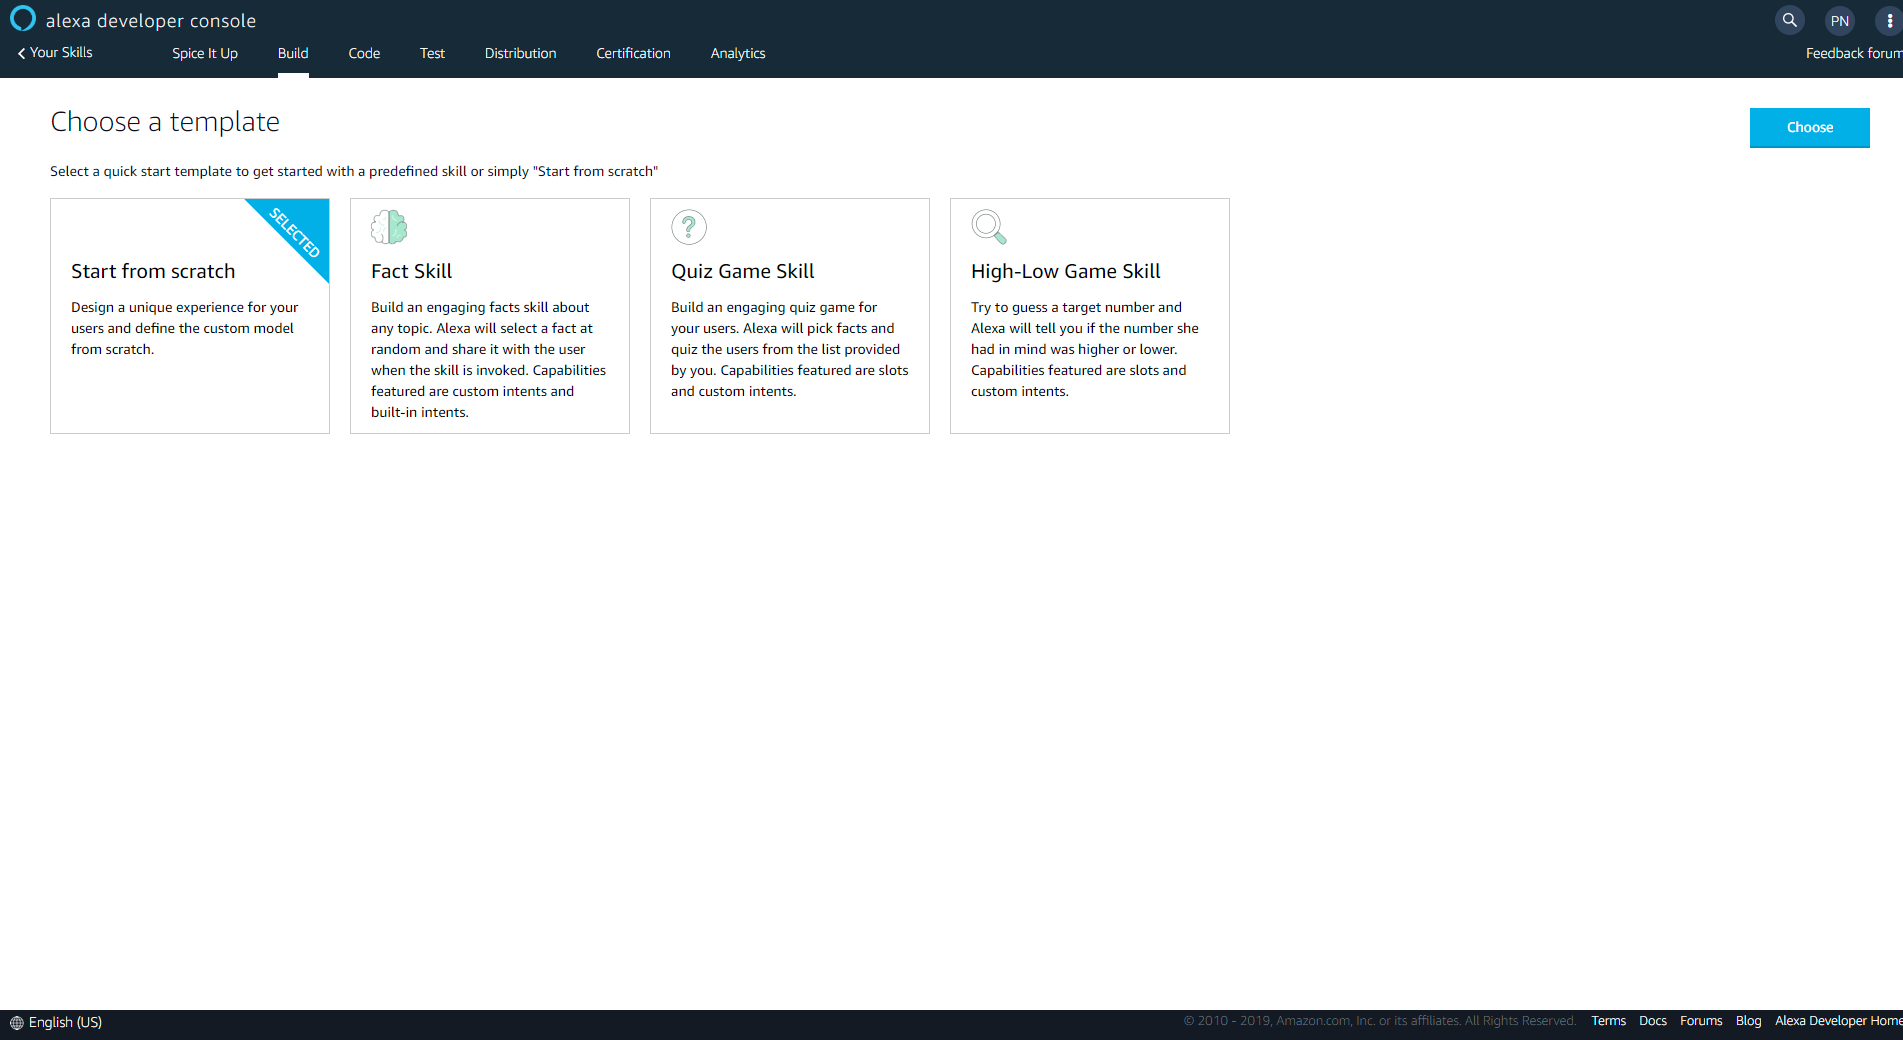
Skill Template
Past this screen, I can start configuring my interaction model.
At this point you can choose to add more languages to your skill using the language dropdown in the top left corner.
Add more languages with the language dropdown in the upper left
Important: If your skill suppports multiple languages you must make sure that your response is translated correctly. For e.g. responses from a skill which supports and is being used in a German locale must be in German, it cannot be in English. This is an important functional requirement.
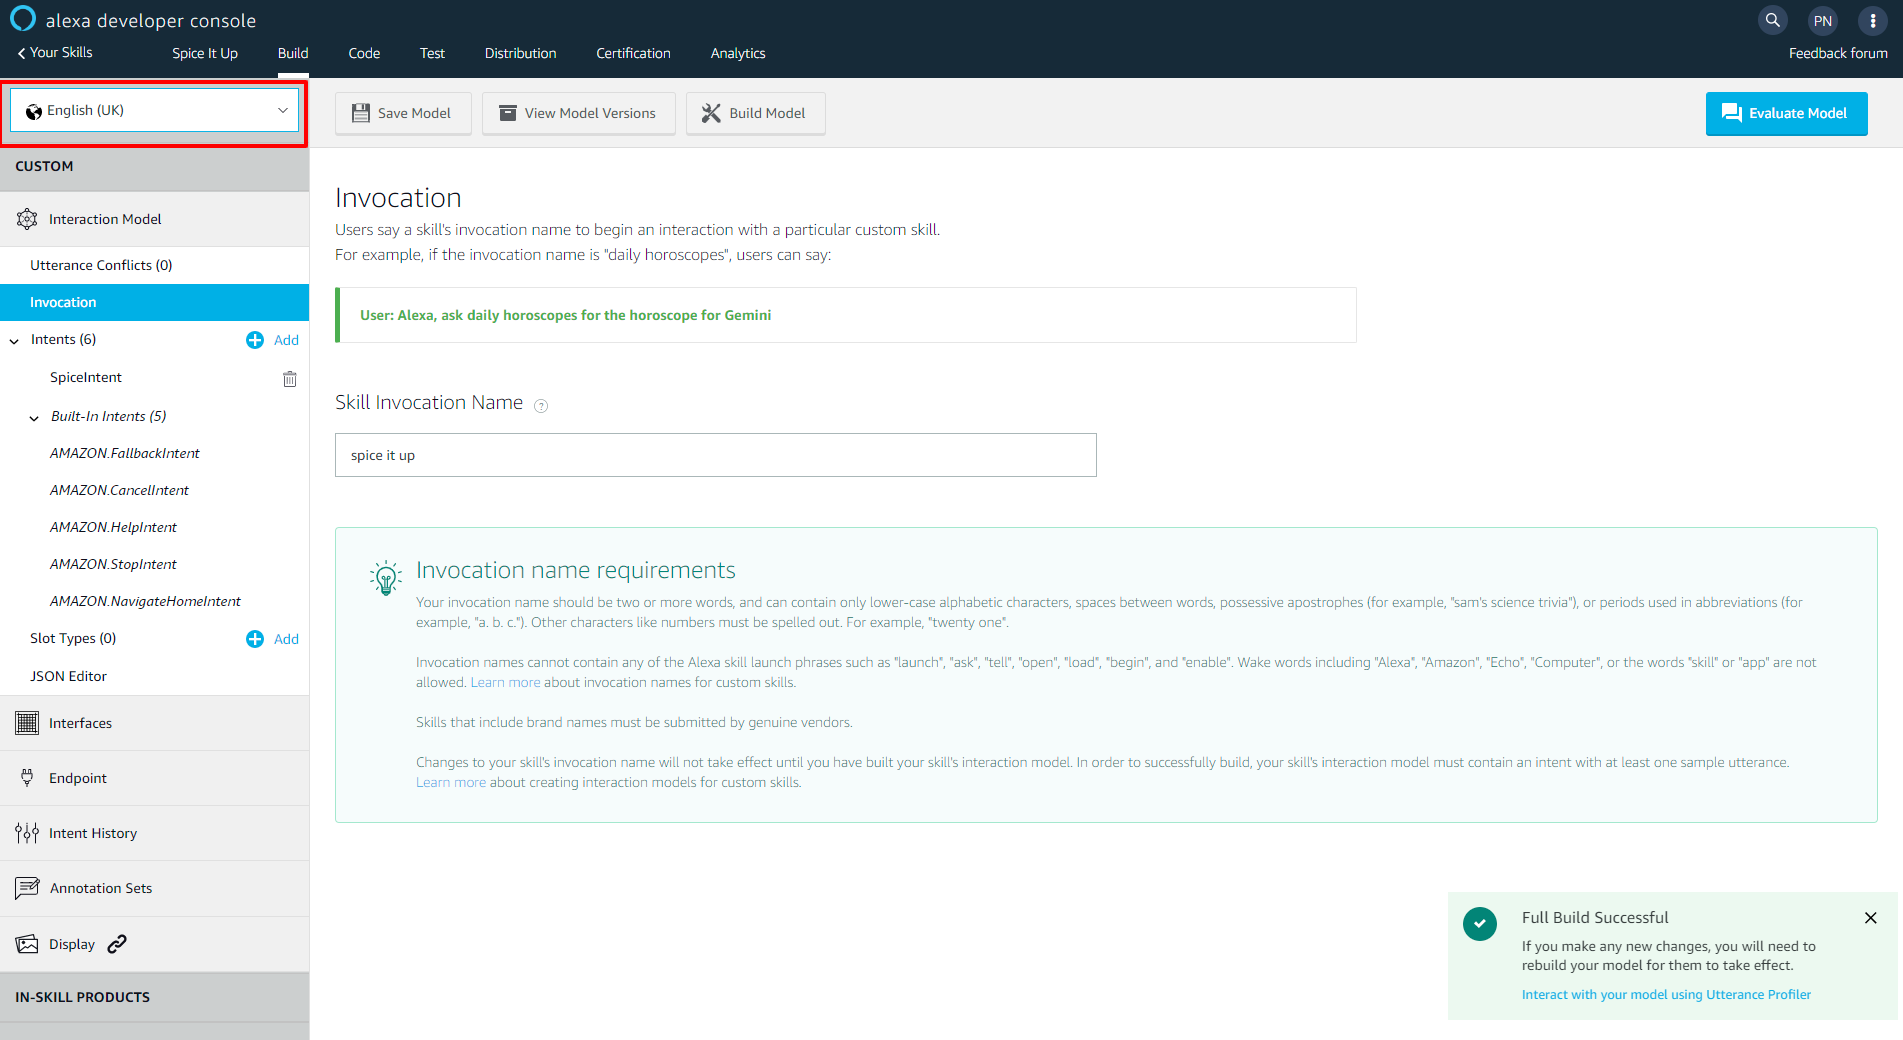
The first item in the interaction model is the invocation name. This is the name used by the user to start conversing with a skill. Alexa identifies a skill using the invocation name. There are requirements around the invocation name which can be found here. But the most important ones are
- Only lower-case alphabets, spaces and periods are allowed
- The invocation name must not contain any of the Alexa skill launch phrases or connecting words or wake words
Invocation Name
I can now start configuring intents and utterances. There are two types of intents - built-in and custom. There are about 25 standard built-in intents available out of which the following are compulsory to any custom skill.
- AMAZON.NavigateHomeIntent - Active only on Alexa devices with screen where it returns users to home screen.
- AMAZON.HelpIntent - Provides help on how to use the skill
- AMAZON.FallbackIntent - This intent is triggered when Alexa cannot match the words spoken by the user to any of the utterances specified.
- AMAZON.CancelIntent - It can be used to exit a skill or cancel a transaction, but remain in the skill.
- AMAZON.StopIntent - Used to exit the skill
You can read about all the standard built-in intents here.
Even though the above intents are compulsory to any custom skill, it is not necessary to handle them in your API. But as a best practice it is highly recommended as you can control the output response and provide your users with information that is contextual to your skill.
Custom intents are specified by the skill developer. There are requirements around the names of custom intents as well. Only alphabets and underscores are allowed. If you noticed the name of built-in intents are in the AMAZON namespace and they are specified using a period. But it's not possible to do that with custom intents. No special characters or numbers are allowed. For my skill I specify a custom intent called SpiceIntent. This intent will help serve the random fact to the users.
Finally, let us talk about utterances. Utterances are words or phrases that can be specified for each intent. When your user uses any of the utterances while conversing with the skill, Alexa tries to find a match for the words/phrases among the intents in the skill. If no match is found among the intents, the FallbackIntent is triggered. The quality of a skill depends upon the level of natural conversations you can have with the skill. As a developer you have to make sure that maximum conversations result in proper conversational response served to the user then fallback messages. So the trick lies in thinking from a user's perspective on what phrases they can use, how they order their words, how they phrase their conversation and mapping them as utterances in your intents. There are requirements on how utterances should be and you can read about it here. You must specify utterances for your custom intents. The built-in intents ship with a few sample utterances but you can always add more utterances if you need to.
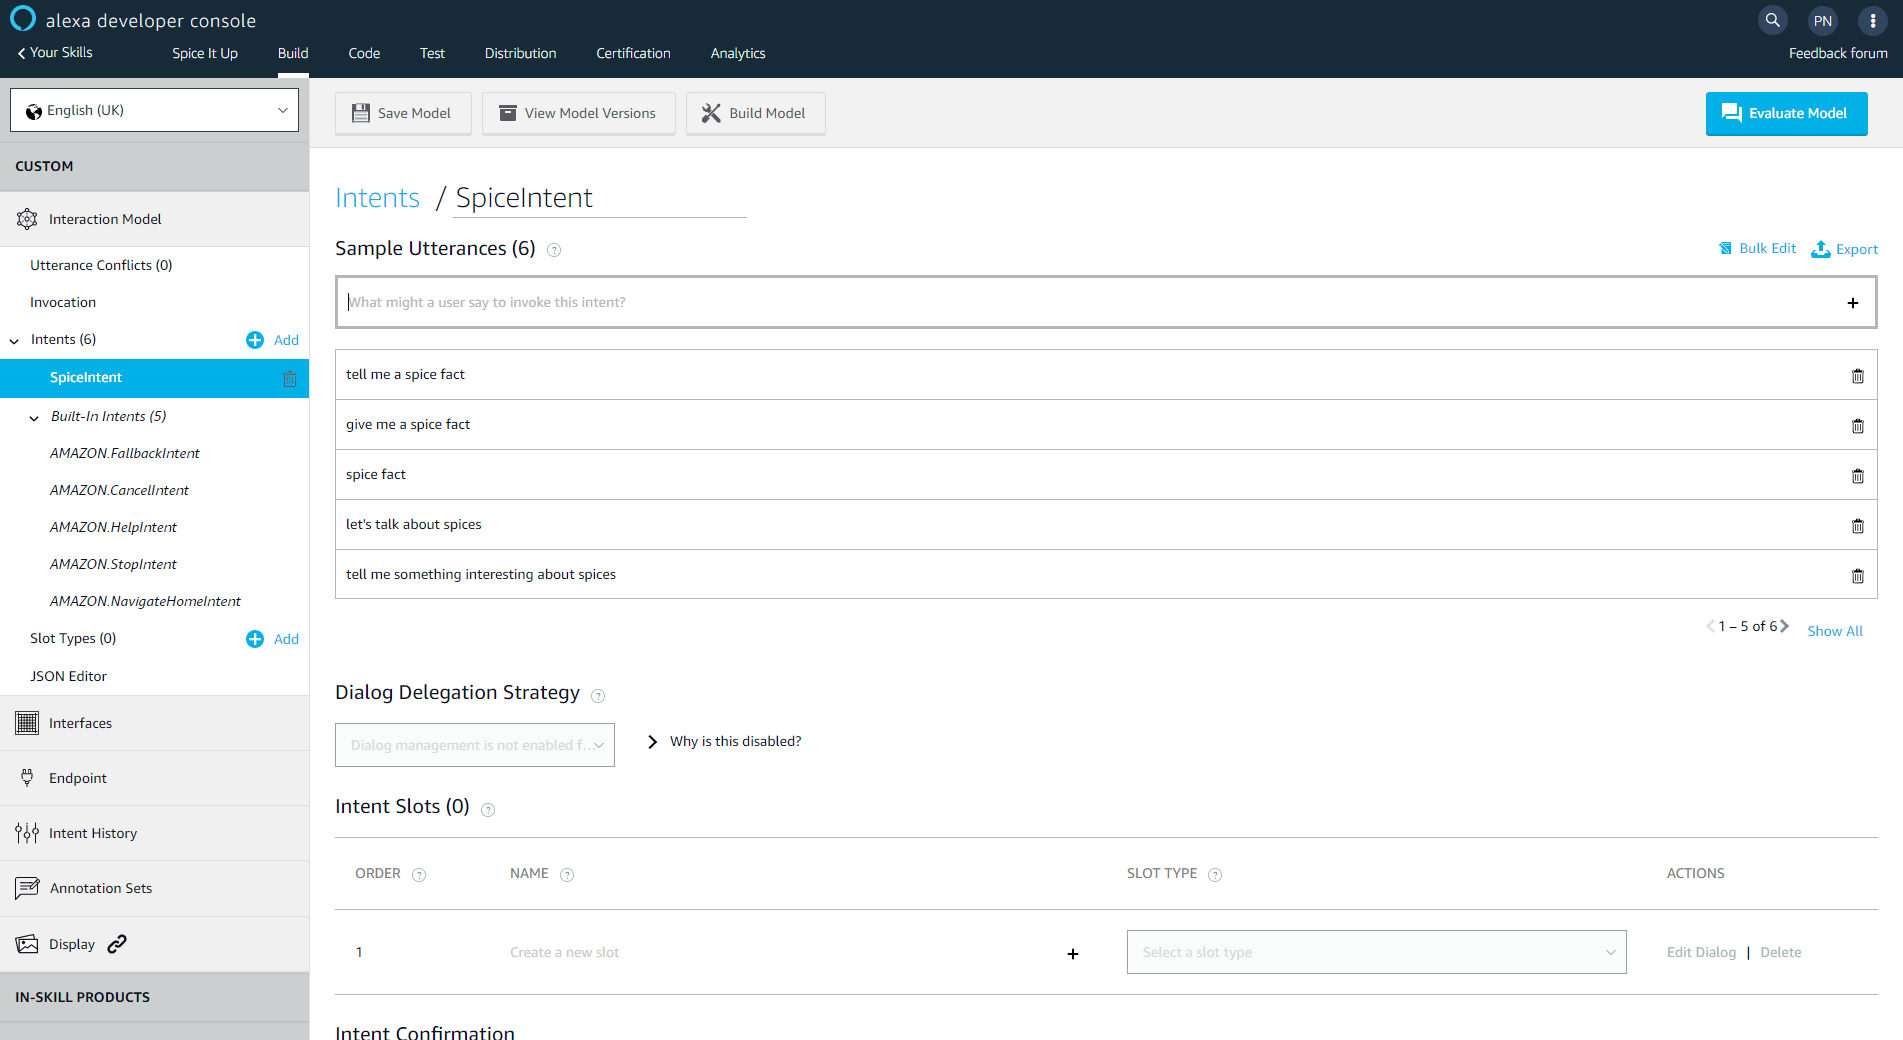
Intents and Utterances
How users interact with your skill
Conversations with a custom skill needs to follow a certain pattern like so.
-wake word- -launch-phrase- -invocation-name- -connecting-word- -utterances-
Wake word is usually Alexa. Upon encountering this word Alexa starts listening to the user. Launch phrases are keywords and some examples are Ask, Tell, Open, Launch. These words are used to start a conversation with your skill. Connecting words are word like for, whether, what etc to make the conversation sound natural. More information on these can be found here.
For e.g. you can talk to my skill like so "Alexa, Ask Spice it up for a spice fact".
My skill serves a random fact to the user at this point.
You can also do the above as a 2 step conversation like so
"Alexa, Launch Spice it up"
This opens a session with the skill and Alexa understands that further conversations from the user must be served using my skill. The user gets to hear a custom welcome message from my skill at this point.
"Tell me a spice fact"
I have specified the above as an utterance for my custom intent. So the user gets to hear a fact from my skill.
Now, you must be wondering how a user gets information on how to converse with a skill. When you publish your skill to Amazon skill store you are required to enter some example utterances to help get a user started and this information is available in the skill card in the skill store.
Skills Card in the Amazon skills store
The API
The API is where all the magic happens. Alexa does a secure HTTPPOST to your API, so your API must be available over HTTPS. The API can be hosted on a dedicated server or any cloud platform like Azure. Alexa posts a structured response to your API, so your API must be capable of handling the request JSON and must also be able to serve up a structured JSON as the response.
I have developed the API for my skill as a .Net Core web API. You can read about how to build one here. My web API needs to communicate with my Heartcore project so I begin by installing the Heartcore .Net Core client library into my project. You can do that using the following command in Visual Studio Package Manager Console.
Install-Package Umbraco.Headless.Client.NetMy web API needs knowledge of the Heartcore project alias to communicate with the REST API and I specify it in the appsettings.json as a section called Umbraco. If you choose to protect the Content Delivery API in your Heartcore project the API key can be specified in the file as well.
"Umbraco": { "ProjectAlias": "your-project-alias", "APIKey":"your-API-key" }Now I can connect to my Heartcore project and get an instance of the ContentDeliveryService as shown below.
private ContentDeliveryService GetContentDeliveryService() {
//get the Umbraco section from appsettings.json
var umbracoConfig = this._configuration.GetSection("Umbraco");

//get the value of project alias
var projectAlias = umbracoConfig.GetValue<string>("ProjectAlias");

//get an instance of the ContentDeliveryService
return new ContentDeliveryService(projectAlias);
}
My API needs to accept the structure JSON request and serve up the structured JSON response. So my end point starts to look like below.
[HttpPost] [Route("spicefacts")] public async Task GetSpiceFactsAsync([FromBody]SkillRequest request) {
SkillResponse skillResponse = new SkillResponse
{

    Version = AlexaConstants.AlexaVersion,
    SessionAttributes = new Dictionary<string, object>() { { "locale", "en_GB" } }
};

switch (request.Request.Type)
{
    case "LaunchRequest":
        skillResponse.Response = await this.LaunchRequestHandlerAsync();
        break;
    case "IntentRequest":
        skillResponse.Response = await this.IntentRequestHandlerAsync(request);
        break;
}

return skillResponse;
}
The SkillRequest object is a C# representation of the request JSON. The code can be found here. Similarly, the C# representation of the response JSON SkillResponse can be found here.
Taking a deeper look at the code above, the first step is to ensure the type of request. The incoming JSON has a request object which contains information on the type of request. A LaunchRequest type is fired to the API when the user initiates a conversation with the skill but they do not expect the skill to perform any function. An IntentRequest is fired when Alexa finds a matching intent for the utterances from the user. I have separate handler methods for handling both request types.
private async Task LaunchRequestHandlerAsync() {
// get content delivery service
var service = this.GetContentDeliveryService();

// get the spice facts container
var items = await service.Content.GetByType("SpiceFactsContainer");
var spiceContainer = items.Content.Items.FirstOrDefault();

// get the default media value from spice facts container node
var media = this.GetMedia(spiceContainer.Properties["defaultImage"] as JObject);
var response = new Response
{

	OutputSpeech = new OutputSpeech()
	{
		Ssml = this.SsmlDecorate(spiceContainer.Properties["welcomeMessage"].ToString()),
		Text = spiceContainer.Properties["welcomeMessage"].ToString(), // get the welcome message text from spice facts container node and serve it up as SSML
		Type = "SSML"
	},
	Reprompt = new Reprompt()
	{
		OutputSpeech = new OutputSpeech()
		{
			Text = spiceContainer.Properties["welcomeRepromptMessage"].ToString(),
			Type = "SSML",
			Ssml = this.SsmlDecorate(spiceContainer.Properties["welcomeRepromptMessage"].ToString()),
		}
	},
	Card = new Card()
	{
		Title = spiceContainer.Properties["alexaSkillName"].ToString(), // get the value of alexaSkillName property from the node
		Text = spiceContainer.Properties["welcomeMessage"].ToString(),
		Type = "Standard",
		Image = new CardImage()
		{
			LargeImageUrl = media.Url,
			SmallImageUrl = media.Url
		}

	},
	ShouldEndSession = false
};
return response;
}
The output response has three main objects
- OutputSpeech - The output speech heard by the user. The type I have used is SSML(Speech Synthesis Markup Language). You can control how Alexa generates speech and other speech effects using SSML. I am not going into it in great detail as that is outside the scope of the article.
- Reprompt - This is what the user hears as a reprompt. When the user does not talk further after launching the skill, Alexa initiates the reprompt to the user
- Card - This is relevant for Alexa devices with screen. You can choose to show the spoken message along with a a title and an image as a visual card to the user.
This is how my method for IntentRequest handling looks like. In my handler method I check for the actual intent triggered and serve up corresponding response. As mentioned above I am handling both custom and built-in intents.
private async Task IntentRequestHandlerAsync(SkillRequest request) {
Response response = null;
switch (request.Request.Intent.Name)
{
	case "SpiceIntent":
	case "AMAZON.FallbackIntent":
		response = await this.SpiceIntentHandlerAsync();
		break;
	case "AMAZON.CancelIntent": //handling built-in intents
	case "AMAZON.StopIntent":
		response = await this.CancelOrStopIntentHandler();
		break;
	case "AMAZON.HelpIntent":
		response = await this.HelpIntentHandler();
		break;
	default:
		response = await this.SpiceIntentHandlerAsync();
		break;
}

return response;
}
And this is how the intenthandler for my custom intent SpiceIntent looks like.
private async Task SpiceIntentHandlerAsync() {
// get content delivery service
var service = this.GetContentDeliveryService();

// get the spice facts container
var items = await service.Content.GetByType("SpiceFactsContainer");
var spiceContainer = items.Content.Items.FirstOrDefault();

// get the default media value from spice facts container node
var media = this.GetMedia(spiceContainer.Properties["defaultImage"] as JObject);

// get all spice facts and choose a random node
var spiceFactItems = await service.Content.GetByType("SpiceFact");
var next = random.Next(spiceFactItems.Content.Items.Count());
var item = spiceFactItems.Content.Items.ElementAt(next);

var response = new Response
{
	OutputSpeech = new OutputSpeech()
	{
		Ssml = this.SsmlDecorate(item.Properties["fact"].ToString()), // get the value of the "fact" property from the node and serve it up as SSML
		Text = item.Properties["fact"].ToString(),
		Type = "SSML"
	},

	Card = new Card()
	{
		Title = spiceContainer.Properties["alexaSkillName"].ToString(),
		Text = item.Properties["fact"].ToString(),
		Type = "Standard",
		Image = new CardImage()
		{
			LargeImageUrl = media.Url,
			SmallImageUrl = media.Url
		}

	},
	ShouldEndSession = false
};
return response;
}
I am not going into great detail of code around the handler methods for built-in intents. All the code is available in my GitHub Repo
I host my API in Azure and add the end point in the Amazon Developer Console as shown below.
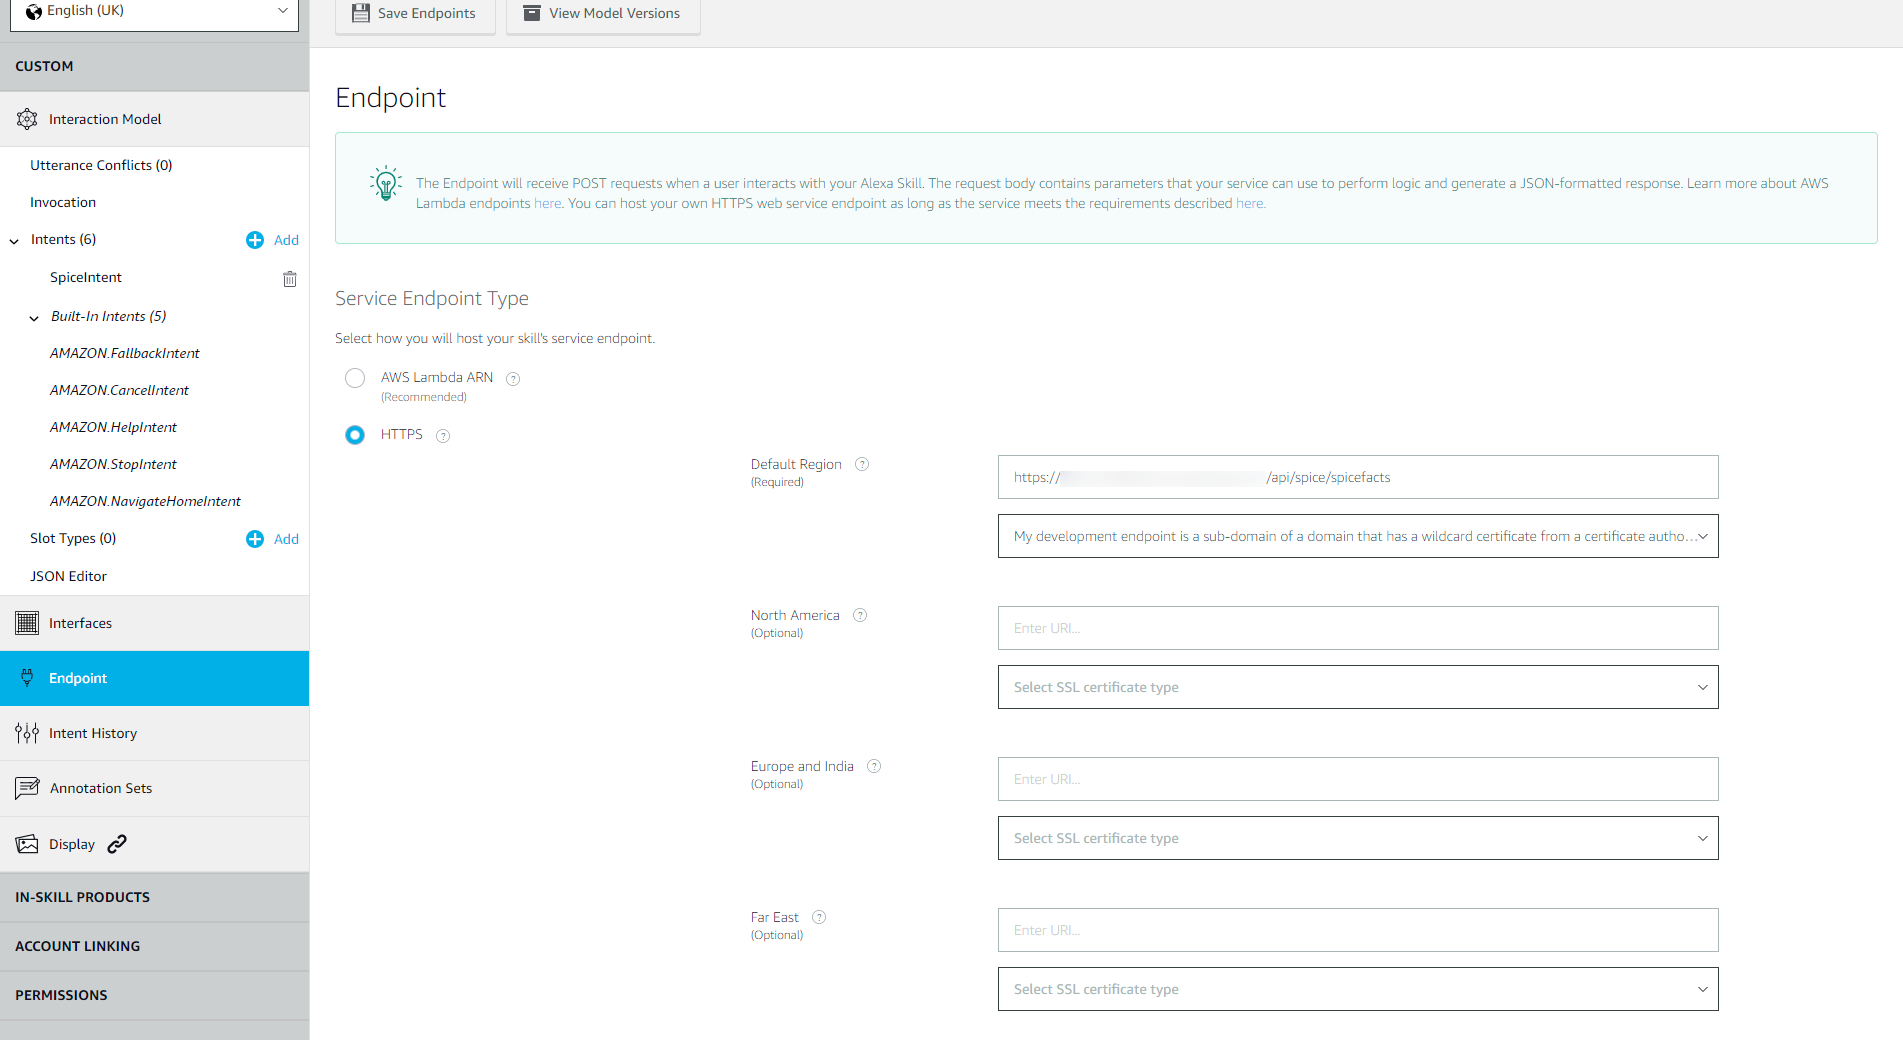
Adding an endpoint in the Amazon Developer Console
Once saved, you will need to go back to the intents section and build the model. Alexa begins to train itself on the interaction model of your skill.
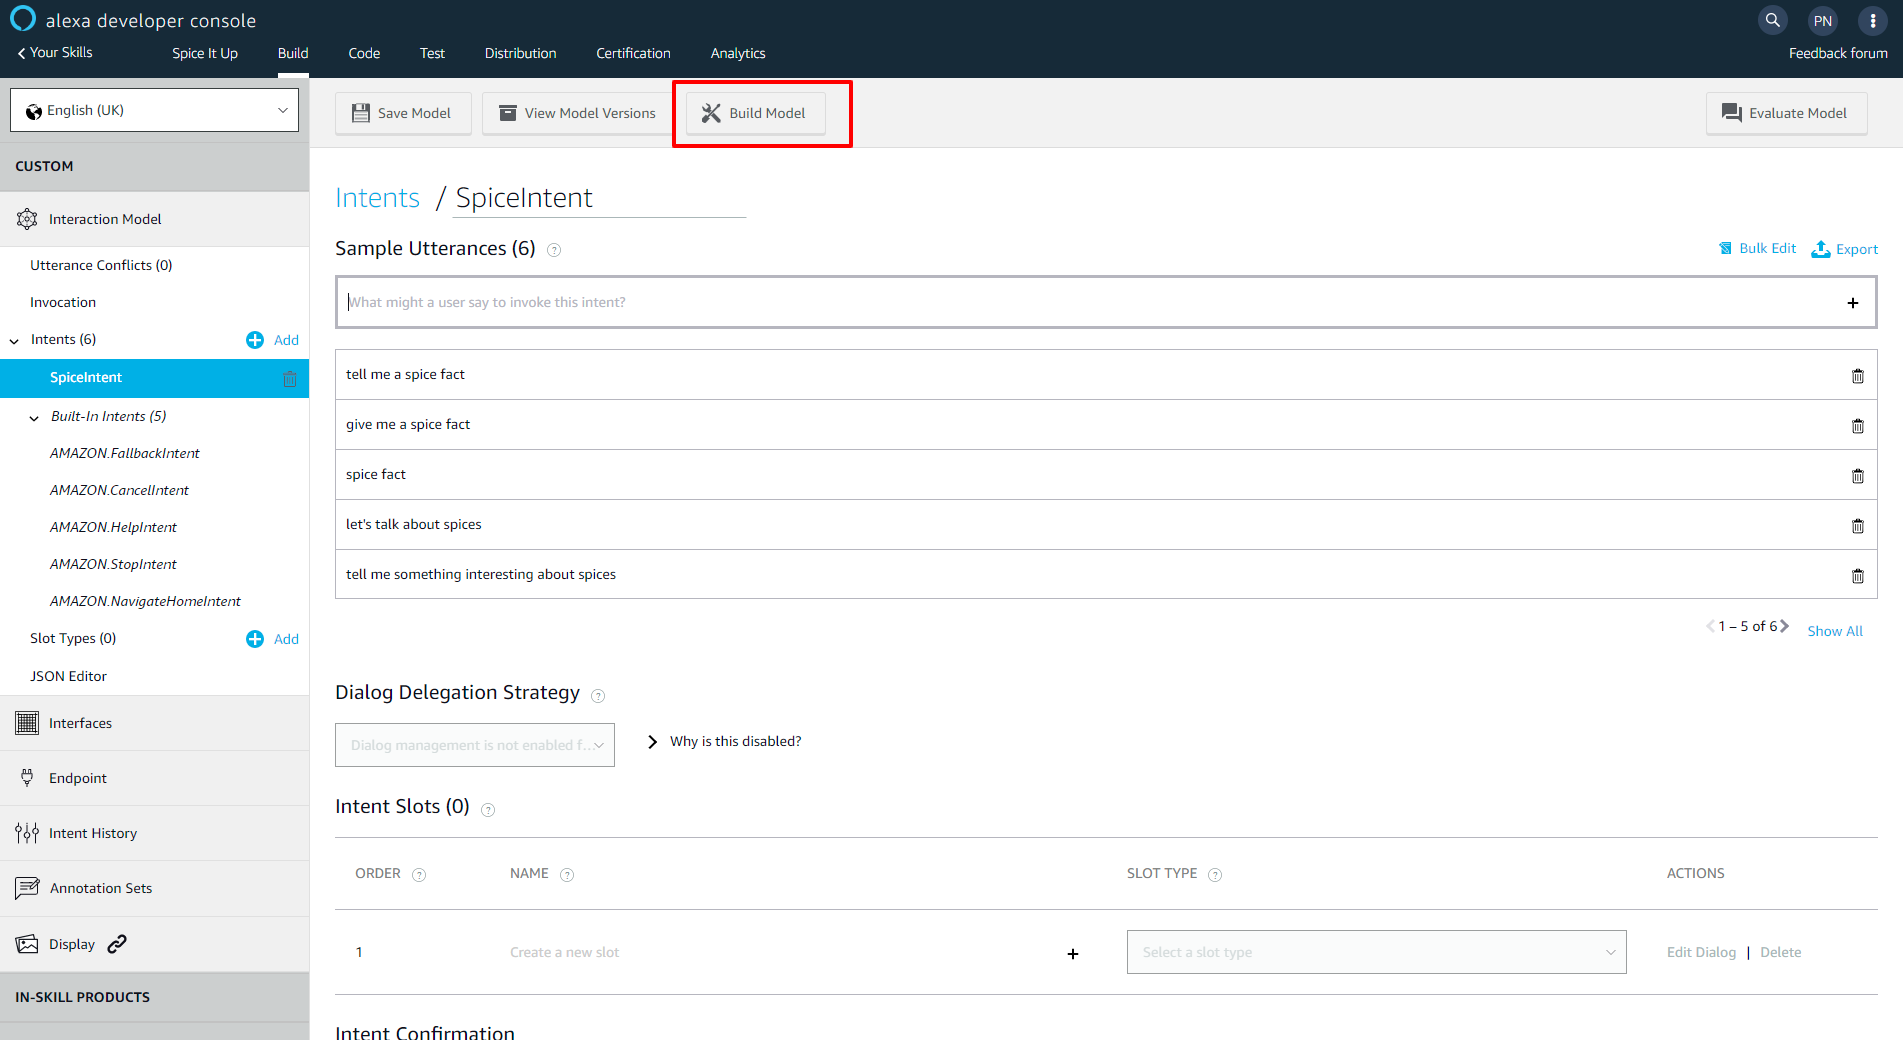
Building the model in the intents section
Once the model has been successfully built you can use the test console to test your skill. Make sure you enable skill testing before you start!
I have noticed a slight blip in the visual card in the test console. However, if you are logged into your Alexa device or Alexa smartphone app with the same account as your developer account, you can test a skill which in development and see the visual cards. I had to resort to it while I was testing my skill.
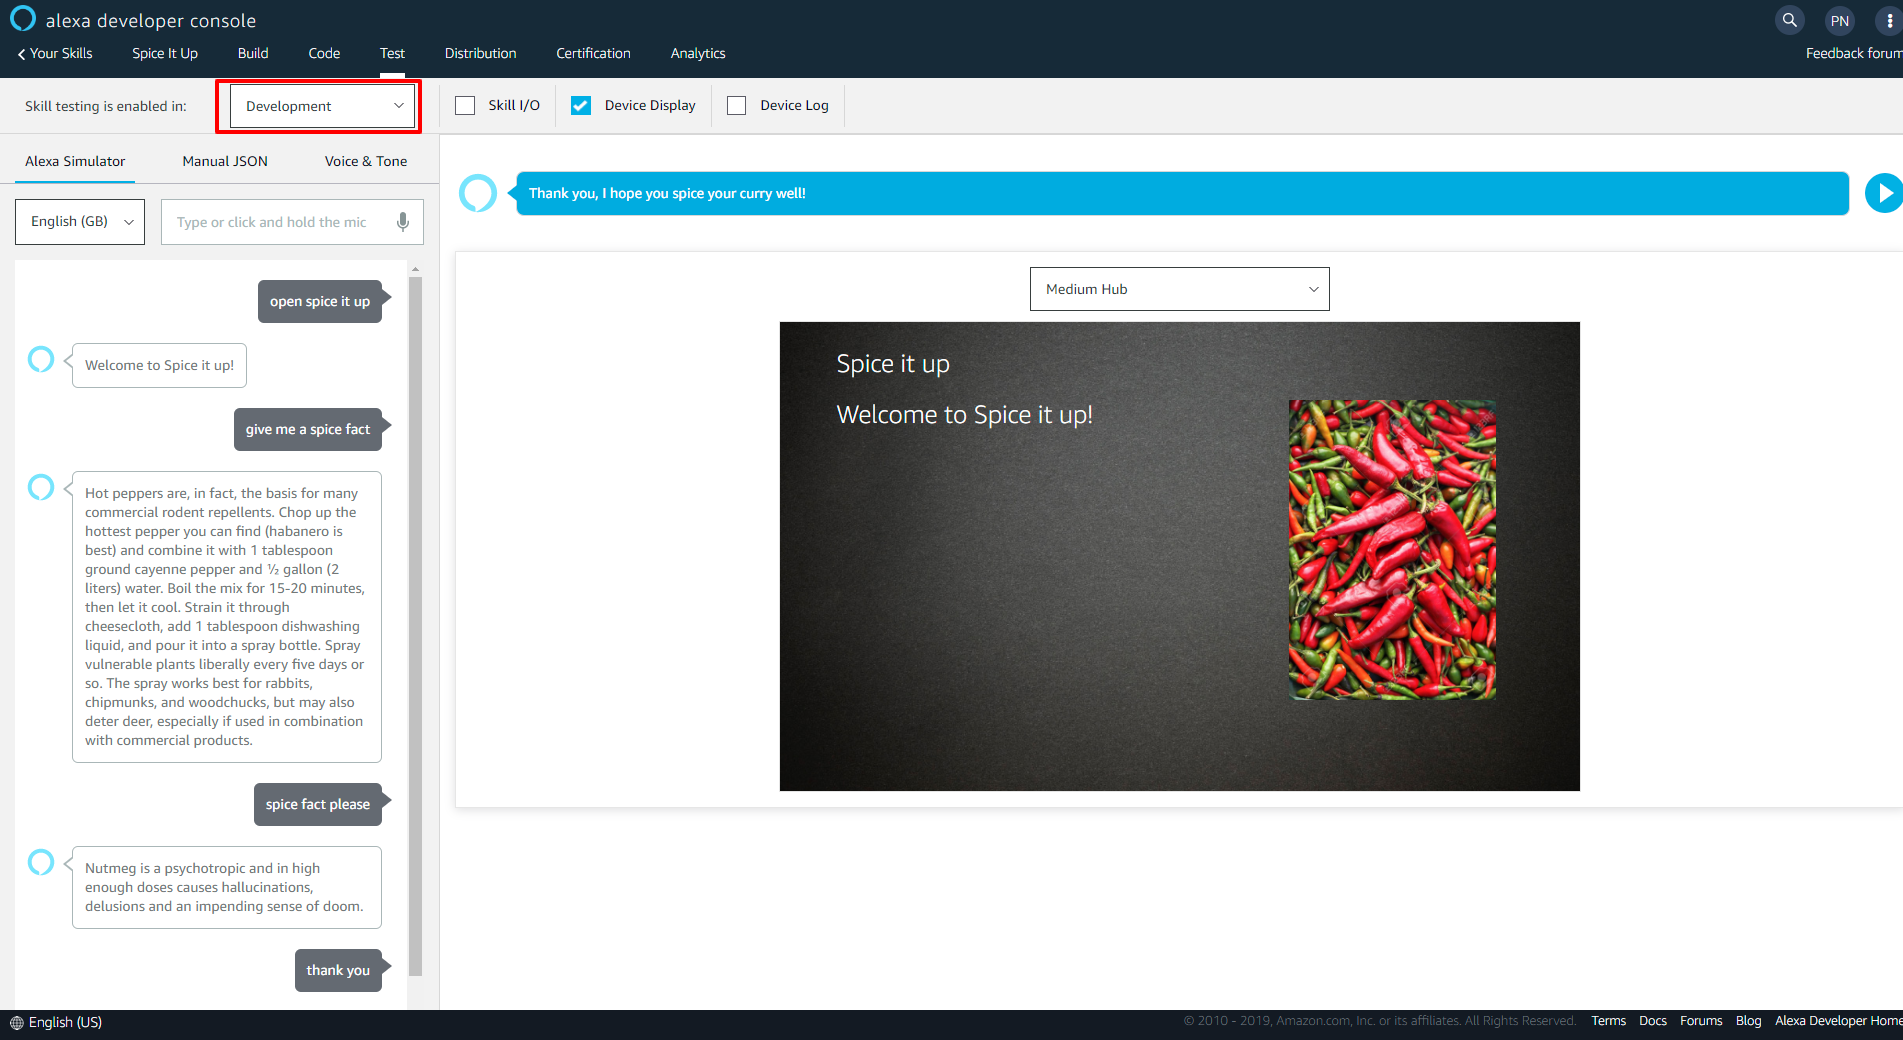
Test console
Make your skill available in the skill store
If you wish to make your skill live and available to end users via the skill store you will need to complete the certification process. More information on it can be found here. There are security and functional tests performed on your API by Amazon as a part of this. The requirements for this can be found here. Documentation on it can be found in the link mentioned above. To get some inspiration on securing the API according to the requirements visit the Github Repo. This is the demo I put together for my talk at the UK Festival last year. The APIController and RequestValidationHandler should help you out with crossing off all the points in the security checklist.
Conclusion
I know, I know it's been a lengthy article. But even then this only covers the very basics of Alexa Skill development. There are so many advanced things that you can do like introducing slots, delegating conversation, account linking and even making purchases. The developer documentation is a good starting point for it. It's quite strong and getting better day by day. Amazon introduces new features into Alexa regularly, so cast an eye on the monthly newsletter that comes by. So there you go, give this a spin yourself and let me know :-)
Ta for now!