
In 2023 it seems like you can’t throw a rock on the Internet without hitting yet another hyped-up article about AI and LLMs (large language models) and how they’re going to change everything forever / save the world / destroy the world / etc. As exciting as some of the potentials (and alarming as some of the pitfalls) are, it gets a bit tedious, doesn’t it?
In this article I promise to offer zero hype about fixing any problems with LLMs. Instead, I’m focused on having a little fun with making a chatbot using OpenAI’s ChatGPT API.
I know what you’re thinking.
“Kyle,” you say, “OpenAI already lets us chat with ChatGPT. For free. (Or, well, for a modest price if we actually want it to reply to our questions sometime this year.)”
This is true!
But what we’ll be making is not just a chatbot, but one where we can talk to it with the power of our voice, and have it speak out loud back to us. Furthermore, it will have a jaunty cartoon face and a programmed personality to stick along with.
Ready? Let’s go!

The Technologies Involved
In addition to a codebase for a front-end and back-end, we’ll need to have software that can help us with three things.
First, we need to be able to translate what we’re saying to text. For that we’ll be using OpenAI’s Whisper. model.
Next, we’ll need the chatbot to be able to think about what we’ve said and generate an interesting response. As I mentioned earlier, for that we’ll use OpenAI’s ChatGPT API, specifically its Chat Completion API.
Lastly, we’ll need a way to let the chatbot speak back to us, converting the response from ChatGPT into speech. For this example, we’re going to stick to something simple and rely upon the Web Speech API in the browser.
The Catch: Stack Choices and Dependencies
The front-end I’m going to build today using React. We’re going to need a backend to securely send our API requests to ChatGPT and to run the Whisper model on. For that I’ve chosen to use… Python.
I know. I know. This is an Umbraco magazine! I should be using .NET. 😬 But in this case I needed Python for the implementation of Whisper I had access to (Python is insanely popular in the machine learning world). I’ll be researching .NET alternatives out there, but for this example I’ll be using Python. The front-end would be identical regardless, so if you end up sourcing .NET transcription code, you could consider going that route.
We’ve got one additional dependency to those to take into account, and that’s FFmpeg, which is used by Whisper. You can find installation instructions for Windows here. (I believe it’s even easier to install on MacOS or Linux, but I'm not strongly familiar with using those OSes).
Get An OpenAI API Key
To use ChatGPT’s API, we’ll need an OpenAI API Key. In order to get an OpenAI API key, you need to sign up to the OpenAI API by visiting the OpenAI sign up page and create an account. Once you've done that, follow the instructions there to set up your billing details. This step is necessary to receive your API key. It’s worth noting that the ChatGPT model we’ll be using in this example is highly cost-efficient. It can process roughly 37,500 words, encompassing both prompts and responses, for a mere $0.01.
Get The Code
Before we begin looking at parts of the code itself, let me direct you to this GitHub repo where you can download the completed chatbot. It has dependencies, installation, and information on running the application there.
Checking Out The Backend
(That is not a bad pun, I swear.)
The backend for this example only has a single code file, backend/app.py, and is concise enough to include all of its contents in a single code snippet:
from dotenv import load_dotenv
from flask import Flask, request, jsonify
from flask_cors import CORS
from TTS.api import TTS


import flask
import openai
import os
import tempfile
import whisper


load_dotenv()
app = flask.Flask(__name__)
CORS(app)


# OpenAI API Configuration
OPENAI_API_KEY = os.getenv("OPENAI_API_KEY")
OPENAI_CHAT_MODEL = os.getenv("OPENAI_CHAT_MODEL")
openai.api_key = OPENAI_API_KEY


POST_ONLY_ERROR = "This endpoint only processes POST requests"


# --------------------------------------------------------------------------- #
# ----------------------------- API Endpoints ------------------------------- #
# --------------------------------------------------------------------------- #


@app.route("/chat", methods=["POST"])
def chat():
    if request.method == "POST":
        data = request.get_json()
        messages = data["messages"]
        temperature = data["temperature"]
        frequency_penalty = data["frequency_penalty"]
        presence_penalty = data["presence_penalty"]
        max_tokens = data["max_tokens"]
        response = openai.ChatCompletion.create(
            model=OPENAI_CHAT_MODEL, messages=messages, temperature=temperature, frequency_penalty=frequency_penalty, presence_penalty=presence_penalty, max_tokens=max_tokens
        )
        return response
    else:
        return POST_ONLY_ERROR


@app.route("/transcribe", methods=["POST"])
def transcribe():
    if request.method == "POST":
        language = request.form["language"]
        model = request.form["model_size"]


        # there are no english models for large
        if model != "large" and language == "english":
            model = model + ".en"
        audio_model = whisper.load_model(model)


        temp_dir = tempfile.mkdtemp()
        save_path = os.path.join(temp_dir, "temp.wav")


        wav_file = request.files["audio_data"]
        wav_file.save(save_path)


        if language == "english":
            result = audio_model.transcribe(save_path, language="english")
        else:
            result = audio_model.transcribe(save_path)


        return result["text"]
    else:
        return "This endpoint only processes POST wav blob"
The entire chatbot is powered by just two API endpoints. The transcribe endpoint polls the Whisper model on the backend server that you run. It takes in the audio data passed from the front-end and the language and model_size parameters to configure Whisper before trying to turn the audio data into text and then returning the result.
The chat endpoint takes an array of chat messages (which we’ll explain the shape for when we discuss the frontend code) and some parameters for fine-tuning the ChatGPT endpoint’s response: temperature (which makes the response more random the higher it is), max_tokens (which determines the maximum size the response can be), and frequency_penalty and presence_penalty (which determine together how often the chatbot repeats itself and sticks to the topic.)
And that's it for the backend!
Checking Out The Frontend
Frontend? Front-end? I'm never sure if there's supposed to be a hyphen there. 🤔
The code in the frontend for the application is larger, but still not that great in size. Our end goal is to have a chatbot with a face that listens to us and talks back. For the sake of this example I’ve chosen my favorite robot (well, android), Commander Data from Star Trek: The Next Generation, as our conversational companion.
You can see how he’ll look here.
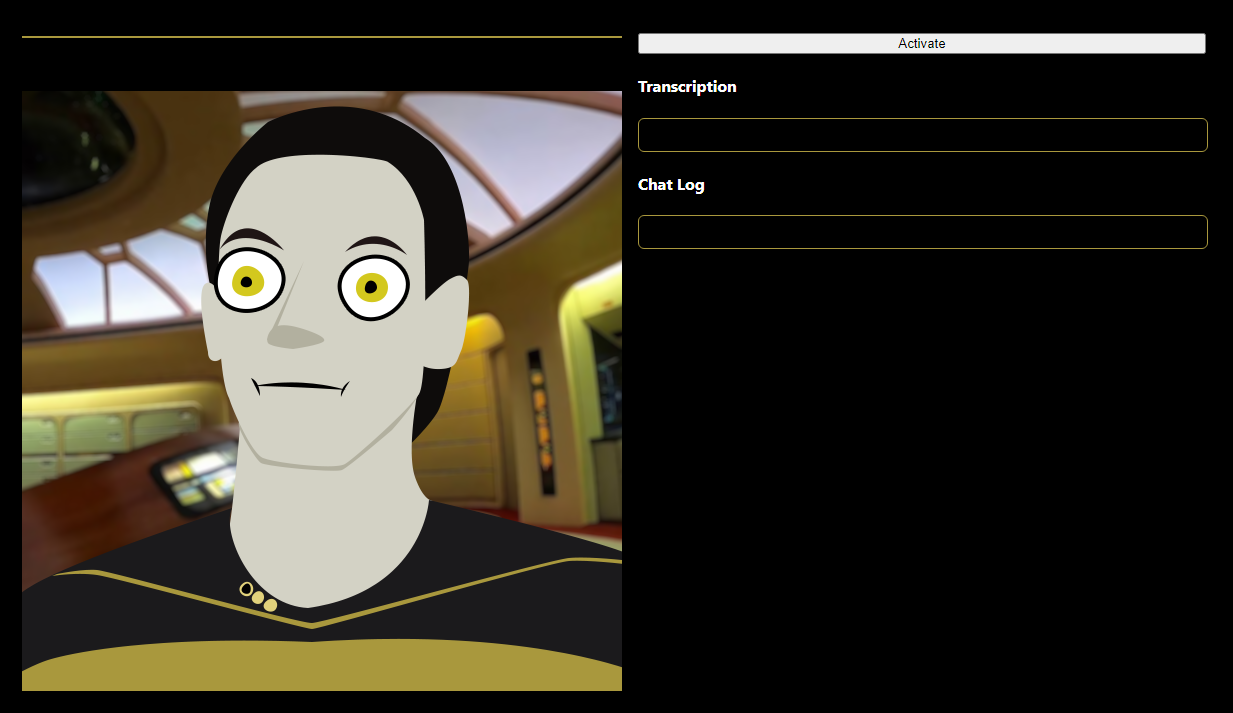
The Eyes. The eyes!
Who wouldn’t want to look into those soulful, bugged out, yellow eyes and empty out their soul in a meaningful conversation?
Leaving aside create-react-app boilerplate and some styles and image files, our application’s meaningful code is in just two files.
First, let’s look at src/library/api.ts. This is where the front-end calls our endpoints from.
export type OpenAiChatCompletionMessage = {
  role: string;
  content: string;
  name?: string;
};


export const chat = async (
  messages: OpenAiChatCompletionMessage[]
): Promise => {
  let request = {
    max_tokens: 2048,
    messages: messages,
    temperature: 1,
    presence_penalty: 0,
    frequency_penalty: 0,
  };


  const response = await fetch("http://127.0.0.1:8000/chat", {
    method: "POST",
    headers: {
      "content-type": "application/json",
    },
    body: JSON.stringify(request),
  });
  const data = await response.json();
  return {
    message: data.choices[0].message,
    usage: data.usage,
  };
};


export const transcribe = async (blob: Blob): Promise => {
  const formData = new FormData();
  formData.append("language", "english");
  formData.append("model_size", "base"); // options are "tiny", "base", "medium" (no english models for "large", "large-v1")
  formData.append("audio_data", blob, `tr_${new Date().getTime()}`); // "temp_recording");


  try {
    const response = await fetch("http://127.0.0.1:8000/transcribe", {
      method: "POST",
      body: formData,
    });
    if (!response.ok) {
      throw new Error("Network response was not ok");
    }
    const data = await response.text();
    return data as string;
  } catch (error) {
    // sometimes the transcription fails on the server, so we'll just return an empty string to avoid breaking the app
    return "";
  }
};
Note the OpenAiChatCompletionMessage type. That’s the shape of our messages that we’ll send to the chat endpoint. The role defines whether a message belongs to the user (with a role of “user”) or the responses from the bot (with a role of “assistant”), the content is the text of the message, and the name is optional for assigning a formal name to the speaker in question. In our example we won’t be using the name parameter.
The transcribe function takes a blob of audio data that we’ll be gathering in our application and sends it to the API endpoint as a file, then receives back a response containing the text translation.
The chat function takes in an array of OpenAiChatCompletionMessage (which contains not only our messages, but prior responses from the bot) and sends it to the chat endpoint. The response includes the message we want, as well as the usage of tokens (which in our example we’re not making use of for data purposes).
The other code file to look at is /src/App.tsx. It’s too long to include the entire thing in this text, but we’ll look at the more interesting bits here.
First, let’s look at the state management we’re doing in this. Because this is a pretty small app, I’ve decided to keep all the state login in useState functionality at the beginning of the component:
  const [chatHistory, setChatHistory] = useState<OpenAiChatCompletionMessage[]>(
    []
  );
  const [isMouthOpen, setIsMouthOpen] = useState(false);
  const [isRecording, setIsRecording] = useState(false);
  const [isSpeaking, setIsSpeaking] = useState(false);
  const [isThinking, setIsThinking] = useState(false);
  const [newestBlob, setNewestBlob] = useState(null);
  const [tick, setTick] = useState(0);
  const [timeToOpenMouth, setTimeToOpenMouth] = useState(0);
  const [transcribedText, setTranscribedText] = useState("");
  const name = "Data";
  let recordingTimer: any;
There I’ve also added two non-state variables: name holds the name of our chatbot’s personality, which it will listen for us to say before responding. recordingTimer we’ll use to periodically poll the audio data we’re capturing.
Speaking of audio capture, please note that we’re including react-mic in this project to capture our audio on the browser. This isn’t the best audio-capture library, but was a quick addition to the project. I’ll probably replace it in future versions of this kind of project. Because my project is written in TypeScript and react-mic doesn’t, I need to include a // @ts-ignore comment above its import to avoid errors.
// @ts-ignore
import { ReactMic } from "react-mic";
Here it is included inside the render statement:
             {
                handleMicStop(rb);
              }}
              onData={handleMicData}
              strokeColor="#a9983d"
              backgroundColor="#000000"
            />
Because we’re capturing audio in the browser, for browser security/anti-annoyance reasons we’re not allowed to record the user’s voice without a deliberate action on the website from them. So we’ve got an activate button that when pressed triggers handleActivateClick:
  const handleActivateClick = () => {
    setIsRecording(true);
    startRecordingTimer();
  };


  const startRecordingTimer = () => {
    recordingTimer = setTimeout(() => {
      setIsRecording(false);
    }, 2000);
  };
This activates react-mic, and then triggers startRecordingTimer, which will wait 2 seconds, capture the audio data for that time, then turn off the recording for a moment. (Note, if this is too quick of an interval to poll for audio data in your experience, feel free to increase the timeout’s duration.) This in turn triggers the handleMicStop function being called by <ReactMic>’s onStop property:
  useEffect(() => {
    /** PITA workaround to the fact that the onStop handler for ReactMic does
     * not update its reference, so can't directly call React functions in it
     * that aren't stale.
     **/
    if (newestBlob) {
      handleBlobUpdate(newestBlob);
    }
  }, [newestBlob]);
By doing this, we avoid react-mic’s bug stopping our application from seeing the update. The comment describes how I feel about having to do that, but at least it’s a short workaround.
  const handleBlobUpdate = async (blob: Blob) => {
    await transcribeRecording(blob).then(async (text) => {
      if (wasNameSpoken(text) && !isThinking) {
        await thinkUpResponse(text);
      }
    });
  };


  const transcribeRecording = async (blob: Blob): Promise => {
    setIsRecording(true);
    const transcription = await transcribe(blob);
    setTranscribedText(transcribedText + transcription);
    startRecordingTimer();
    return transcribedText + transcription;
  };


  const wasNameSpoken = (text: string) => {
    const lowerCase = text.toLowerCase();
    const punctuationRegex = /[.,;:?!]/g;
    const withoutPunc = lowerCase.replace(punctuationRegex, " ");
    const words = withoutPunc.split(" ");
    for (const word of words) {
      if (word === name.toLowerCase()) {
        return true;
      }
    }
    return false;
  };
In handleBlobUpdate, we first get the text translation of the blob (which happens in the transcribeRecording()) function. We also turn the recording back on there so we don’t miss what the user’s saying while we’re doing that. We then check if the name was spoken (in wasNameSpoken()) and make sure we’re not already trying to get a reply from the chatbot (by making sure isThinking isn’t true). If the name was spoken, it’s time for us to go talk to ChatGPT.
  const thinkUpResponse = async (text: string) => {
    setIsThinking(true);
    setTranscribedText("");
    const userMessage: OpenAiChatCompletionMessage = {
      role: "user",
      content: text,
    };
    setChatHistory([...chatHistory, userMessage]);
    let messages: OpenAiChatCompletionMessage[] = [
      {
        role: "system",
        content:
          "You are Mr. Data, the android and ops officer of the USS Enterprise.",
      },
      {
        role: "user",
        content:
          "Behave as if you are Mr. Data, the android and ops officer of the USS Enterprise.",
      },
    ];
    messages = [...messages, ...chatHistory.slice(-4), userMessage];
    const response = await chat(messages);
    const { message } = response;
    setChatHistory([...chatHistory, userMessage, message]);
    setIsThinking(false);
    await talk(message);
  };
In thinkUpResponse() we combine a personality statement guiding our chatbot’s personality with the most recent messages we’ve had, including this newest one that triggered the function. You may notice that we’re basically repeating the “system” message (which guides the chatbot’s personality) with a second “user” message telling it how to behave. This is per OpenAI’s advice in their documentation, as the current model doesn’t strongly follow the system message by itself in guidance.
We send more than one message to the chatbot if we have them to help it keep on track for the conversation. LLMs have a tendency to drift or “hallucinate” as it is, and the ChatGPT API doesn’t inherently remember the conversation between times you’ve hit the endpoint, unlike their website’s chat service.
We could send a lot more messages than the 4 we’re including, but the API has a limit of 4096 tokens (roughly 3072 words) per request, and that includes both the messages we send and the response it gives us. If we send too large a request, we won’t get much of a message back. We could safely go above these few messages, but I set an arbitrarily low amount for the purpose of this demo. You can change the amount sent (in the chatHistory.slice(-4) line of code) as you see fit.
Once the application gets back the API response, it inserts the received message into the chatHistory and then triggers the function responsible for our chatbot speaking out loud, talk():
  const talk = async (message: OpenAiChatCompletionMessage) => {
    setIsSpeaking(true);
    const synthesis: SpeechSynthesis = window.speechSynthesis;
    const utterance = new SpeechSynthesisUtterance(message.content);
    utterance.voice = synthesis.getVoices()[0];
    utterance.onend = () => {
      setIsSpeaking(false);
    };
    synthesis.speak(utterance);
  };
We’re using the SpeechSynthesis part of the Web Speech API in your browser for our text to speech (TTS) functionality. It’s thankfully quite straightforward and fairly zippy. We create a SpeechSynthesisUtterance object that we insert the text of our message into, choose a voice (in this case we’re simply defaulting to the first available), adding an event handler to let our application know when it’s done, and then triggering the SpeechSynthesis .speak() function with the utterance.
And, boom! We talk, it gets translated to text, sent to the LLM, it thinks up and returns a response, and it’s converted into speech back to us!
The remaining code on the page is either the render statement or responsible for handling the behavior around the avatar, choosing which image to show based on whether or not the bot is talking, at rest, or thinking. For the sake of this article’s length, I’ll leave you to explore that in the code itself, but it’s fairly straightforward, making use of the existing state parameters tracking the bot’s current actions and a looping timer to handle the mouth opening and closing at intervals while speaking, as well as a small tick function to insure the React component refreshes to show the frames.
Once again, you can find the entire application’s code here in this GitHub repo.
Possible Enhancements
The chatbot works with this simple demo, but there’s clear areas of enhancement on performance that you can pursue.
ChatGPT, like all LLMs, can take several seconds to think up a response to a chat completion request. It provides a streaming mode that resembles the behavior on their own chat application that can start sending the response’s first parts early as it cooks it up, and this might help improve the experience (as long as there’s no lengthy pauses in the streamed text.)
React-mic works for audio capture, but there’s bound to be better packages out there to replace its somewhat janky implementation.
There’s also speech synthesis libraries out there that provide much better quality voices that could replace the Web Speech API, although the drawback is those often take a second or two to generate the text, adding to the response time.
Want To Check Out Something More Feature Rich?
If you found the idea of a chatbot that you can interact with your voice interesting, I’ve got a more complex one that I’ve created for you to check out. Called Sock (as in, puppet), it provides a much more refined application. There’s a better UI, the ability to toggle between voice and text entry modes for the user, the ability to have the chatbot respond after so many words are spoken or only when you speak its name, and a settings panel that you can set up your own avatar in, fine-tune the OpenAI settings, edit the chatbot’s personality, swap speech synthesis to a better model running on Coqui-AI, and more. In the near future it will also include Twitch integration features to let it read and respond to messages from a Twitch chat stream. Check it out and let me know what you think!
Thanks for reading, and have a great day!