
One of the great Umbraco features is the capability to run multiple sites on the same installation. When we take advantage of this, we can share code and designs between all the sites, saving us tons of work at development time and also afterward giving support to the sites; for instance, we will only need to upgrade one Umbraco installation.
The way to do this is by creating different trees of content and make each one respond to specific domains.
Once we've done that we need to add these domains to the bindings of our app, whether it is IIS, or as in the case I'm presenting here, in an Azure Web App.
Front Door
The previously described configuration wouldn't be a big problem on its own but things start getting more complicated if we use Front Door.
Front Door is a service offered by Azure. It offers an entry point to our web applications enabling some features like load balancing, caching, firewall, and custom routing, amongst others.
Some of these features are offered by other services in Azure like CDN for caching or even external products like Cloudflare. But with Front Door we have other great features like creating webapps in different regions and letting Front Door redirect the traffic automatically if a region is not responding fast enough for instance. You can also create routes that will redirect the users to different servers depending on the entered URL.
In our case, we want to protect four domains with the Web Application Firewall (WAF) feature of Front Door. This will involve some custom routing configuration to send the visitors of one domain to the right Umbraco tree.
When we configure Front Door, we have to route our visitors to a specific backend app. That configuration is relatively straightforward, but if we leave the default values when we create our routes, our multi-site Umbraco won't work as expected.
The problem appears when we need to configure our public domains again in Front Door.
How do we do that if we have already assigned them to the Web App? We can't configure the same domain in two different places. Azure just doesn't allow that because to add a custom domain we first need to add the DNS records to the domain, and we can't have two different records for the same domain pointing to two different resources!
Setting Up Umbraco (Take 1)
Before setting up the domains side of things, I'm assuming you have already built an Umbraco site running on at least one domain (it can be just in your localhost).
Firstly, we need to create our different trees that will separate the content amongst all the various sites.
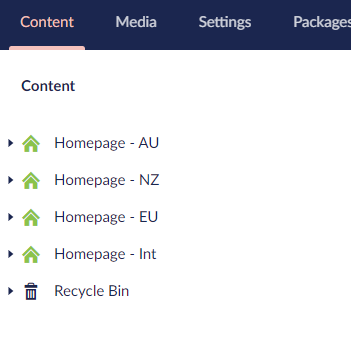
Once you have the different trees you need to configure them so that each of them responds to a different domain. At this point, and just for testing, we could configure them to respond to different segments on the URL.
To do this, we have to right-click on the root of one of our trees and click the 'Culture and Hostnames' option.
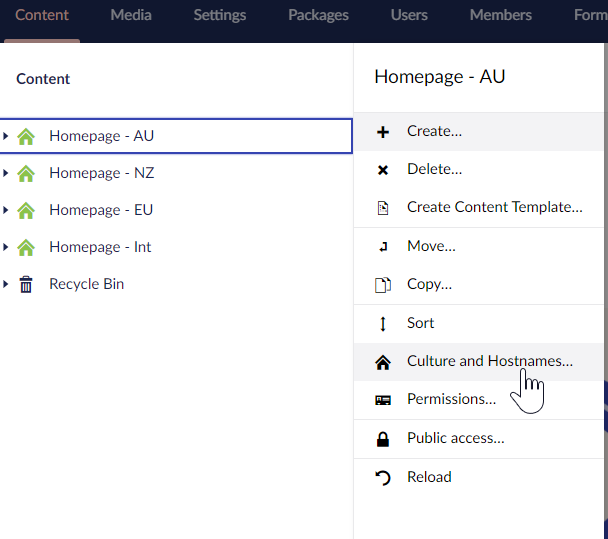
On the window that opens, we can configure multiple domains for the tree. This same root will respond to all of them. For now, we will configure our Australian root to respond to the /au segment.
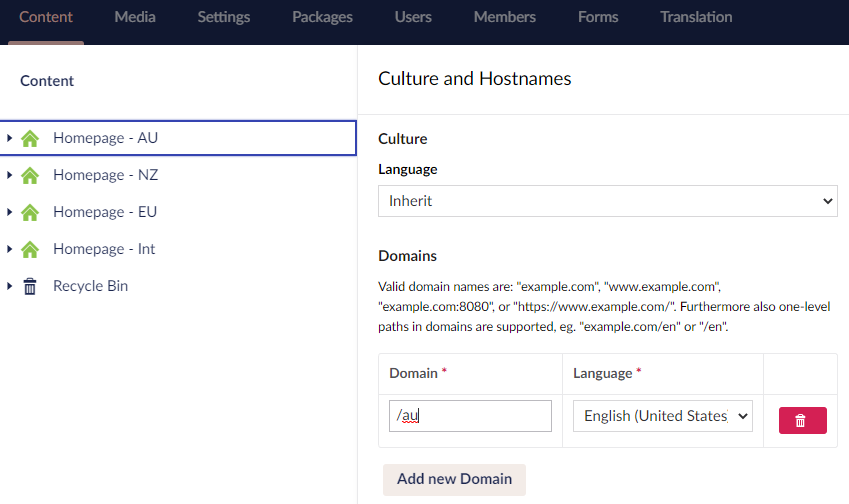
The previous configuration will display that root for an URL like http://www.domain.com/au
If you navigate to the root domain http://www.domain.com instead, you will also get the AU tree's content. This is because, by default, Umbraco displays the first root node on the site.
You can also see here that you can select a language, this option is to create multi-language sites and is out of this post's scope. You can find more information on the Umbraco docs.
Azure Front Door
Configuring routes
To configure our Front Door routes, we need three different parts: frontends, backend pools, and routing rules. These are configured on the Front Door designer.
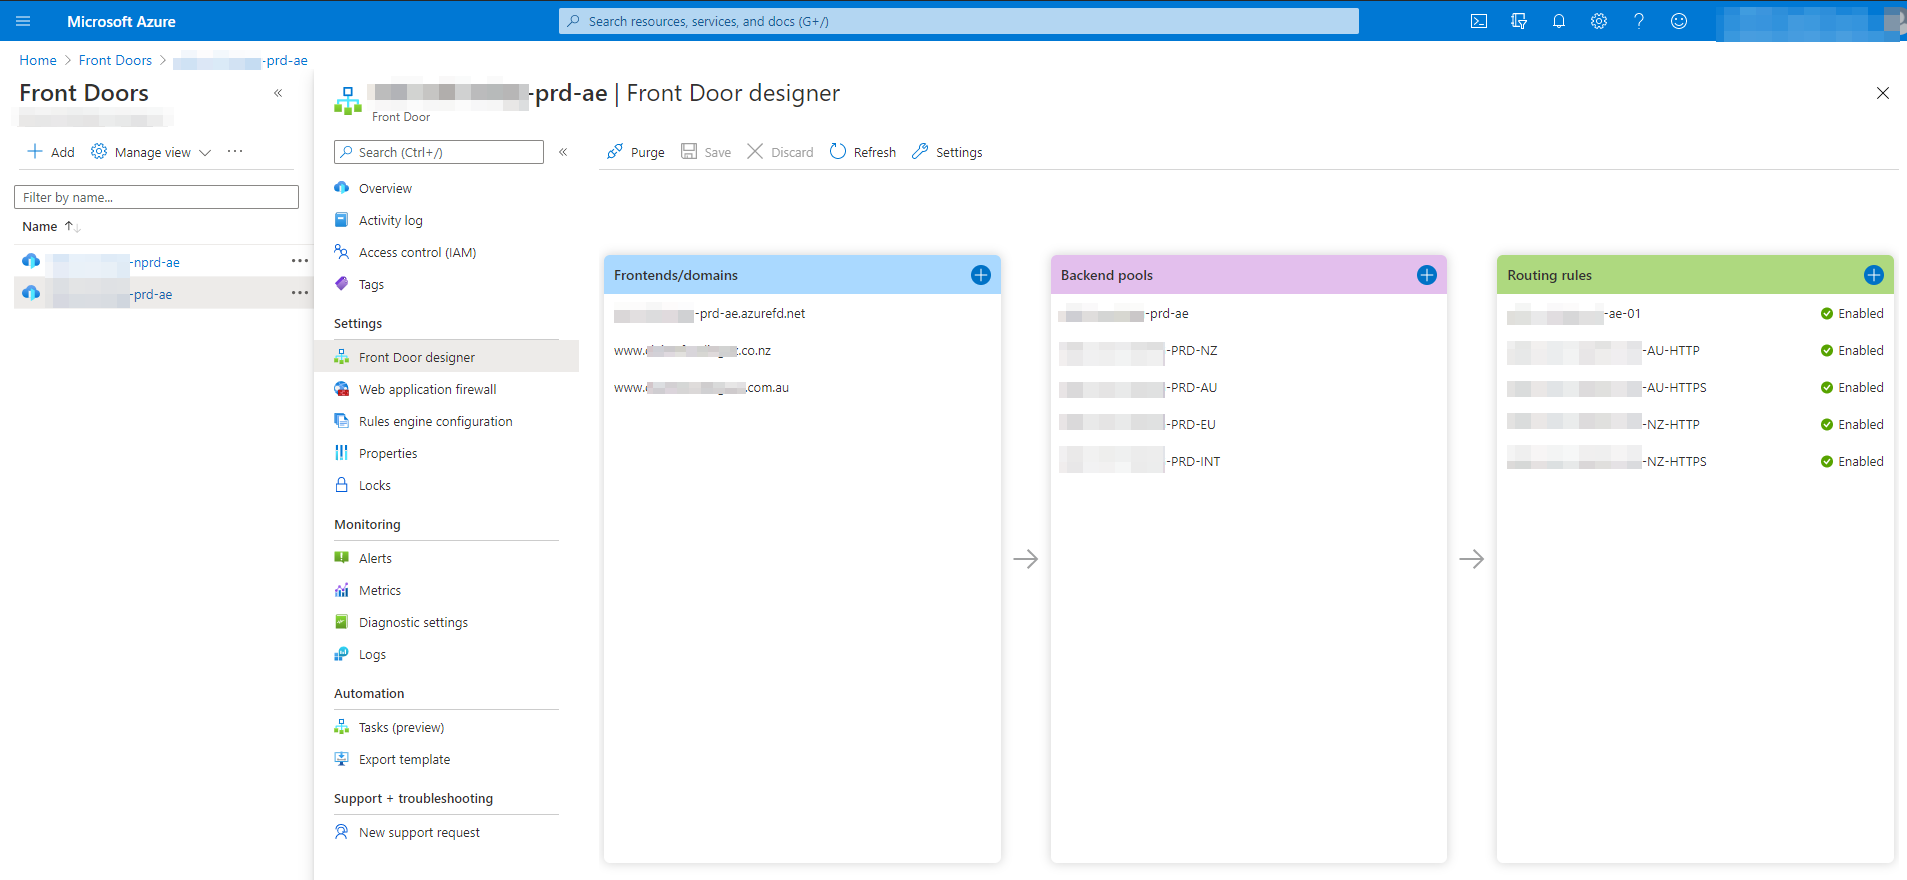
On the previous screenshot, you can see that we have only fully configured two of our domains: NZ and AU. We have two additional backend pools EU and INT that we will use in the future, but for the sake of this post, the configuration for one domain will be easily adjusted for any other domains you need to configure, i.e staging.domain.com.
Adding the Frontend
First, we need to add the frontend, this is the real domain facing the users: www.domain.com. You will need to enable the 'Custom domain HTTPS' section and configure it using a Front Door managed certificate or your own one.
This step is where you will need to configure your DNS to point to your Front Door resource.
Adding the Backend pool
Now we are going to create a new backend pool. Click the + icon on the middle section of the designer, you will get a new blade to enter your pool's details. Here you will need to add a new backend. Select an 'App service' host type and select your app. The trick here will be to indicate which tree should respond to this request. This is done by configuring a domain for the 'Backend host header'.
By default, if we don't type anything as the 'Backend host type', Front Door will send to our app the requested domain www.domain.com. Here is where we face the issue we are trying to solve: we can't send the same domain to our web app because it's already configured as a frontend for Front Door!
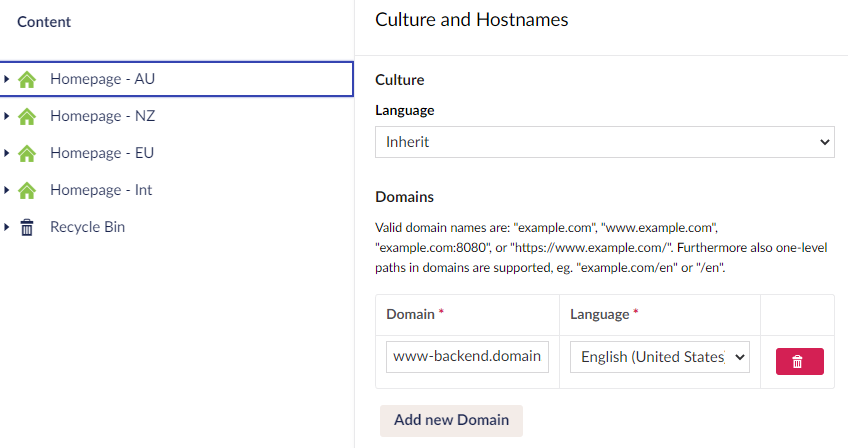
To fix this, we will indicate that our backend is going to respond to a 'helper' domain instead of the public one. In our example, we are configuring the backend for the NZ domain, and we will indicate that our 'Backend host header' will be www-backend.domain.co.nz.
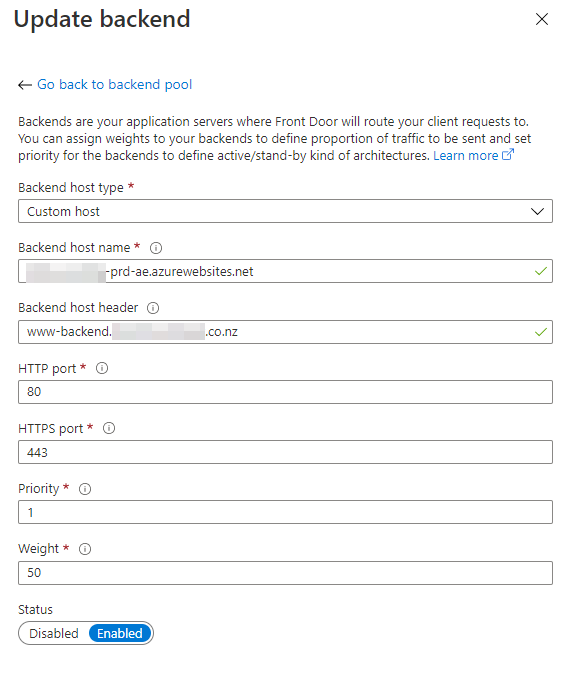
You will need to create as many backend pools as domains you want to configure.
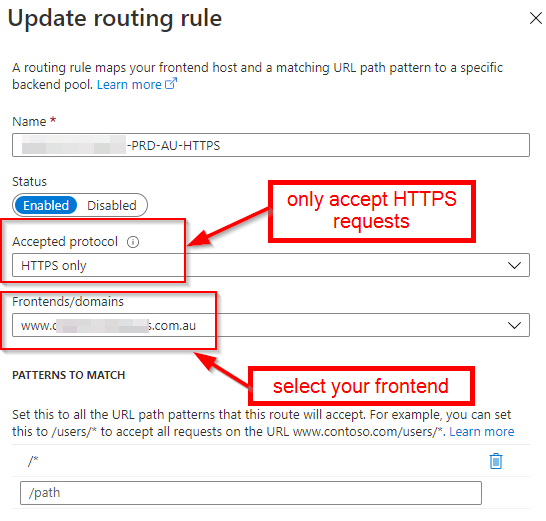
Joining the dots: routing rules
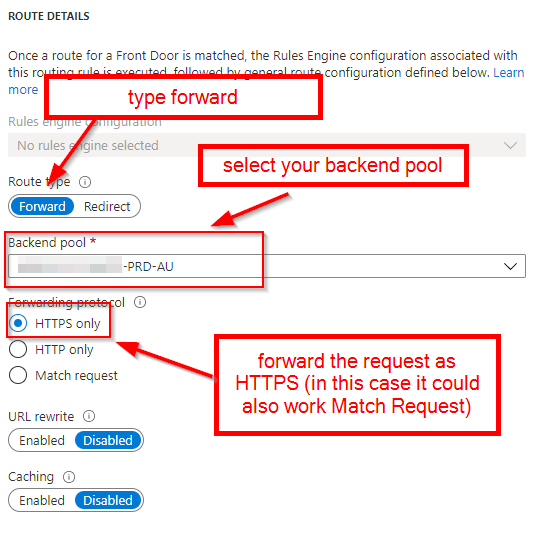
The next step will be to join each frontend with the right pool. To do so, we need to add a new 'Routing rule' on the right section of the designer.
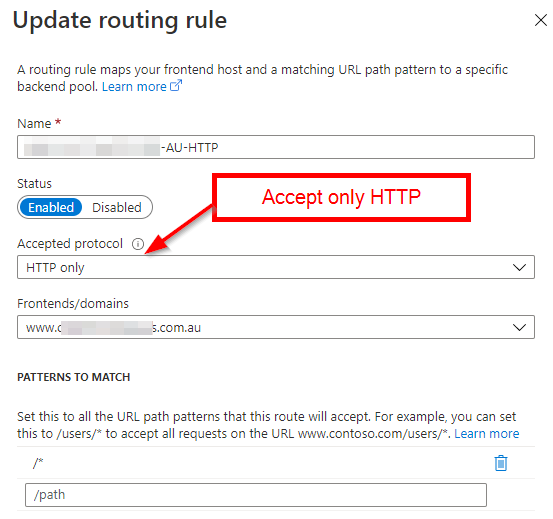
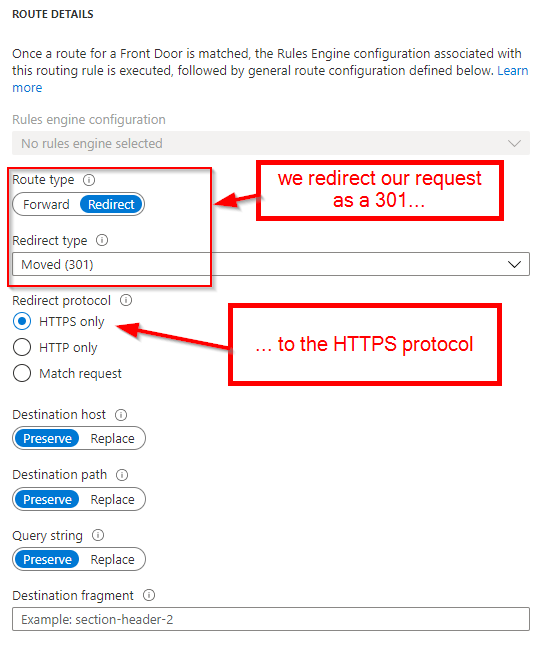
Bonus: redirecting HTTP to HTTPS with Front Door
As you can see, we are only responding to HTTPS requests. This is because we want to redirect all HTTP requests to HTTPS. Instead of allowing all the requests to go through to our web app and then adding a rule to our web.config, we can configure an additional rule, so Front Door does the job instead.
Setting up the 'helper' domain
At this point, we have our www.domain.com in Front Door routing the requests to our Umbraco web app, and it's sending the value www-backend.domain.com as the 'Backend host header' value.
Now, we need our Azure web app to respond to the requests to www-backend.domain.com. To do this, we need to add this domain to the 'Custom domains' configuration.

Great! Now the link between Front Door and our web app is complete. Good job!
Setting Up Umbraco (Take 2)
Now we just need to tweak a little bit our trees configuration in Umbraco, so each one responds to the right domain. Do you remember the 'Culture and Hostnames' option?. Well, you have to add your 'helper' domain here.
Once you have added the real domain you can remove the /au we used for testing.
Epilogue
It is possible to have your Umbraco site host multiple sites. This will allow you to share code, design, and resources amongst them. Using the Culture and Hostnames option make things pretty easy.
Things get more complicated if we want to protect our site with Azure Front Door. In this case, we cannot add our domains to both Front Door and the web app. The way around this is by adding the public domain to Front Door and a 'helper' domain on our web app. We can then configure our Front Door routes to point to our web app sending the 'helper' domain as the 'Backend host header'. Umbraco will use this header to find the right tree and therefore the right content.